With the Mines of Moria just about sorted and a new army/location to play Matched Play games in the meantime, I decided to return to the beginning and build up a bit of a running start for the campaign. Onwards, to the Wilds of Eriador!
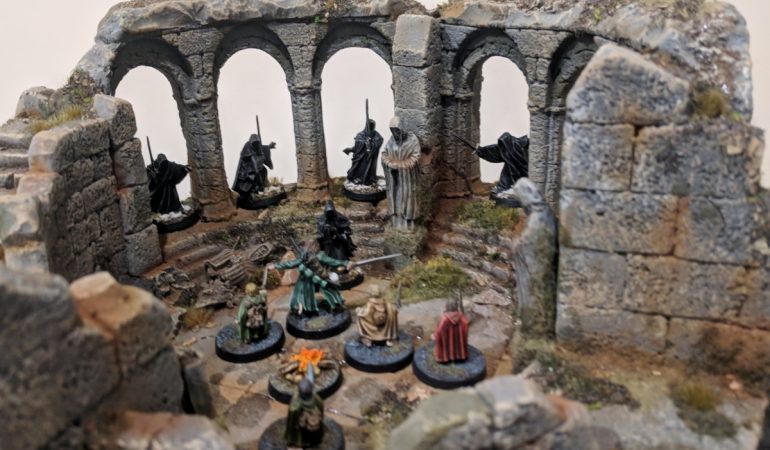
All things considered, The Fellowship of the Ring Journey Book has a pretty forgiving start; kicking off with a couple of escalating skirmishes between the Nazgûl and the Dúnedain on the borders of the shire before following the Hobbits on their journey towards Rivendell. As my go to set of terrain for Middle-earth is supposed to be portraying this exact area, this meant the scene was largely set – all save a few key pieces. From a miniature standpoint, while I do not own any Dúnedain, I do have a set of 10 Rangers of the North for my Grey Company who do will pretty serviceable job, despite their fancy grey cloaks. This meant that the only thing holding me back from my first two games were The Nine.

I’m no stranger to Nazgûl at this point, having painted the Witch King, Dwimmerlaik and Tainted for my Angmar army- as well as the full set of nine Nazgûl of Dol Guldur. None of these quite felt right as the Black Riders though – if nothing else, they were just too damn conspicuous. This meant that – as much as I’d love the hobby synergy of using my characterful named Nazgûl miniatures in the campaign – I’d have to paint up some plain, old generic Ringwraiths.
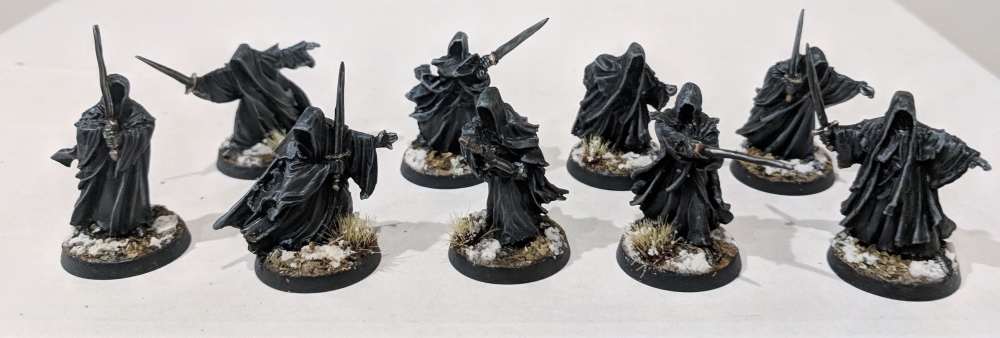
If you’re ever looking for quick, cheap and easy to paint project to get into the Middle-earth Strategy Battle Game with, you could do a lot worse than starting with The Nine. Clocking in at £49 from GW with free delivery, ranging anywhere from 500-ish points all the way up to over 1000 and taking me only a single work-week evening go from sprue to Instagram, they’ve got to be the single most efficient way to turn fistful of bank notes into a tabletop-ready army.
The biggest challenge with these guys was clean up and assembly; you have to be very careful cutting these guys from the sprue as there’s a few particularly delicate parts at risk of snapping, and there’s a few bits of flash, etc to clean up in some very awkward to reach areas. Unfortunately, one of my Nazgûl ended up with a smaller guard on their sword hilt as the result of a botched clean up and I’m not 100% happy with how straight I managed to get all of their swords. Immersing them in boiled water from the kettle, I found it was easy to work out the massive bends, but some of the more subtle kinks just wouldn’t quite squash out for whatever reason.
With cleanup finished, I spread some texture paint onto their bases and super glued them in the slotta holes and this was assembly complete.
As far as painting is concerned, these were even faster than my Nazgûl of Dol Guldur. After quick blast with black rattle can primer, I blocked in the metallics on the boots/gauntlets and swords with AP Gun Metal. This was followed by a few successive layers of drybrushing with Mechanicus Standard Grey, Heavy Bluegrey and Wolf Grey, followed by a wash with Nuln Oil before repeating the drybrushing process again with a little more focus on the extremities with Wolf Grey. This was all washed down again with Nuln Oil to remove some of the chalkiness from the drybrushing and dial back the contrast a little. As a final step, I painted Brassy Brass on the hilts of the swords and picked out the armour extremities and sword edges with AP Chainmail Silver, with a mild silver highlight on the sword hilts. After painting the base Earth, drybrushing with Elfic Flesh and washing it with Agrax Earthshade, I blasted the lot with a quick coat of Dullcote and finished the base as I usually do for my Evil armies – and that’s job done!
With the first two missions in my back pocket, it was time to switch focus to the journey of the Hobbits.
The next couple of missions are very similar, with Short Cuts Make Long Delays and the Bucklebury Ferry missions being largely about our Hobbit heroes escaping the map with the Nazgûl in hot pursuit. The first mission is a fairly standard affair using the Hobbits and the Nazgûl miniatures on a similar woodland battlefield to the Dúnedain games, but the second takes us to our first new miniature for the “Good” side, and our first piece of specialised terrain for the campaign.
Bucklebury Ferry is, similar to the first two Dúnedain missions, a case of the Journey Book looking to the novel rather than the movies for inspiration and features the Hobbits escaping across the Brandywine River with the assistance of Gildor Inglorion.
I’ll confess now that this blog post is written posthumously (they all are) and not strictly in the order that I actually painted everything – it’s much easier to write about them in the order they come in the book instead of trying to keep straight the fragmented order I actually did them in. In reality, Gildor was one of the last miniatures I got around to painting for no reason other than that he was extremely hard to track down. It took about a month of trawling eBay before I found one at a halfway sensible price, and even then I ended up paying about as much as I’d paid for some of my other out of production Rivendell characters. I probably wouldn’t have paid as much for him as I did if it was just for this singular narrative game1, but after painting Lindir, armoured/mounted Glorfindel and mounted Gil-Galad2, Gildor and his warband of Exiles are the only stone left unturned in Rivendell collection by this point – handily enough for me, both Gildor and the Wood Elves miniatures show up in this campaign book at different points.
I had a great time painting Gildor. I took out pretty much a full Sunday to paint him and only him and took a bit of a leisurely pace to painting him. I’m not convinced that he looks any better for it, but at the very least the experience was a little more relaxing and a little less exhausting than my hobby usually is. For his colour scheme, I knew I wanted to give him a Ranger-esque green tunic, though I wasn’t entirely convinced on giving him the usual Magic Blue cloaks of my Rivendell army. After some considerable deliberation, I decided to give him a blue-grey cloak in the style of my Grey Company Rangers instead – the reasoning here being that I wanted him to be able to fit in well enough with the rest of my Rivendell, but I also wanted to mark him out as an ‘Exile.’ What better way than to give him a similar looking cloak to Strider? I did want to tie him in somewhat with my Rivendell army however, and to that end, I gave him a pair of blue bracers and a magic blue underskirt peeking out under his tunic.
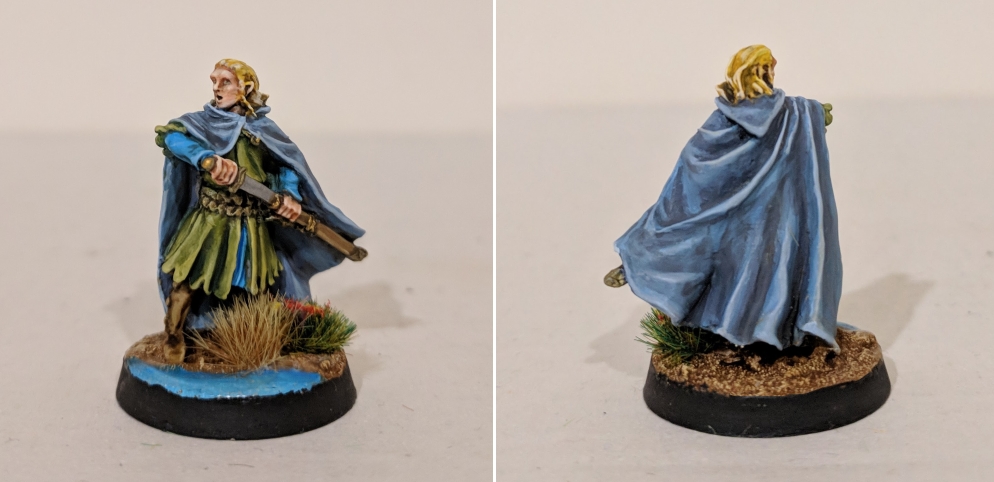
All-in-all, he was a pretty fast and fun little project, and pleasingly wraps up the very last remaining official sculpt I was missing for my Rivendell army – the only things I can think of that I’m missing now would be a warband of Wood Elves for Gildor, and maybe converting a Lindir on horseback.
The other key additions needed for the Bucklebury Ferry mission were the Brandywine River and the Bucklebury Ferry itself. I had originally dismissed this as a new terrain requirement – after all, I already had a number of scratch-built river sections (courtesy of Fat Frank’s Wargaming), and I assumed the win condition for the scenario would simply be reaching the ferry. The scenario is actually a whole lot cooler than that, and even has rules for paddling the Bucklebury Ferry across the river, rules for panicking Hobbits that fall in the water and so on. I didn’t especially fancy spending a whole lot of time or money on a wide, four foot river piece that would only be used for two scenarios, so I went for the simplest, cheapest and most portable solution I could think of – blue felt.
I had hoped I could find a product like Deep Cut Studio’s roll o’ river, but nothing came up that met my width requirements. Eventually, I stumbled on an eBay listing for 9″ squares of coloured felt, and decided to get myself 6 squares each of sea blue and black (for the Brandywine River and the chasm of Khazad Dum later). The 9″ dimensions meant that I could cut them in an imperfect wavy line while still keeping them 8″ wide as per the requirements.
For what I needed it to represent, the black felt was fine as is, but I felt (heh) that the water sections needed a little something extra so as not to come off as completely lazy and cynical. I covered one side of each of the felt pieces with a generous coat of Vallejo Water Texture to give it that wet, reflective look with a bit of wavy texture. The end result is pretty good, and the areas where the felt has absorbed more of the moisture from the water texture gel creates a nice variance in tone under the water texture as well. As far as quick and dirty solutions go, I’m pretty happy and almost wish I’d left the squares uncut now to leave space for a little mud and grass texture to really complete the look. Live and learn.

Next up was the Bucklebury Ferry itself. The Journey Book provides a guide for making one yourself out of balsa wood, but instead I lazily opted once again to buy something prefabricated. I found a company called Anyscale Models who sell a whole bunch of resin cast wargaming things for pretty cheap over eBay selling this ‘log bridge’ product that seemed to perfectly fit my needs – not only did it provide a pair of matched pier pieces, but also a log bridge of sorts – all in three separate pieces. I was mildly concerned that the bridge piece itself was a little bit too long, and this proved to be the case when it arrived. Despite being a reasonably dense and brittle resin, the bridge trimmed down pretty nicely. Before I started cutting, I arrayed my four hobbit miniatures on the bridge and counted how many logs there were overlapping. Once I knew how much I needed to trim, I then took a pair of clippers and cut the bridge in half. Being a little brittle, the pieces snapped off forcefully rather than slicing off easily, but thanks to the nature of the sculpt with the gaps between the logs being the thinnest points of contact, the snaps were all fairly clean and I didn’t damage the model during this process. After snapping away a roughly equal number of logs from each side until the bridge was just the right size, I then sanded down each side with an emery board until the bridge came together with enough contact to super glue smoothly, and filled the gaps with green stuff.
The paint job was pretty minimal – prime grey, base coat with Vallejo Earth, drybrush with Elfic Flesh then a nice all over wash of Seraphim Sepia. Job’s a good ‘un.

With our Hobbit’s safely across the Brandywine River (at least in theory), we enter the next leg of the journey – through the Barrow Downs.
This was another rather fortunate leg of the journey for myself, as I already had a number of the miniature’s required ready to go (the Hobbits, Tom Bombadil and 2/4 of the Barrow Wights), while the terrain set remained largely the same (trees, hedges, walls, etc) – in fact, the only additional terrain feature necessary would be the Barrow’s themselves.
The Barrow Mounds themselves required no extra work on my part. With no real physical description to go against, I figured they could be represented just as well with any jutting rock formation. Fortunately, I already had such a thing in my terrain collection. Some time ago, I bought some modular rocky outcrops that I stumbled across on eBay. These outcrops were cut and sanded wood stands, pre-textured with sand and has modular slots with which to put blank bases – which I used to make my modular forests – and also bases with these plaster cast rocky outcrops. The outcrops themselves, it turns out, make for really good Barrow Mounds – even coming based for easy use in play. As for the extra two Barrow Wights, I painted these in exactly the same fashion as my first two when I started my Angmar army. Being painted largely with washes, I knocked them out in the space of an evening after work whilst assembling the Bat Swarms for my Moria army. Piece of cake.

Beyond the barrows, we get to perhaps the most interesting and exciting stop on our journey to Rivendell – the Trollshaws and Weathertop at Amon Súl. This would involve a couple of scenarios based on Weathertop itself, a couple of scenarios in the surrounding areas and then finally the Flight to the Ford.
Weathertop. It’s a big ‘un. I think there are few set pieces in the Lord of the Rings – certainly in The Fellowship of the Ring – quite so iconic as A Knife in the Dark, so it was important to me that I did this right.
While The Fellowship Journey Book provides an interesting scratch build project for building Weathertop, for the longest time I was massively fixated on the idea of the ForgeWorld Weathertop kit – it’s massive, it’s gorgeous, it’s millimetre accurate to the Fellowship movie. It also costs almost as much as a Smaug, or the guts of a Warhound Titan chassis. I spent a long time on my lunch hours deliberating whether or not to buy the kit before I started looking around for alternatives. After a good bit of poking around the internet, I stumbled on a German company called Ziterdes – who happen to produce a ‘Watchtower’ terrain piece which does the job nicely, albeit with a couple of caveats.

The ‘Nalog’ Watchtower differs from the ForgeWorld piece in a number of ways, some for the better and a few for the worse. First of all, I want to get my one major criticism I have of this piece out of the way – this watchtower is a couple inches smaller in diameter than the ForgeWorld Weathertop, particularly in the central floor space. It’s maybe a little unfair to call it a criticism of the piece itself as there’s nothing really wrong with Nalog’s dimensions in a vacuum, but it does seem like it will produce a more claustrophobic play experience when you put five Nazgûl and four Hobbits onto the piece at once.
With that being said, there is a lot of good things to say about the Watchtower ‘Nalog’. First of all, it not only looks great in it’s own right but it absolutely captures the aesthetic of Weathertop from the Fellowship movie, right down to the statues, the arches and the staircases. While it lacks the millimetre for millimetre accuracy to Peter Jackson’s set of the ForgeWorld model, it does make some pretty good use of these concessions – while the ForgeWorld model’s arches are a little too narrow to fit a 25mm base between, every piece of this model that is intended to be traversed can comfortably hold a 25mm miniature. All six arches and both staircases and platforms are wide enough for a miniature to stand on, allowing Nalog to make full use of the traversable space – making up somewhat for it’s slightly smaller diameter. As far as materials go, the piece is cast of a firm expanding foam, which makes it incredibly lightweight but still durable. Better yet, while not squishy by any stretch, the shock absorbent effect of the foam means it can handle the impact of a knocked miniature – even a metal one – with less to worry about with regards to paint chipping on either the miniature or the terrain itself. Heck, I would roll dice in this piece without batting an eyelid. It definitely feels less “prestigious” than a heavy resin cast terrain piece from ForgeWorld, but it’s a whole lot more practical. As an added bonus, it even comes preassembled and basecoated in a light grey with a mild drybrush and some (maybe a little over-bright) static grass applied to the outer rocks – certainly a playable tabletop standard out of the box, but you can get some incredible results with a little extra effort.

Of course, the single biggest reason I went to Ziterdes for this foamcast terrain piece over ForgeWorld wasn’t that it came preprimed or had practical archways and staircases. It was the price. While ForgeWorlds resin monstrosity will set you back £255 with free express shipping, the Nalog Watchtower cost me all of £60 including international shipping to the UK from Germany. The ruin itself was a mere €37, supplemented by three resin cast statues at €4 a pop. Pretty outstanding value for money when you consider the quality of design and the just about flawless cast.
It was also an absolute joy to work with. There was minimal assembly – pretty much a case of ‘paint the statues and glue them on’. Two of them went straight on, while the third was cut in half and the break point trimmed at with some sand and rubble glued on to make the break look more realistic. The bottom half was glued on like the others, while the top was placed near the last remaining stand, which was also cut away at and had some stones and sand glued down. After some dry fitting, they were primed grey, washed and drybrushed, and superglued down to the ruin. With the ‘assembly’ complete, it was onto weathering.
Out of the box, it was a rather bright blue grey with a very light grey drybrush over the extremities, so the first thing I knew I wanted to do was darken it right back down, while also pushing the contrast. There being so much surface area, I didn’t want to have to push wash over the whole thing, and so I decided to take a different approach and make heavy use of weathering powders. My two primary go to colours were both Vallejo Pigments – Burnt Umber and Natural Umber. My first port of call was taking a large, old brush and alternated dipping it into the pigment and then heavily brushing into the recesses of the model – between steps, the edges against walls or curbs, under archways and just about anywhere two surfaces met. I did this first with Natural Umber and followed with Burnt Umber a little deeper in the crevices. This process wasn’t particularly neat or careful, and after applying I’d wipe my brush off around the edges of where I just applied my pigments – this created a natural, dusty looking fade where less and less of the pigment would settle into the crevices. Thanks to the incredibly textured and tacky nature of the foam and the primer, this all settled and held itself in place with very minimal effort on my part. In some of the darkest areas, I’d follow with a pin wash of Agrax Earthshade just to really darken things down.
With the pigments applied and the whole thing looking gloomier and weather worn, I followed up by giving the whole thing a hefty drybrush of Vallejo Game Khaki. I’m a huge fan of using this colour of grey stone, as I think the two colours work well together to create a more natural look. I then followed up with a second, more sparing drybrush of Elfic Flesh on the extremities. This drybrush combined with the pigments really helped up the contrast on the stone, and produced a much more natural looking weather worn look.
My final paint application was applying some large smudges of Vallejo Slimy Grime effect in various places. This was a mostly subtle touch that would be partially obscured by the flocking, but it helped break up some of the more monotonous grey sections.

The painting and powdering stage now completed, I moved onto my favourite step – gluing stuff down. Here, I used a pretty wide combination of static grass and flock from Gale Force 9 as well as some of my Forest Litter mixture from Serious Play, dead leaves from Green Stuff World and a mixture of Jungle, Mountain and Highland Tufts from Army Painter. You can see for yourself on my photography exactly how I applied them, but my general approach was to keep most of the lighter coloured grass and tufts towards the stones on the outside and up on the most exposed areas, while keeping things a little more muted towards the more central and sheltered areas. I tried to be relatively restrained with the dead leaves and either placed singular leaves, or clumped them in small piles of two or three here and there, as the leaf litter would have arrived piecemeal, carried by the wind.
After the glue dried and the excess was dusted off, the final touch was squeezing a few Vallejo Still Water puddles onto the ruin. Again, I didn’t want to go overboard and drown the model in water effect, but I wanted puddles to remain here and there to give the impression of gloomy weather. Done, and done.
At this point, I’m still unsure if I’m going to make a hill for Weathertop to rest upon for the miniatures to ascend, or simply simulate it in steps with books, etc. under the neoprene mat we normally play with on. The other alternative is simply to play it on a flat surface – the plan is to use ForgeWorld’s A Knife in the Dark scenario over the one in the Journey Book, as the latter is designed for a much more open, scratch-built ruin – and an easier to traverse surroundings may well make for a better play experience.
Well, for the sake of keeping these updates from getting too long-winded, that takes us to the end of this chapter. In the next instalment of my Preparing the Narrative Campaign series, I’ll talk about the very last leg on the Road to Rivendell – the Flight to the Ford – as well as the Fellowship’s journey to Moria. Between now and then I’d also like to talk a little bit about my other upcoming projects, and my display board project for my Rivendell Elves and other Good armies, so don’t forget to check back for updates.
Until then, as always, thanks for reading and happy wargaming!
1 Neither Gildor nor Glorfindel are based on any likeness in the movies as far as I’m aware, and so it would have been an acceptable concession to just use Glorfindel for this scenario and Arwen for Flight to the Ford.
2 The latter two, my Mounted (Armoured) Glorfindel and Mounted Gil-Galad being 3rd party sculpts from Unreleased Miniatures. I’d considered converting these myself a number of times, but I was honestly just so impressed with the overall look of these miniatures. Neither are absent of issues – the metal is a little soft for my taste, the casts are far from perfect and Glorfindel is bizarrely “flat” – but they’re an awful lot closer to capturing the essence of both of these Lords of the West than I think any of my own conversions would have been.
Amazing 🙂