
It’s been a long time since I made a post detailing a singular piece. Lately, it’s almost like I’ve been playing catch-up with social media – I post my finished miniatures to Twitter, or Instagram, and then write a few paragraphs about each in a long blog post when I get the opportunity. I usually cover my reasons for the decisions that went into the miniature, and talk a little bit about my progress retroactively, with little to nothing in the way of work-in-progress photography.
This wasn’t always the case. Back when I started this blog, I logged the progress of my VI Legion Varagyr across three separate posts. Other the other end of the spectrum was my somewhat vast New Year, New Nazgul article, which covered a whopping 7 (!) distinct pieces in one overlong article1. There’s a middle-ground to be found there somewhere; I’m fairly happy with the pacing of my Grey Company post. Certainly, my Warhound Titan was of a scale large enough to deserve a separate article for construction and painting.
Given the pace of my miniature output sometimes, I think it’s probably better that I allow my social media to do the job of documenting my every day output. I’d like to refocus what I’m trying to accomplish with this blog, and do a better job documenting some of my more momentous projects. I don’t plan for every post here to become a detailed tutorial – for example, my Preparing the Narrative Campaign series will continue to live on, covering the numerous smaller pieces that make up the wider project. But gone will be the coverage of every little thing I finish, as I finish it2. Instagram and Twitter are doing a fine job of documenting the progress of my Iron Hills Dwarves until the army is “complete” enough to discuss in full; I don’t need a paragraph about them in here too.
Instead, I’d like to talk a little bit more in-depth about my Treebeard.
I received Treebeard as part of a 30th birthday present from my fiancé, alongside some other non-miniature related gifts and a Barrels out of Bond set. While I have plans for the Barrels a little further down the line (oh, I have ideas), I was keen to crack open Treebeard – quite literally, out came the clippers, and off I disappeared down the rabbit hole.
Out of the box, the Finecast Treebeard kit was just about flawless. The details were crisp, there was virtually no mould release agent on the miniature and virtually no mould slip or other sorts of seams. The miniature itself – meticulously hand sculpted by Trish Carden from cinematic reference – is one of my favourite from the Middle-earth miniatures range. It perfectly captures the stiff, ponderous motion of Fangorn and the sad, glassy eyes below his thick brow. It’s got a real depth of texture to all of the surfaces that make it respond incredibly well to simple techniques like drybrushing. Merry and Pippin atop are also rather timeless Perry Brothers sculpts as well and make a lovely, contrasting addition to the potentially monotonous palette of Treebeard himself.
There’s just one problem – he’s a touch too small.
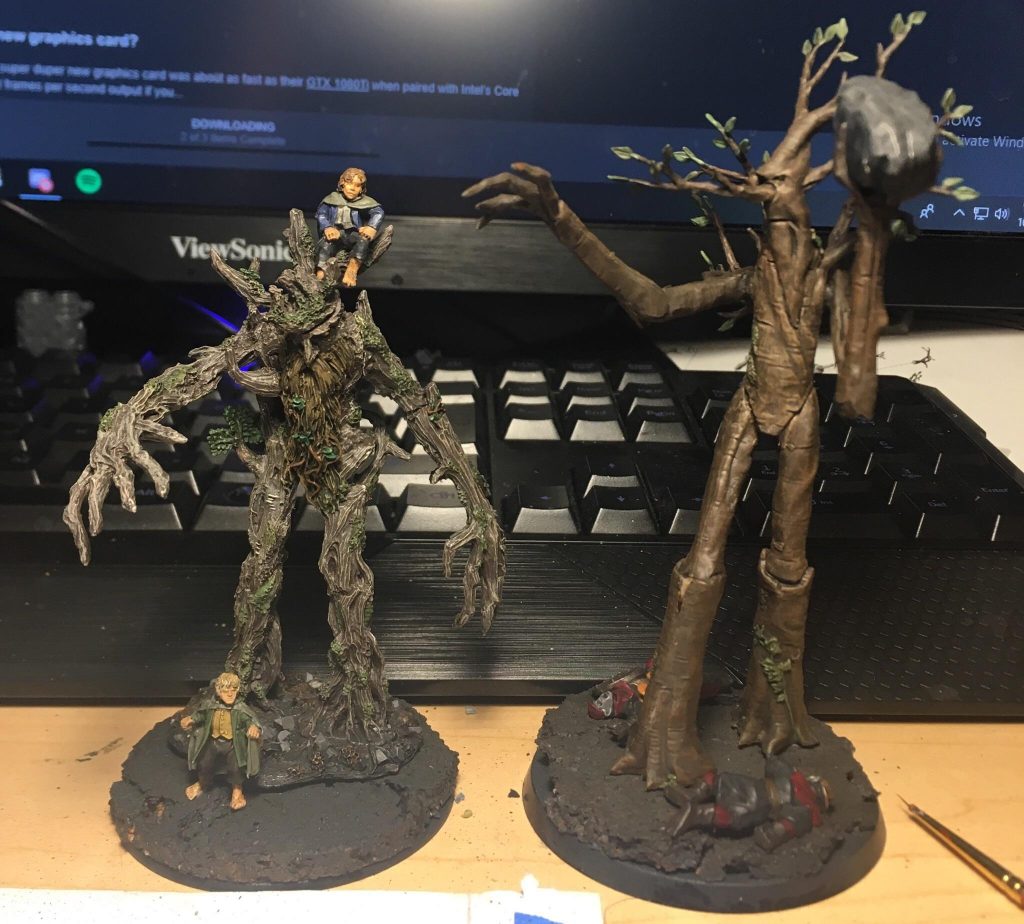
In my experience, scale creep is the only true constant with Games Workshop miniatures. There has been a marked increase in the height and density over the years in their miniatures. I assume this is largely down to the demands of the consumer for yet more impressive and intricate miniatures, as well as their recent move to releasing almost exclusively plastic kits these days. In both instances, a larger miniature makes life a little bit easier, as well as making life a little easier for the hobbyist.
Middle-earth miniatures, however, have always been fraught with somewhat inconsistent sculpt sizes as early as the first wave of releases. The plastic Númenorians with sword and board found in the original “Last Alliance” plastic kits were slightly smaller than the metal Spearmen and Bowmen. Going forward a little, the original Elladan and Elrohir sculpts – released around the Two Towers period – each wielded a pair of swords that were each larger and thicker than a Rivendell Spearman’s arm. These are just the realities of hand-sculpted miniatures – particularly with a range such as these licensed Lord of the Rings miniatures. Often based on the likeness of characters played by actual people, these 25mm sculpts were intended to portray more realistic depictions than the 28mm Heroic Scale miniatures that Games Workshop were generally known for.
Treebeard was not immune to this issue. Originally released alongside another metal kit for a generic Ent (which, incidentally, looks especially tiny these days), the metal Ent kit was eventually superseded by the plastic kit that we have today. While a reasonably pleasing kit with a decent amount of configurability (a little more limited than I’d like aesthetically), they do pose one major issue for the Fangorn army as a whole – they absolutely dwarf Treebeard.
This was a cause for concern. After all, the combination of receiving Treebeard himself and the £50 in Games Workshop vouchers I received from my sister made me seriously consider beginning a March of the Ents project for a moment. Truth be told, the inkling still yet remains – perhaps stronger after finishing Treebeard – but my senses eventually returned when I remembered I hadn’t even finished my Iron Hills Dwarves yet. Still, I couldn’t shake the idea that I might want to build an army of Ents one day. This meant that Treebeard would have to fit in with the other Ents, and not as the old short guy at the back, but as the Master of Fangorn smashing up the industry of Isenguard from the front lines.
Thus began my work to make him just that little bit more intimidating.
The first thing I did was assemble him in full – I wanted to ensure all the bits fit together and were glued neat and flush. Once this was finished, I whipped out my new Tamiya Hobby Saw (which I had also received from my lovely fiancé for my birthday, what luck!) and sawed him in three locations – each thigh, just under the hip, and right across the centre of his belly. I have to say, if you’re on the fence about picking up a modelling saw for your conversion work, absolutely pull the trigger. In the past, I’d probably have just hacked away with an X-Acto Knife until the joint was weak enough to snap; using the saw I was able to simply saw the miniature in pieces with considerably less effort and damage to detail. What a difference.
The thighs were my first choice to extend as they were the thinnest, least complex areas of the model to fill. His arms were already pretty long and, being a tree, it kind of made sense that he might have long, lanky legs. However, even before extention, I found his torso was a little bit short and stubby for my liking, so I decided to extend this also – taking care to cut at the least intricate area of detail on his beard
To hold him together, I pinned each section together with two pieces of paperclip in parallel for a little extra sturdiness, held together with a little super glue. In total, I extended the legs by about 12mm and the body by about 6mm. For the final touch, I took some 2mm high MDF bases I had lying around and stacked them to lift the height of Treebeard’s scenic base a few more mm further from the ground. Between torso/limb extensions and base trickery, he now stands a good 22mm taller than he did before – that’s over a hobbit’s length taller!
With the extension complete and the limbs secured, it was time to put some flesh on the bone and fill the missing gaps in the miniature.
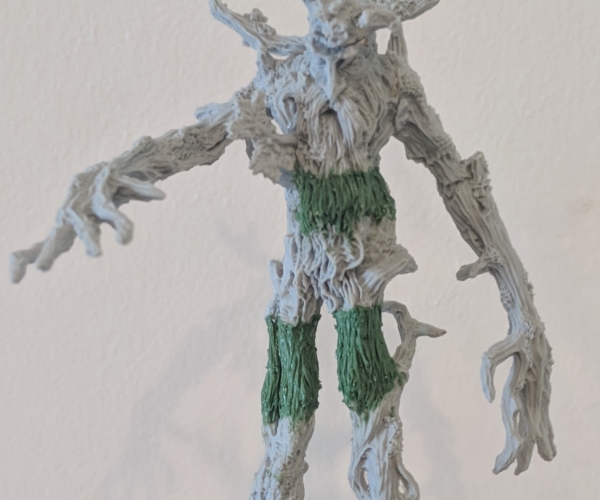
Sculpting the missing sections of Treebeard was considerably easier than you might imagine. The process was simple – knead up some green stuff, and wrap it around the pins. I then did my best to squish it with my fingers until the shape was roughly flush with the top and bottom of each connecting section. Once flush, I then used my knife to push in the deepest grooves around where the beard meets the body, and the gnarled deviation of the bark on Treebeard’s right leg.
Once the basic shapes were set, I took the back of my X-Acto Knife, dipped it in water, and ran it lightly down the grooves in the wood grain or the beard of the resin miniature, following the line in a roughly straight path across the putty, trying to line it up with the grooves of the next section of resin. As a final touch, I took some care to ensure that the areas where the resin and the green stuff met were blended reasonably well, taking care to smoosh down some of the overlap into the resin grooves for a smooth gradient, and carefully sliced away any excess created.
After filling the rest of the gaps from assembly, Treebeard himself was finished, and the last step before priming was the base.
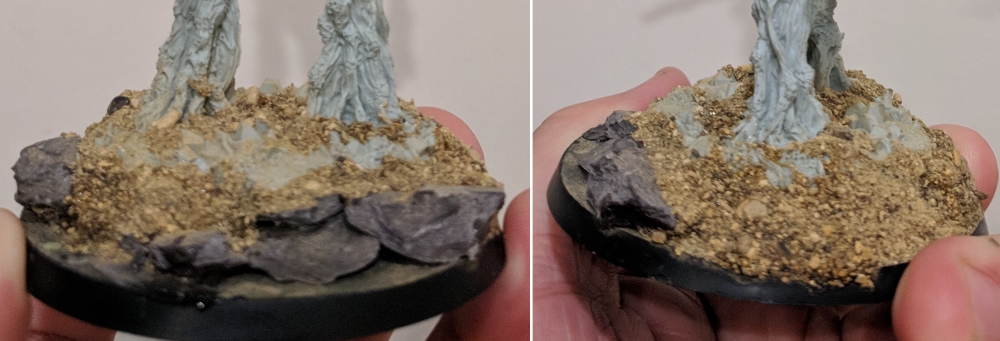
The first challenge was figuring out what to do in order to completely conceal the MDF discs, and give the base the appropriate depth of texture. Beyond that, I knew that I wanted to put a water feature on the base – as is my tendency with my Middle-earth miniatures. To at least partially satisfy one of these, I decided to take a lesson from my Iron Hills minis and add a bunch of stacked slate at the front of the base – this did a great job of concealing the MDF risers, as well as providing a nice, natural looking river bank with enough space for a little bit of water feature.
As for the rest of the base, I decided to get a sand/gravel blend, and settled on a War World Gaming product that I found on Amazon. This was a little unusual for me, being a big proponent of Vallejo Earth Texture for this sort of thing, but I’m also extremely impatient; the base needed a lot of texture, and I wanted something that I put down in several thick layers without too much waiting arouind. Additionally, the sand mix had a nice, varied texture that I thought worked really well for the earth under Fangorn. To apply, I pretty much free poured CA glue across any exposed patch and threw a pinch of the sand over it, repeating this until there was no more exposed base, gaps between the resin scenic base and the base itself and all variations in height were smooth and natural looking.
The miniature was now completely assembled, and ready for paint.
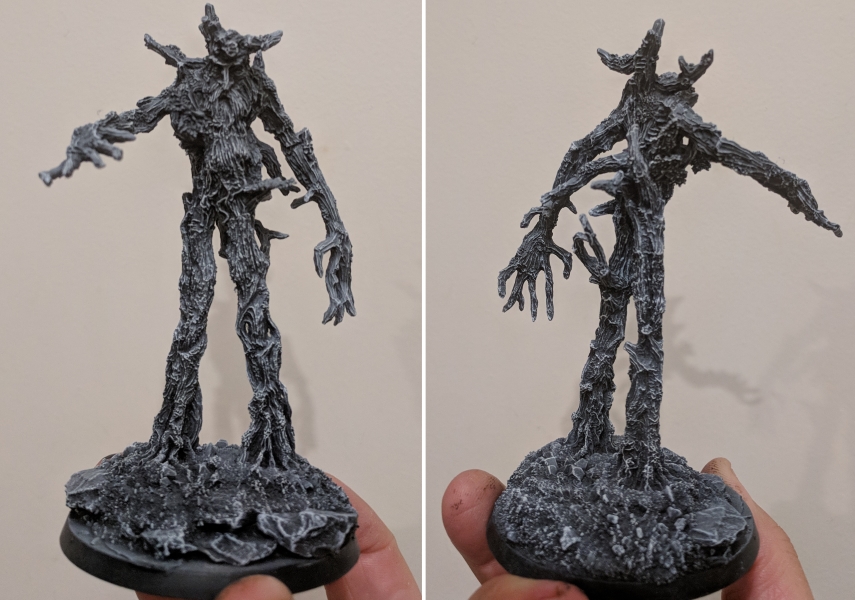
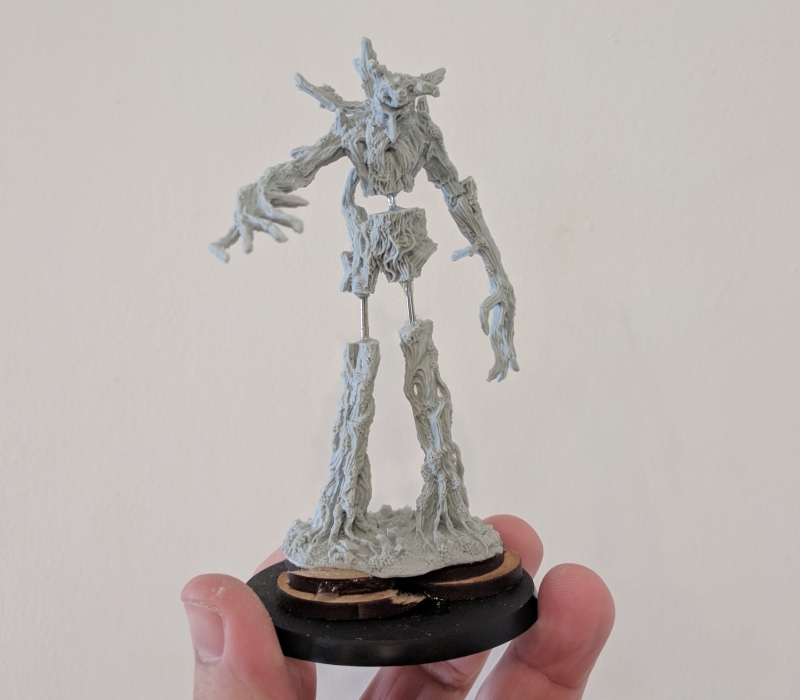
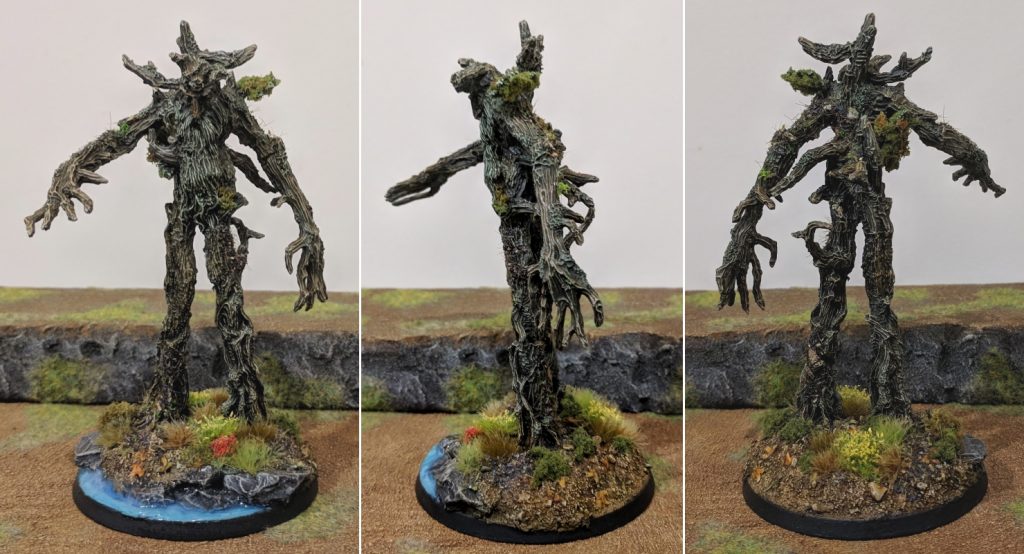
With a sculpt like Treebeard, there is so much surface texture to play with that painting can feel borderline trivial at points – particularly with a relatively muted colour palette. To counteract this, I wanted to convey a sense of directional lighting on the miniature to add a little more to the overall variation to the miniature beyond the wash and drybrushing. I began by priming Citadel Chaos Black and giving him a quick zenithal of Hycote Grey Primer at about a 45 degree while the black was still wet. This made his base colour more of a greyscale than simply a flat black or grey, with a pleasing gradient across the miniature – the grey still managed to seep into some of the wider recesses, but completely missed the underside of his arms and some of his more protruding features, as well as some of the tighter lines in the wood grain.
Following the initial base coat/primer step, I then took some Dead White and drybrushed the entire model in a top left to bottom right kind of sweeping arc, taking care to pick out all the edges and wood grain. On the darker/on black areas, I found a single pass was enough to create a pleasing contrast while some of the more prominent grey areas took a couple passes to get the white drybrush 100% opaque on all the surfaces. At this point, I was half tempted to paint his eyes red and call him Fangorn Noir.
Fun as my arthouse Treebeard was to look at, that stage was not to last – the next step was colourising.
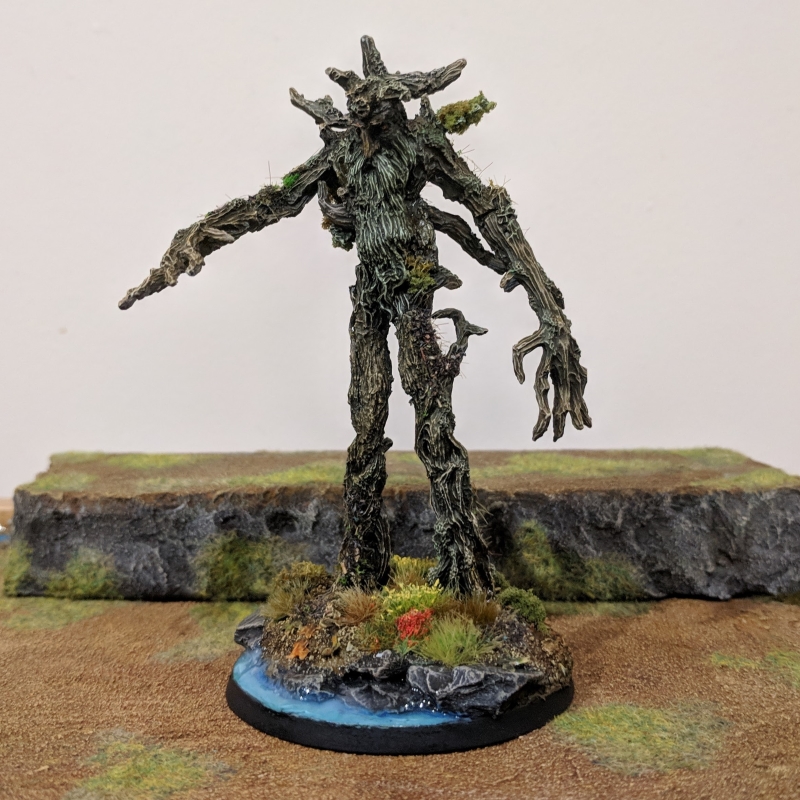
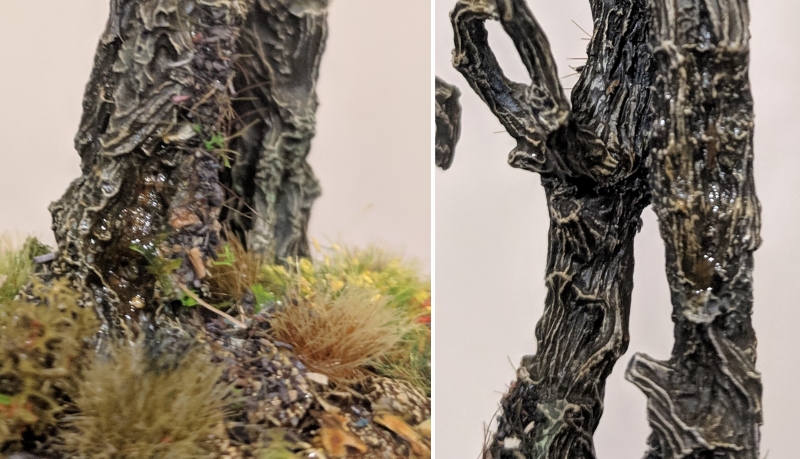
This step was, frankly, extremely quick. With most of the hard work already done in the pre-paint stage, I slapped a thin coat of Vallejo Ink – a 50/50 mix of Brown and Sepia – over the majority of the miniature, taking care to avoid his beard. The ink was relatively thin and so had a very minimal ‘wash’ esque effect in some of the deeper recesses, but mostly just brought an ancient, woody texture colour to the already shaded and highlighted Treebeard. For the beard and leafy patches, I used Vallejo Green Slime effect as my experience using it on my Weathertop taught me that it was a somewhat translucent, pale green that was thin enough to settle nicely in recesses, which tinted the base colours of these areas nicely. Once dry, I gave the beard in and leafy areas a subtle drybrush of Off-White, tinted slightly with the Green Slime effect to make them pop. As a final touch to the wood grain, I drybrushed the most prominent areas with Khaki and called it a day.
The base was business as usual – Mechanicus Standard Grey rocks, Earth coloured gravel and dirt as a base. The rocks were shaded with Agrax Earthshade before receiving a drybrush of Heavy Bluegrey, Wolf Grey and Khaki whilst the Earth was drybrushed Leather Brown, then Elfic Flesh and washed with Seraphim Sepia. For the water, I put two coats of Nihilakh Oxide down, blending a little Guilliman Blue in where it meets the land on the second.
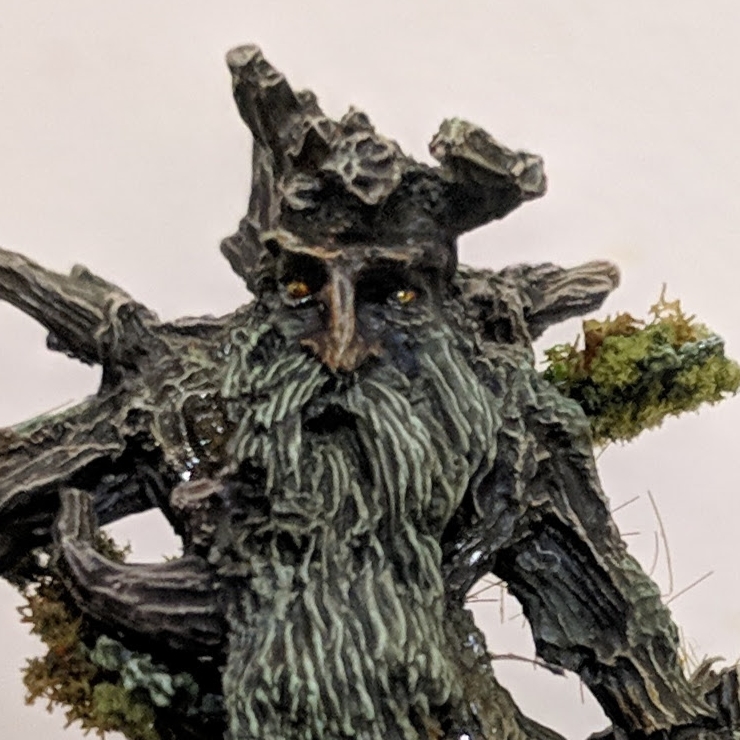
I painted Treebeard’s eyes with a layer of Sun Yellow over a basecoat of Elfic Flesh. This was very lightly shaded with a 50/50 Seraphim Sepia and Cassandora Yellow mix around the edges before adding a thin line of Charcoal Black for the pupils. As a final touch, I applied a couple very thin glazes of Reikland Fleshshade over his nose for the Ent equivalent of a ruddy nose.
The paint job was complete. I took him outside and gave him a couple thin coats of Testor’s Dullcote. When this had finally dried, I applied a thin coat of gloss varnish to each of Treebeard’s eyes, as well as a nice thick top coat of Vallejo Water Texture to – you guessed it – the water.
Around about then, I decided to show off my progress to my fiancé, who raised a question that I hadn’t really considered at all – was I going to have any tree sap on the miniature? This gave me something of a moment of pause; I can honestly say that I had in no way considered this sort of effect until she mentioned it. Come to think of it, I don’t think I’d ever really seen anyone put something like this on a Treeman-esque miniature. But I liked the idea a great deal – it’s a nice little visual effect, not unlike Blood for the Blood God or Nurgle’s Rot, which would provide a little more visual interest to an otherwise massively drybrushed miniature. To achieve it, I mixed up some PVA glue with a 50/50 mix of Seraphim Sepia and Lamenter’s Yellow glaze and applied it liberally in a couple of coats to a few choice recesses of the miniature – around the bottoms of the legs, between two gnarled roots, and so on. I did a couple of layers of this to ensure it had some depth, and finished it with a layer of gloss varnish to ensure it looked appropriately wet and sticky. The miniature was then left overnight for the water and glue to cure. When everything was sufficiently dry to the touch, it was time to glue some more texture down!
The base was the obvious place to start. I wanted to put some tufts down of various grasses and flowers, along with a scattering of dead and/or fallen leaves. I super glued the tufts to the base, and then glued a few individual leaves from my tub of Leaf Litter down in clear visible places – this was somewhat fiddley work, so I wanted to make a few of them count rather than deal with stacking a load of them. When dry, I applied washes and glazes to tint them – Athonian Camoshade, Biel Tan Green, Seraphim Sepia, Bloodletter Red and Reikland Fleshshade all got used in various places, sometimes shading or tinting each other in layers.
Being a plant of sorts himself, it felt right to get some leafy texture on Treebeard’s body as well. I didn’t want to go too overboard, but I knew I wanted to get some around the leafty patches in a few locations – and so applied some PVA glue (mixed with matte varnish to ensure it didn’t dry shiny) and scattered some of my Serious-Play Forest Scatter over him in small patches, making sure to blow off any big chunky pieces or any eyesores that didn’t quite fit. At this point, Treebeard’s two dimensional leaf-canopy branches felt a little bit.. well, two dimensional. I ripped off some clumps of Woodland Scenics Light Green Foliage Clusters which I used on my one living tree for my (joint-3rd ‘Best Scenic Board’ / 2nd place ‘Best in Show’ winning) Armies on Parade entry “The Death of Hope” and super glued them to either side of the leafy branches to give them a little more volume.
At this point, the location of one of those branches just wasn’t working for me. After much frustration, I eventually broke it off, covered the break with some more foliage, and glued it back on to Treebeard’s left shoulder. You can see the original and new locations in my zenithal photo and my finished Treebeard photos. The dichotomy between the clump foliage and painted leaves was a little too stark for my liking though, so I thinned down the clump foliage and replaced some with a kind of dried-lichen looking thing from my Forest Scatter mix in a couple of places.
And just like that, Treebeard was complete! I superglued some magnets to his base for storage/transport, grabbed my display board to take some photos and prepared to get some photos on Instagra
Oh. Oh, wait a minute. What about Merry and Pippin?
… Whoops.
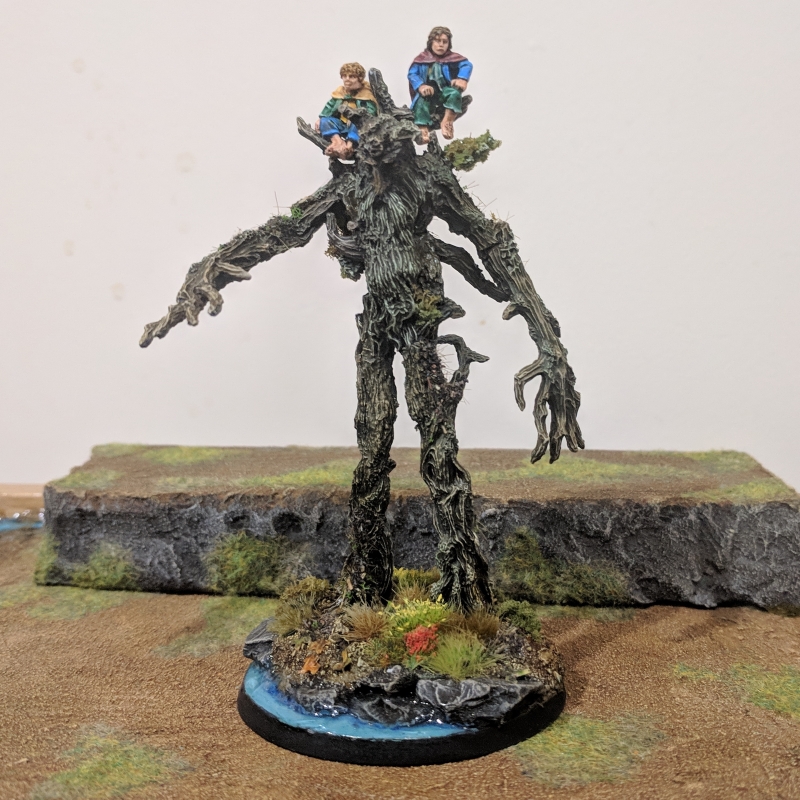
It was always my intention to add Merry and Pippin to Treebeard, but I really wanted for them to be separable – partially for painting reasons, but also because I wanted to be able to field Treebeard as a lone agent if I wanted to. Finding a way to do this without ruining Treebeard’s aesthetic without them (no exposed magnets!) was a consideration of mine during assembly, but somewhere in the excitement of not completely screwing up the extension I had completely forgotten to actually implement this. Thankfully though, retroactively correcting this proved to be considerably less invasive than I had originally anticipated.
My solution for an optional Merry and Pippin was simply to attach a thin but reasonably lengthy pin in the bottom of the hobbits where they would normally be superglued to Treebeard, and to drill a relatively snug hole in each of his branches where it could be inserted. My hope was that the combination of overhanging legs and arms of the hobbits, along with the length of the pin – and gravity, of course – would keep them held relatively secure without any awkward rattling or risk of falling off during game play.
I’m pleased to say that – in practice – this was pretty much the end result. Getting the pins to line up correctly in either side was a little bit of a faff – I drilled one or two holes in the entirely wrong location on the branch that would need filled afterward, but for the most part it worked out nicely. Filling and repainting the areas I had drilled into on Treebeard was pretty trivial – a quick coat of brush-on primer and a little bit of brown/black to restore the original colour. With Merry and Pippin removed, the minute holes in Treebeards branches are neither especially noticeable nor out of place. While I wouldn’t necessarily transport Treebeard with the Hobbits attached, they do remain securely in place when picked up and moved without too much care – I call that a win.
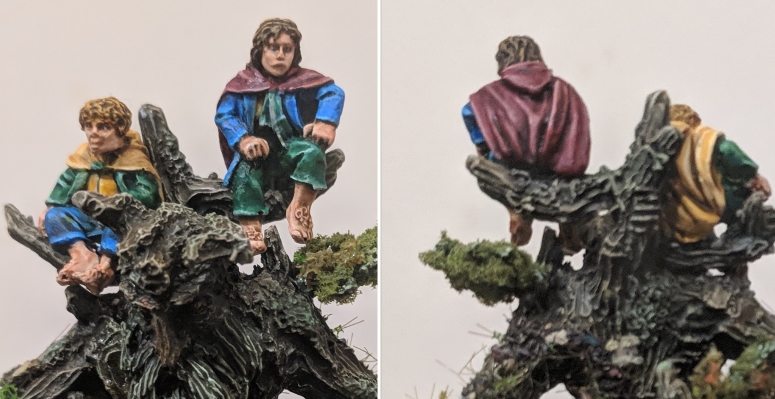
As far as painting goes, Merry and Pippin were pretty quick jobs – there’s not too much to add. For colours, I referred to the Merry and Pippin that I painted for my Fellowship display back in December 20173 and the paint job was fairly simple – base coat, wash, layer and highlight the edges with a little white mixed into the base colours. In fact, the worst thing about painting them was keeping them separate – they were held by pretty tiny little pins, and in general I really hate how fiddley it is to paint any miniature that’s not attached to a base. Regardless of the speed, I’m pretty happy with them and the colour effect they ultimately bring to the otherwise somewhat monotonous Treebeard.
So that’s Treebeard – truescaled, and complete with all the trimmings. I thoroughly enjoyed working on this miniature, and I’m extremely satisfied with the extra effort that went into the modelling side of things. It’s always good to step outside of your comfort zone from time to times; sometimes you mess up, but sometimes it just really pays off. I still find myself extremely tempted to run out and pick up a gang of Ents – I think there’s a lot of fun to be had in modifying the plastic kit and extending the length of the OOP metal one – but that’s a project for another day, I think. In the meantime, I have Iron Hills to finish and milestones to reach with my Space Wolves and Iron Warriors; then there’s the small matter of the Middle-earth narrative campaign…
Until next time, thanks for reading, and happy wargaming!
1 Reading it back some time after posting it, it became clear to be that 7000 words is about 2000 words longer than any blog post should really be – a fact I have been incredibly vigilant about since.
2 New Year, New Nazgul really didn’t need to cover my Moria Goblins – I could’ve easily covered them in my article about the Moria project later on and kept a closer focus on the Nazgul themselves.
3 Much as I want to claim it was deliberate, it was entirely a happy accident that, in the end, Merry and Pippin’s colour palette would exactly match the colours on the base – red, yellow, brown, green and blue.