Well, we all saw this one coming from a mile away, right? One does not simply paint a Treebeard without going on to paint a whole army of Ents.
I’m actually a little surprised it took me this long to get started. I had mulled over the idea of assembling a legion of Ents as soon as I had finished Treebeard. The project was a lot of fun to work on, but what got me was the sheer conversion potential of Games Workshops plastic Ent and Citadel Wood kits – and that’s not to mention the entire range of AoS Sylvanneth models. Add the barbed bracken and creeping vines kits into the mix and the potential for kitbashing is momentous.
I talked myself down after a weekend of foaming at the mouth. I had an awful lot on my plate already, between narrative campaign prep work, finishing off the outstanding kits in my Space Wolves and Iron Warriors legion projects, the (patiently awaiting it’s moment) Blackstone Fortress boxed game that I had received for my 30th (thanks mum), and other bits and bobs that I wanted cleared from my backlog. There was also the small matter of finishing off my Iron Hills Dwarves. I put a pin in the idea, and I pushed on.
Flash forward a couple months to the present1 – my legions are completed, my loose ends tied up and my Iron Hills are well underway. One night, I was working on the dismounts for my Goat Riders at the time, chewing my long-suffering fiancé’s ear off about my plans to field my new Iron Hills models in a couple of 450-500 point tournament events in mid-August/early September. That’s when she turned and asked me:
“Are you not going to use your Elves for either of them? What about your Treebeard?”
… Huh.
The question gave me pause, not least it made me realise I had no idea what my plans for Treebeard actually were. When did I actually plan to use him? And – given that both events were within a fortnight of each other – did I really want to use the same army twice?
I laughed and brushed the question off, but the seed had been sown. The question played on my mind over the next few days, but it was on one of my commutes to/from work when I finally crossed the Bruinen. I was reading the Armies of LOTR book on my phone during a period of spotty 4G signal when when I happened upon the Fangorn section – and it occurred to me that Treebeard plus a pair of Ents was 440pts.
“Wait, wasn’t that doubles tournament supposed to be 450 points?”
One of my better excuses not to build an army of Fangorn thus far was that – five models or otherwise – it was a little hard to justify going out and buying/building/painting a whole new army when I already had ongoing projects to be getting on with. Just a pair of Ents felt much more like a tasty little side project that a long term diversion.
That was me sold – I went straight to the Games Workshop webstore and threw a couple of Ents into my basket.
The plastic Ent kit promises several distinct options such that you need not build two Ents exactly the same. This is.. not entirely true. I did a bit of research into the sprue online and found out that this amounted to three left arm options (but still only one right arm), and two heads. You also have some choice in how you pose the branches, but not really. This isn’t as much of a big deal as it sounds though – the plastic Ent kit has something of a distinct look about it, and if you were planning on building more than a pair of Ents in the first place, you’d probably want to consider getting creative with kitbashing anyway.
Thankfully for me, I was only building two of them (for now).
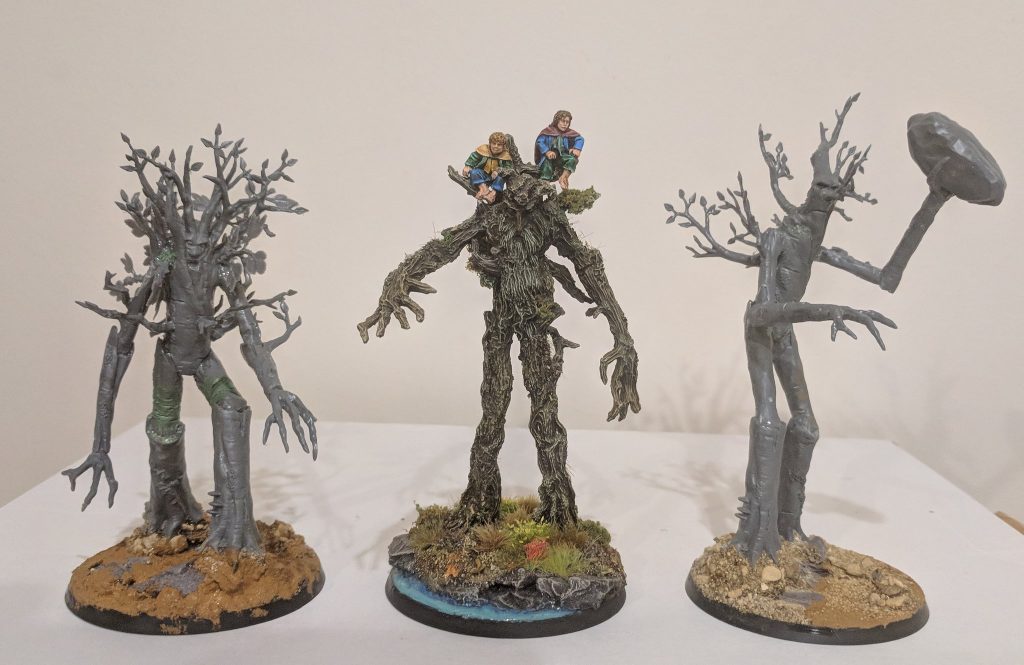
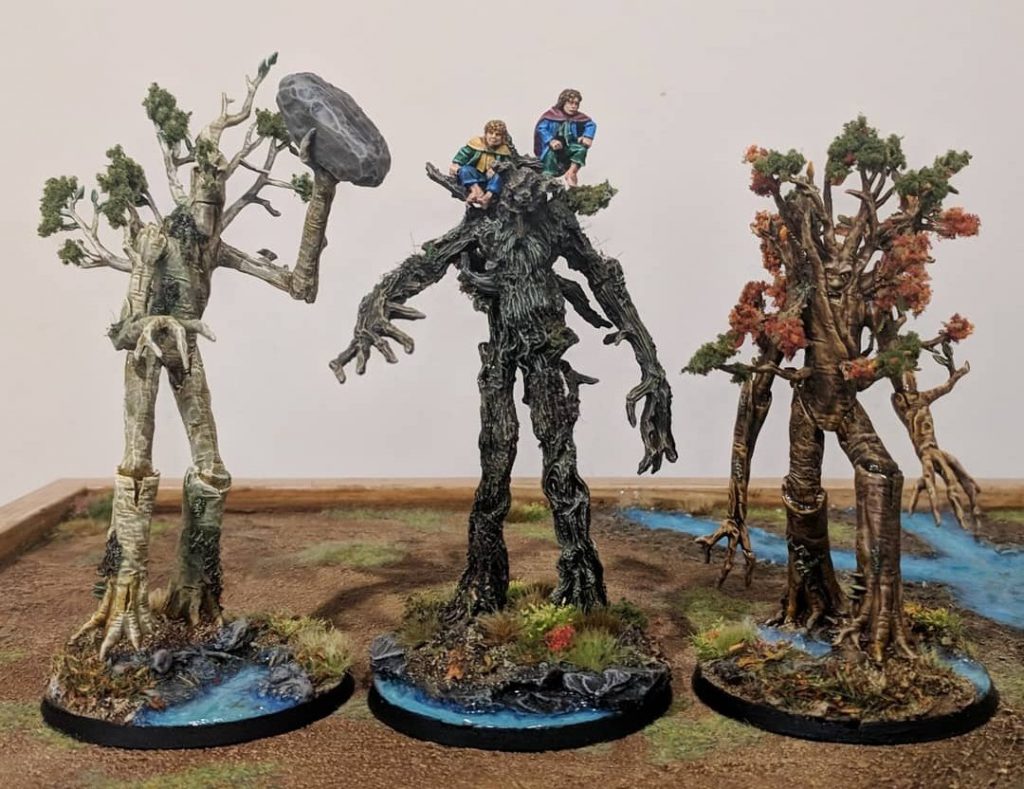
For my first attempt (pictured above, on the right of Treebeard), I wanted to assemble something right out of the box – this was my first plastic Ent model, so no sense in re-inventing the wheel quite yet. Importantly though, I wanted to get a feel the dimensions of the model and get a benchmark for how the plastic Ents scaled against my ‘Extended Edition’ before modification.
I went for the lankier of the two head options for this proto-Ent and – although I assembled the model in a slightly hunched pose – I was extremely pleased with how Treebeard scaled. The new Ent had a slightly higher eyeline than Treebeard, but did not look disproportionately so. Compared to how the two compare out of the box, the result was night and day.
That said, with just three Ents all told in my 450pts list, I didn’t want to settle for Treebeard as the shortest of the Entmoot – he’s supposed to be the most powerful of the three, after all. I decided to remedy this on my third Ent. Before assembly, I went and trimmed a good 15mm out of the middle of each of the upper thighs at it’s slimmest point, gluing the two remaining halves together and smoothing out the join with some green stuff.
Thanks to the lanky, somewhat disproportionate2 nature of the plastic kit, the resulting Ent miniature still looked pretty good after a pruing. I assembled this one a little less hunched but with the shorter, stumpier head option that made the body look a little ‘loggier’. The shorter, thicker thighs complimented this well, I thought. In the end, his eyeline ended up just a little below Treebeards, giving me a nice spread of heights in the force, with Ol’ Fangorn himself fitting nicely in the middle.
While Lankyboy suited the bare, minimalist look, something still felt missing from Stumpy the Ent. To remedy this, I decided to accentuate Stumpy’s branchy head and add a number of extra branches about his body. Some of these where done using leftover branches left over from the two Ent kits I just built, while others I made from the flexible Creeping Vines kit. The result was a considerably more three dimensional body, with a denser canopy of branches more akin to an actual tree. I’m pretty happy with the final build – the denser canopy combined with the stumpier legs gives a bit more personality to what was – in my opinion – the weaker of the two potential builds from the kit.
For basing, I followed the same pattern that I had established on Treebeard – tall, built-up mound with slate bordering a stream of bright blue water. I did this with slate pieces, scattered sand and rock debris, plus some Vallejo Earth texture paste. I stuck the Ents down onto them with CA glue and filled in the gaps where their ‘foot’ met the ground with some more texture paste.
My pair of Ents were assembled. Now, it was time to think about painting them.
I knew that I wanted both of these Ents to be lighter than the very dark looking Treebeard. With that in mind, I decided to go straight to grey primer instead of a zenithal over black. When finished, I took a medium drybrush and did a heavy drybrush of Elfic Flesh, followed by Pure White with an emphasis on the downstrokes – taking care not to snap any of the fragile branches. I decided that I wanted the lanky Ent to be lighter in tone, so I took a bit longer on each drybrush layer to ensure the model was starting from a lighter base.
After finishing up the zenithal drybrushing stage, it was time to get tinting. For Lankyboy, I made up a tint which was equal parts Lamenters Yellow Glaze, Seraphim Sepia wash and a good dose of Lahmian Medium to ensure transparency. I applied it all over the wood, taking care to ensure that it went into all the crevices, and made sure it didn’t pool too much on any of the surfaces. While this was drying, I applied another glaze mix made up of Seraphim Sepia, Reikland Fleshshade and Lahmian Medium to Stumpy.
With the glaze applied, my wood was starting to look a little.. um.. woodier? This was followed by a careful drybrush of Elfic Flesh and Leather Brown respectively to brighten the edges up a little more, and restore just a little bit of that grainy brush effect that the glazes smoothed over – not an effect that I would usually desire, but one that worked well for trees.
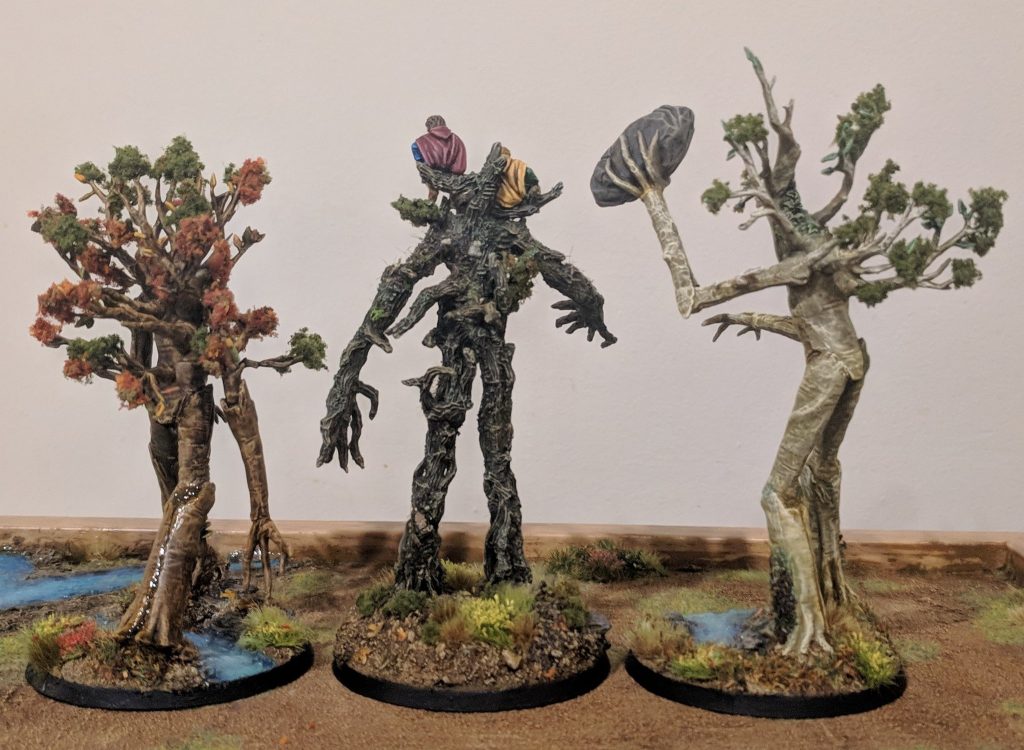
Next up was the moss and leaves. Equally true of both Ents, the moss I did using Vallejo Green Slime effect, followed by an Elfic Flesh drybrush and Athonian Camoshade wash. This gave the moss a bit of a desaturated greenish tint without calling too much attention to itself. On the lankier Ent, I used the same process for painting the leaves, although I upped the saturation a little afterwards with a wash of Waywatcher Green glaze to make them seem a little more vivid and alive.
For Stumpy, I wanted to mix things up and decided to paint the leaves in a more Autumnal style. To begin, I painted some of the leaves in the standard green. Along with a couple of leaves here and there across all the branches, I took particular care to paint some clusters of leaves on the most jutting and outstretched branches, for reasons that I’ll get into shortly. After that, I went and based a bunch of leaves in Filthy Brown, Heavy Red and Orange Fire, before giving the whole thing a wash of Seraphim Sepia to bring a bit of brown back into it all and shade some of the overlaps. Not wanting to hand-highlight every single leaf, I in the end drybrushed the leaves with Elfic Flesh before applying a generous Lamenters Yellow, Bloodletter or Waywatcher Green glaze to all of the various coloured leaves to bring up the saturation and make everything the right colour again.
The bulk of the model now painted, it was onto the finishing touches.
For the eyes, I repeated my process with Treebeard – Filthy Brown, lightly shaded with Seraphim Sepia and then a little slit for the pupils. Only the stumpy Ent had actual teeth, which were done with a Elfic Flesh base, a Seraphim Sepia wash and a little Elfic Flesh again to pick out the individual teeth.
The bases were exactly as I did with Treebeard. As usual, the Earth was drybrushed with Elfic Flesh and then shaded with Seraphim Sepia; the rocks were Mechanicus Standard Grey, drybrushed Heavy Bluegrey and Wolf Grey, shaded with Agrax Earthshade and drybrushed Khaki; and the water element was a couple coats of Nihilakh Oxide with a little Guilliman Blue glaze in the recesses. I also used the same method for painting the lanky Ents Rock as I did those on his base.
Painting finished, the Ents went outside for a coat of Testor’s Dullcote before the fun part began – sticking stuff down!
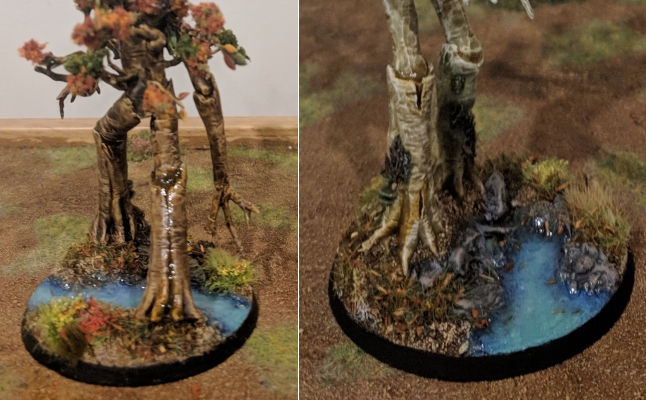
There’s not a lot to say about the bases that hasn’t been said already. Various floral, mountain, highland and jungle tufts were stuck down with CA glue, along with a little scattering of wood chippings/forest scatter that I found on eBay. After everything was dry and secure, the water was filled in with a nice thick coat or two of Vallejo Water Texture. As one final touch I took a few pieces of Green Stuff World leaf litter and glued them down individually, spreading a little Waywatcher Green and Bloodletter Red glaze on them to tint the colour a little.
I took a slightly different approach to the sap this time, and instead of using Wood Glue I mixed Seraphim Sepia and Lamenter’s Yellow Glaze with Vallejo Water Texture instead. This was spread thick and liberally along a lot of the recesses in the wood – in the inner thighs, splits in the legs and arms, beween the roots in the feet, and so on. I tried to ensure it was at its densest in the recesses, but wasn’t too careful about cleaning up the overspill. When it had finally cured, I applied a little gloss varnish over it to ensure it had a nice, sticky shine to it. I also put a little gloss varnish over the eyes.
Onto the home stretch – the leaves.
The leaves looked mostly fine as they were, however – as with Treebeard before them – it annoyed me too much that the base was rich with different materials and textures, yet the miniature itself was just plastic and paint. Once again, I reached for my Woodland Scenics Foliage Clusters, ripping off small pieces at a time and CA gluing them over either side of the green leaves to make things look a little less bare. On the chubby, autumnal Ent, I lucked out and found a little jar of Gale Force 9 Autumn Flock blend that I’d had lying around unused for the better part of a year – although less ‘clumpy’ than the foliage clusters, it still did the job when glued in place and I think looks fairly natural.
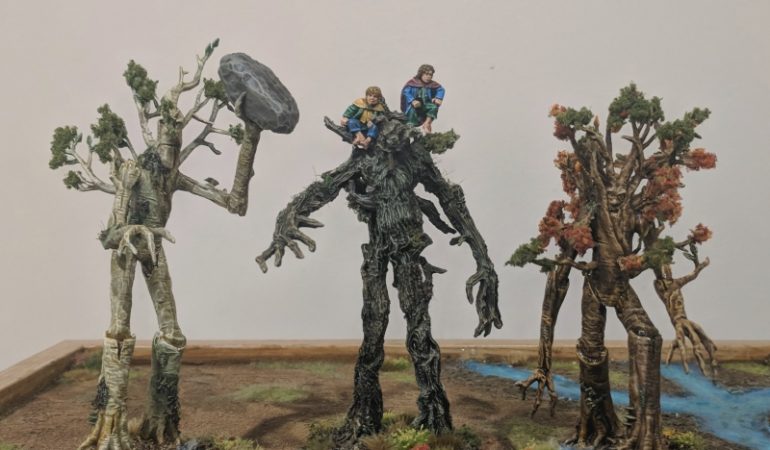
Final touches applied, my Entmoot was complete!
As with Treebeard before them, I had an absolute blast building and painting these guys. The build was an absolute joy, and I had a ton of fun figuring out how best to assemble and pose the kit. It was a great relief to see that my efforts spent in extending Treebeard were not in vain – and fun to work in the opposite direction with Stumpy. Already, my head is buzzing with all sorts of ideas how I could convert the next three, using trees from a Citadel wood, new materials and colours and a maybe even getting a little more ambitious with my sculpting. In the meantime, I’m even considering building up the display base for Fangorn with some magnetic Tree modules.
Above all though, it’s just been wonderful to build a plastic kit again after having worked with so much with pewter and resin lately. It’s gotten me even more hyped to get started on my Beasts of Nurgle, and the oft-rumoured Blackstone Fortress project.
That’s it for now – until next time, thanks for reading and happy wargaming!
1 When I started writing this post, at least.
2 Disproportionate for a human, anyway. The vast and disparate proportions of Ent physiology is another matter entirely.