It’s been a little while I gained any ground my Fellowship Narrative Campaign preparation. In my defence, it’s an easy sort of project to burn out on; there’s an awful lot of miniatures and terrain needed to recreate a three hour movie, as it turns out. The process isn’t quite the same as painting an army either – you don’t get an awful lot of say in what you’re painting. Yes, you need Goblins if you want to play the scenarios in Moria and you need Uruks for the battle at Amon Hen. You can’t have the Fellowship of the Ring without painting the Fellowship of the Ring. Sometimes you’re left with the unsavoury decision as to whether you want to grind through another 18 Uruk Scouts, or paint literally anything else. It’s very easy just to go with the latter.
But enough excuses. We’re back – and this time, we’re finished.
Across parts one and two, I covered the journey from the Shire through to Moria, admittedly missing out a couple of bits and pieces along the way – most notably, the Doors of Durin. Today, I’m going to talk about the gaps I filled in, as well as the thrilling conclusion – the Breaking of the Fellowship.
Let’s get the bad news out of the way: in the interests of getting the campaign ready this year, I’m cutting a couple of corners. I don’t really fancy painting another 12 odd Wild Wargs to do the Hounds of Sauron, and I don’t have the Wood Elves necessary for the Lothlórien scenario either. Cutting these two scenarios from the campaign was not a decision I took lightly, but frankly, the Cons outweighed the Pros in this time. The Wood Elf plastics are among some of the worst in the Middle-earth range, which doesn’t really inspire me to buy and paint them. Aside from that, they were only really usable in this one scenario1. The extra Wargs and Warg Chieftain that I’d need for the Hounds of Sauron scenario would get a little re-use here, but if I was cutting Lothlorien, I was cutting the Hounds of Sauron. It was just a lot of work for two scenarios that don’t even occur in the cinematic adaptation. Meh.
The good news, however, is the rest of the campaign preparation has been completed – and then some – so let’s get to the good stuff.
First things first, I needed to get something together for the Doors of Durin. The Journey book recommends using The Fellowship (obviously), along with 6 Watcher tentacles, an 18″ x 12″ water terrain feature, a 24″ wide cliff facade with a large man-sized door in the middle, along with some trees for decoration. I figured that both my grey stone mat or my woodland space mat would work well for this scenario, and I had plenty of trees already. That left just the cliff facade, water feature and Watcher tentacles to sort out.
I decided to tackle the cliff facade first, seeing as it had a few uses in Moria scenarios to follow this one anyway. The Journey Book recommends building it out of three layers of hard foam, cut roughly along the top with reduced height to give an the impression of an uneven and natural looking rock formation. While I didn’t have any hard foam large enough to make this, I did find that the packing polystyrene that the photo frame that I used for my display board was the appropriate size. I took the front section of this and cut it in half down the middle, giving me two 8″ tall pieces around 18″ wide a piece. The extra length was welcome, as it meant that I could extend the facade across the board a little bit, hopefully making the scene a little more forgiving for photography. That was my hope any way.
I still had a bit of leftover polystyrene from the other half of the packaging, which I cut down at a reduced height and stuck to the front of the original pieces for a similar sort of effect as the three-tier styrofoam in the book. The smaller piece wasn’t quite long enough to cover the full 36″ of the two pieces, so I broke the second one in half and created a ‘crack’ in the wall which solved the reach issue as well as making for a nice visual feature.
One downside of this cheap polystyrene however was that it appeared to be manufactured of loads of little ‘ball’ shaped polystyrene pieces, rather than one solid block of the stuff. This did mean that my terrain piece was considerably more fragile than the one in the book, but it’s kind of hard to argue with ‘free’, really. That said, it did break apart in a really satisfying way, and the exposed ‘ball’ texture looked pretty convincing for natural erosion and damage. I used this to carve out a nice looking broken rock edge for the tops and sides, as well as carving out a number of craters in the cliff facing to create a more naturally eroded, ruined look to the surface. The entire thing was then covered in Vallejo Texture paint and primed black. This was followed up by the usual couple coats of grey drybrushing, some Nuln Oil washes where I got a bit too heavy handed, and then a light drybrushing all over of Khaki to make it a little less greyscale. As a final touch, I glued some some static grass for a ‘mossy’ effect, and called it done.

I did discover after finally sitting it upright again after completion that the texture paint on the front of the ruins made it very front heavy – and while the base was a good inch and a half or so thick, it wasn’t especially stable. This would be a problem if the facade decided to fall forwards on top of my painted metal miniatures mid-game, so I had a think about how to correct this. In the end, I decided to throw money at the problem – about 12 pence all in, to be precise. I stuck down some 2p coins behind the base of the wall section – one at the middle and one at each end – with a little wood glue and sticky tape. This added a bit of counter weight to the back and a lower centre of gravity, making the walls a little more resistant to tumbling over when knocked.
Next up was the Watchers Pool. I’m pleased to say that, once again, I managed to build this from pretty much whatever I had lying around the house. After getting the rough measurements for the pool (18″ by 12″), I went looking for an appropriate base – and found it in the form of leftover plasticard sheets that I had bought for basing my Moria terrain. I took three leftover sheets, and arranged them side by side. I then taped the undersides up nice and flush, then flipped the sheet and applied some plastic glue across the seems to properly join the three sheets together. At this point, I had my basic shape – I cut a wavy line around 3/4 of the edges (so that I could use it on either board edge) and took it outside to prime in black. Then it was time for painting.
To paint it, I covered it in several watered down coats of Tuquoise in broad sweeps, and applied a little Biel Tan Green Wash and Athonian Camoshade over the whole thing in various puddles, along with a little Guiliman Blue glaze to add a little blue back where it needed it. I tried not to overthink painting this too much, lest it look a little contrived. At this point, I took out an old brush and applied a nice and thick border of Vallejo Black Lava around all the edges, a couple mm high. After leaving this to dry for an hour or so, I came back and drybrushed it grey. The whole thing was taken outside and sprayed with Satin Varnish to seal everything down. Now the fun begins.
Knowing that the water is supposed to look eerily still, I didn’t want to slather a bunch of water texture over this one and call it a day – there was no way I could get the water looking that calm and still. Instead, I broke out my bottle of Vallejo Still Water that I’d had forever and squeezed it on. While I was there, I also put a few drops of Athonian Camoshade into the water effect and swirled it around for a more realistic looking finish.
Very quickly2, I realised why I stopped using Still Water effects. Aside from taking all night to dry, Still Water really shrinks. Like a lot. Come the next day, my mm tall coating of water effect had pretty much contracted to a layer of gloss varnish. Perturbed, but not dissuaded, I headed to Amazon for another bottle of Still Water. After arriving the next day, I squeezed the whole damn bottle over my lake this time, which contracted.. still a little more than I’d have liked, really, but enough that the whole experiment didn’t feel like a total waste anymore.
Lake done, time for the Watcher.

Not a great deal to say about this guy. I found him on eBay for around £20 delivered, he came with an absurd amount of tentacles (10, I believe in total) and a weird plaster cast Watcher head. I wasn’t going to paint that part in the end, thinking it was surplus to requirements, but it adds a little bit to the aesthetics of the scenario, I think. Any way, I didn’t spent too long on him or his tentacles – they were primed, painted Vallejo Sick Green with an Elfic Flesh underside, washed heavily with Athonian Camoshade and drybrushed with Heavy Khaki and Khaki, and that was pretty much them. For their bases, I smeared a thin coat of texture paint onto them, painted it the same colour as my lake and put a thick coat of Water Texture over the top, trying to create waves as if the tentacles had just emerged. The Watcher himself was given a similar treatment, and after a coat of Satin Varnish, I smeared some water texture around his edges also to simulate splashes to an OK end-result, I thought.
One small hint I’d like to touch on in the ‘construction of these things was that I ended up using spare Blood Bowl bases in the end to base the tentacles. I had originally tried using 25mm bases, but had a horrible time of it trying to get them to balance. The Blood Bowl bases however provided a little more stability in their 32mm size, whilst their little peg holes for the ball to fit into made for a perfect place to mount the little pins in the bottom of the tentacles. Sweet victory, onwards to Mordor! Next stop: Amon Hen.
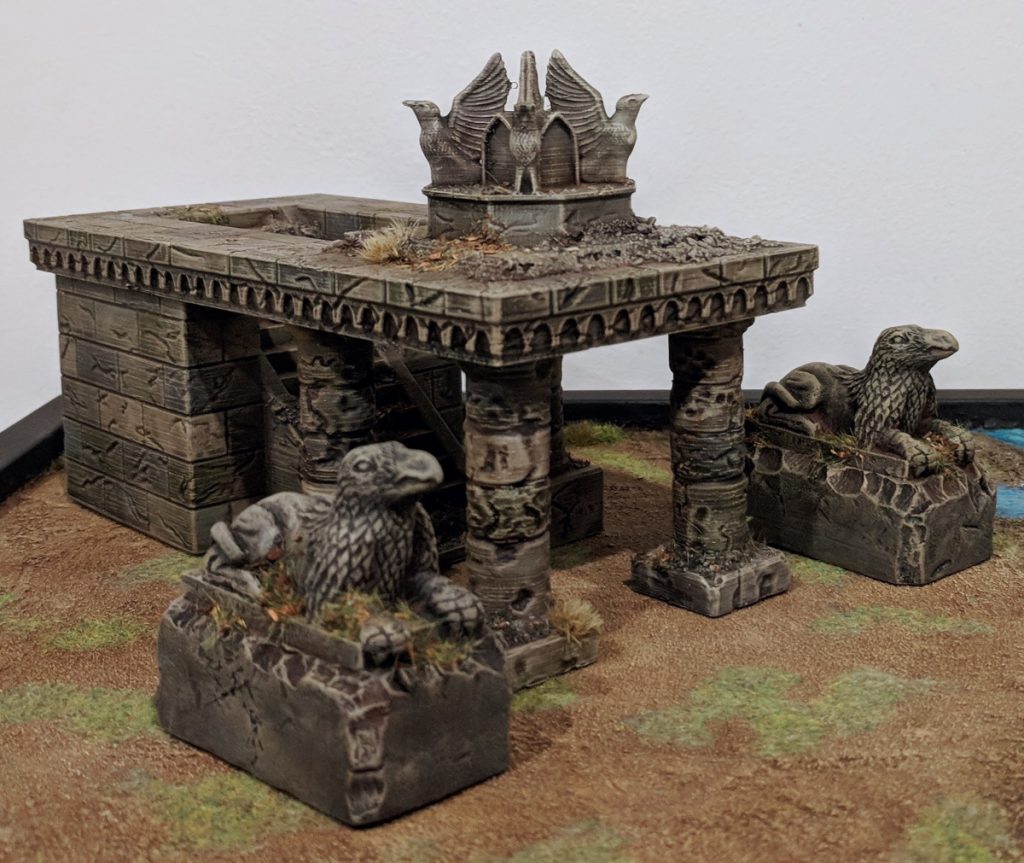
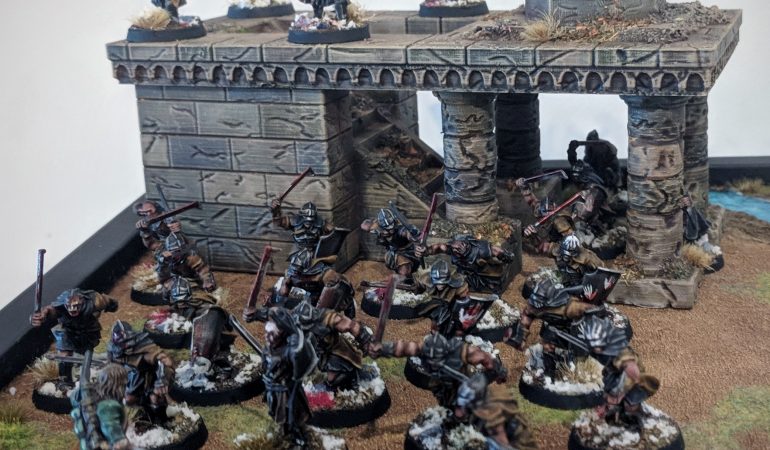
Like much of the journey across Eriador, much of the scenery for Amon Hen was taken care of already – a forest mat with an abundance of trees, hills, rocky outcrops and the like. This left me to concentrate on the ruins of Amon Hen itself.
For this, I had a few options. The standout was a beautiful resin cast piece from an Australian company called Zorpazorp, but logistics ultimately made things impractical – the item itself was pretty fairly priced for a sizeable resin-cast centrepiece with a couple of pieces of scatter, but international shipping from the other side of the planet was just a little too prohibitive. I started to look for other options.
Of course, I could scratch built it for peanuts – the Journey book even has a step by step guide for doing just that. But I had already had my fill of scratch building from the wall sections and the Watcher lake, so I kept on looking.
I found my great compromise in the form of a 3D printed ‘seeing stone ruins’ from a company called 3D Tabletop on Facebook, of all places. They have a number of 3D printable designs and pieces that they’ll print for you in good quality at an okayish price point. This wouldn’t include the little eagle statues at the foot of Amon Hen – for that, I went to a German site Thormarillion – but all in the terrain cost me around £40 – much more manageable than the £100-£120 I’d have spent at Zorpazorp.
The 3D printed Amon Hen was, all things considered, pretty good. If I had to level any criticisms against it, the stones on the main body were a little flat and contrived looking, and the overhanging section was completely smooth on the underside. As for print quality, there were visible striations but nothing particularly jarring. The whole model arrived to me largely clean of flash, with not too much to clean up really.
It came in a few parts. The main body with the steps, the overhanging panel, a number of little cylindrical stones for the pillars with a couple of ‘feet’ for the front pillars and another little panel with the four birds to glue on the top. Most of this went together pretty nicely, with very minimal gaps to fill – the largest of which was between the little bird statue’s base and the top of the podium. This was easily dealt with by gluing down a bit of sand and debris around the statue. I thought this looked pretty good, so I scattered a little more across the top, the pillars and the stairs to keep things looking consistent.
The Thormarillion statues didn’t actually come with their little box pillar things, and when I emailed the store, the guy told me that he just used styrene blocks and distressed them himself – he was kind enough to offer to throw a couple suitably sized blocks in my order free of charge, as well, which was really nice of him. Easy enough.
To paint, I went for my usual ‘ruins with brickwork’ approach – by painting all of the bricks individually in an assortment of different hues of grey, washing everything in Agrax Earthshade and drybrushing everything Khaki to bring it all together. I was a little apprehensive about how this would look on Middle-earth scenics while I was putting down the base layers, but it came together quite well in the end. The statues had the same process, although with just Heavy Bluegrey as a base colour.
For a final touch, after varnishing, I glued a whole bunch of forest scatter to the level areas in piles and a little moss along the walls and sides of things to make it look suitably abandoned and overgrown.
Now onto the most important part of the Amon Hen scenario – the miniatures themselves.
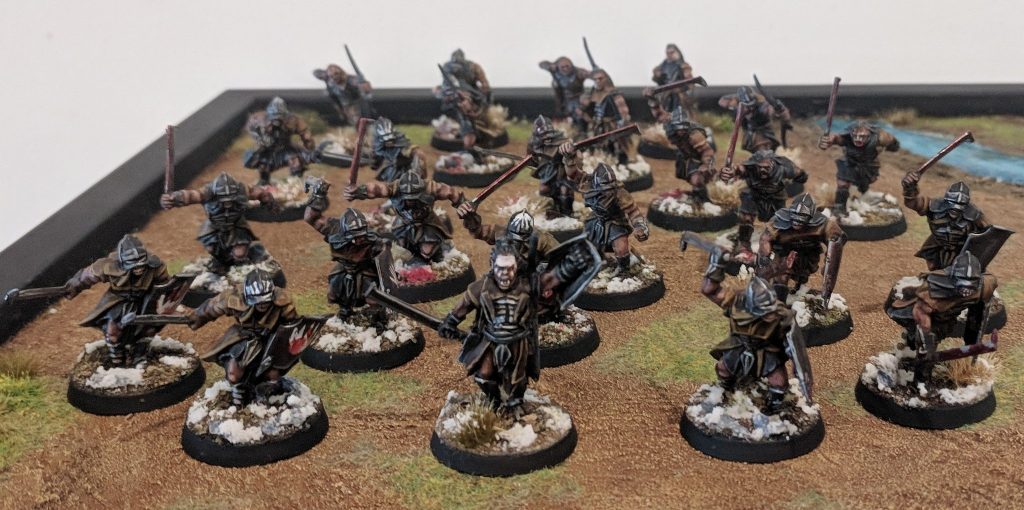
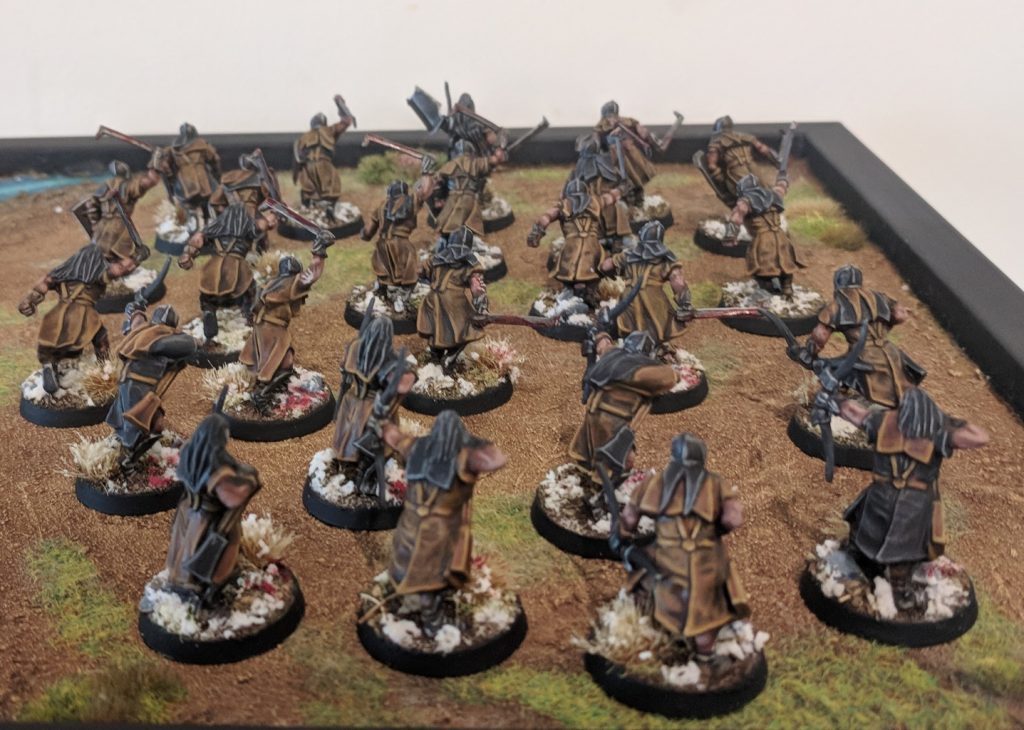
Once again, the ‘Good Guys’ in the scenario were basically just ‘The Fellowship’, meaning the only thing left to do was the fighting Uruk Hai. In the Fellowship, we’ve yet to be introduced to the Uruk Hai Siege Troops quite yet and so their main presence is the fast marching, leather-clad Uruk Hai Scouts led by the infamous Boromir-slaying Lurtz.
I wasn’t especially looking forward to this part. The scenario calls for Lurtz, an Uruk Hai Scout Captain and 24 Uruk Hai Scouts3, which – after having spent so long painting just 12 Iron Hills Dwarves recently – felt like an awful lot of painting.
And honestly, it was. I managed to rattle through all 24 of them in the space of a week or two, but it was utterly exhausting. There’s just something really mentally draining about repeating the same process over and over for so many individual models. You can, of course, cut a lot of corners. Miniatures like these – intended for using en masse and specifically for friendly/scenario play – don’t need to look perfect. And thanks in part to the older, less intricate sculpts, I did succeed in smashing out all 24 of these miniatures considerably faster than my 12 Iron Hills Dwarves – but not quite as quick as I had hoped. I’m sure everyone has their own opinion on what’s ‘tabletop acceptable’, but I found myself immensely unsatisfied with my ‘drybrushes only’ pass at these guys. It took another couple of evenings work before I eventually hit that sweet spot that looked ‘good enough for the table’ – and after all the extra work, I’m pretty chuffed with them now. So much so I’m now tortured as to whether or not I should abandon my current plans and just paint the rest of my Isenguard stuff that I have strewn about in 12 year old Citadel Figure Cases. Argh.
With that, I was finally finished, right? … Right?!
Weeeeeeeeeeeeeeeeeeeeeell.. just one more thing.
While it felt a little bit like cheating to cut the Hounds of Sauron and Lothlorien scenarios from the campaign, it felt justified in it’s own way as neither of these scenarios occur in the film adaptations. On the other hand, one scene – referenced in the novel and played out in the film – felt conspicuously absent from the campaign; the Wizard Battle between Gandalf the Grey and Saruman the White!
Putting a couple minis on the table and Sorcerous Blast’ing each other to death would’ve been boring though, so I looked out another old relic from my childhood – Battle Games in Middle-Earth, issue 12. Along with 6 horses that would form one half of 6 Riders of Rohan, the issue also contained a hex-grid board on it’s centerfold pages alongside rules for a mini-game to play out the Wizard Duel in the Tower of Orthanc.
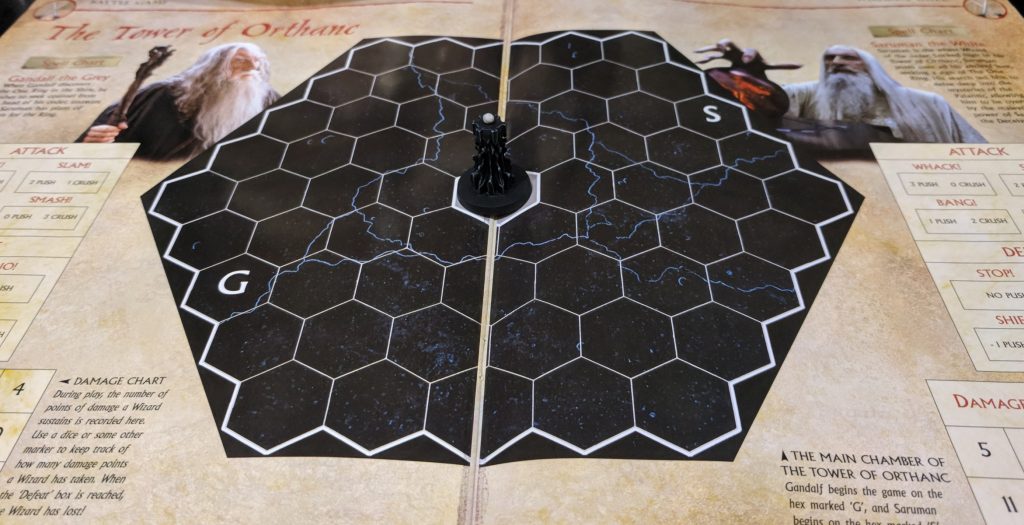
After putting together so much terrain and painting so many miniatures, it feels a little janky to consider playing out a game in the centrefold4 of a saddlestitched glossy magazine. I had originally hoped I could source an old copy of Wizard Duel – the limited release of this exact scenario complete with a proper card board – but alas, it proved harder to source than the One Ring itself. I did manage to pick up an old metal Palantir miniature from the Escape from Orthanc set on eBay though, which improves the look of the board ever so slightly.
And finally, that was that. The Fellowship of the Ring Narrative Campaign preparation has finally come to a close.
To recap, the process has seen me build and paint:
- 9 Ringwraiths on foot
- 9 Ringwraiths on horseback
- Gildor Inglorion
- 48″ of felt river
- The Bucklebury Ferry
- Weathertop
- The Palantir
- 36″ of cliff face
- The Watcher in the Water, 6 tentacles and a pool
- 45 Moria Goblins (albeit slightly overkill)
- Balrog of Morgoth
- 24″ of black felt chasm
- Amon Hen and two statues
- 24 Uruk Hai Scouts
- Lurtz
- Uglúk (as an Uruk Hai Scout Captain)
Whew! As if that wasn’t enough, that’s not even including the other bits and pieces that I did to make all of this work for Matched Play – including Goblin and Uruk Hai Captains, Bat Swarms and the various pieces of scatter terrain for playing Matched Play games set in Moria. There’s also some bits and pieces of prefabricated terrain – such as my Moria Pillars and the Bridge of Khazad Dum – which I purchased for the campaign.
It’s been a long slog over the 5 months I’ve been working on this project, and now I absolutely cannot wait to get started playing some scenarios with it all. I hope you’ve enjoyed reading about it half as much as I’ve documenting it.
Until next time – thanks for reading and happy wargaming!
1 Yes, they would have also been useful on paper for filling out Gildor’s warband on Noldorin Exiles. I’m extremely tempted to convert my own out of Mirkwood Rangers instead though – the miniatures are vastly superior.
2 Well, for some very loose definition of ‘very quickly’ maybe.
3 Well, there’s really a couple of different scenarios in the journey book to play out calling for various numbers. Wherever possible though, I prefer to use the most up-to-date scenario, so I’ll be replacing one of them with the one that appears in the Armies of LOTR book – which happens to call for 24 Uruk Scouts, Lurtz and a Scout Captain.
4 It’s not even the centrefold, which absolutely baffles and perplexes me to no end. Instead, it’s one page after the centrefold, making it not only slightly awkward to flatten correctly but also leading to an ugly page seam running down the centre of the board where the pages haven’t been folded perfectly. I’m very tempted to try and fix this myself with an X-Acto Knife, a ruler and some sticky tape, but I’m not even sure it’s worth the hassle.