Following a brief stint back in the grim darkness of the far future (with a little Blood Bowl squeezed in), it’s time for a return to Middle-earth. Today, I’m going to be talking about my Iron Hills.
I’d been contemplating picking up some Iron Hills Dwarves1 for several months before pulling the trigger back in March. The stars had finally aligned: I’d cleared a number of outstanding projects from my backlog, and – having just finished work on my Moria army project – spent a couple weeks just painting single character model projects. I felt refreshed and ready to tackle something bigger and altogether new. Enter: the Iron Hills.
Starting an new project is wonderful, infectious, intoxicating. It’s incredibly easy to lose your head when starting out with a new project. We’ve all been there – a couple hours in BattleScribe, and next thing you know your cart is full to the brim with brand new miniatures. That part is a lot of fun. Trouble is, before you know it a pile of plastic and resin turns up at your door. Suddenly, you realise that you actually have to do something with it.
Occasionally, you strike gold. You might fall absolutely in love with the project; the miniatures are exciting you, the rules are fascinating you, the hobby process is smooth and effortless. Sometimes, the hype for the project just keeps your motivation at a constant high and you blast through it at a steady rate. More often than not though, the hype fades as soon as you break the seal on the shrinkwrap and the amount of work you’ve just signed yourself up to hits home. Sometimes, something brand new is announced that absolutely steals your heart away. Sometimes, the colour scheme you wanted to paint your models just isn’t working. Maybe the rules turn out to be really boring. Heck, you may even find yourself “just not feeling it any more.”
It doesn’t really matter what the reason was, the end result is the same; you’re off the hype train. Now you’re stuck with a bunch of blisters, boxes and partially assembled miniatures that you just can’t bring yourself to care about any more. This is how a lot of people find themselves with more unpainted models than painted.
In an effort to practice the very restraint that I’m preaching here, I started small – with just 12 Iron Hills Spearmen and Dáin Ironfoot himself. It’s not quite a playable force, but enough to look good as a display piece or even an allied warband in a pinch. My other reason for keeping things minimal at this early stage was that I really didn’t want to rush through this particular project. Subjectively speaking2, my Rivendell and Angmar armies are still pretty fresh and exciting to play, and I’d like to give them a little longer in the spotlight before another army comes in. Without that self-imposed pressure to get something on the table quickly to play with, it felt like I could really give these awesome (and expensive) ForgeWorld sculpts the time and attention they deserved – and that’s a really refreshing sensation. To that end, I find that buying an army a unit or two at a time can help to minimise some of the self-imposed pressure to ‘clear the pipelines’, which often encourages me to rush on ahead.
Alright, alright, so what about the minis? Well, I’m glad you asked!
I decided to start with the Spearmen – better to mess up on the generic infantryman than the ForgeWorld Character Series model, right?
First things first, I had to pick a colour scheme. I knew I wanted something that wasn’t a million miles from the standard straight-from-the-films scheme, but still deviated a little bit in favour of richly saturated colour (as with my other Middle-earth Good armies) over muted realism.
The armour would have to be silver. To change this to a painted pastel colour or even another type of metallic (gold, bronze, copper, etc) would have been a bit much of a deviation from the films – they are the Iron Hills after all! Having painted a few thousand points of Iron Warriors, this wasn’t exactly uncharted territory. With my hands tied on the plate/chainmail, that left me with some decisions to make over their hair, trousers/belts/straps and their shield design. I considered my Rivendell Elves and how the bright, cold blue of their robes contrasted nicely against their warm golden armour, and decided that I wanted a similar effect with my Iron Hills.
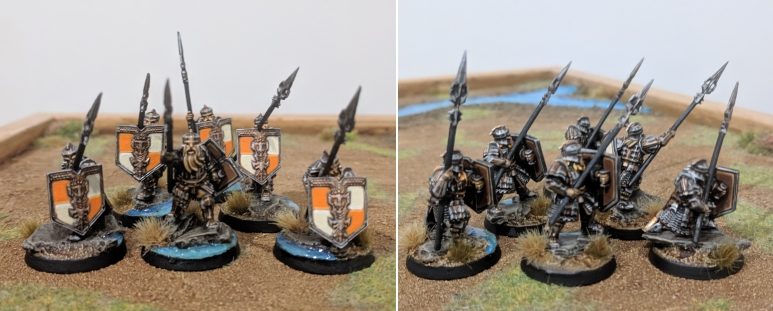
After some deliberation, I resolved to paint their armour in the factory-standard silver with gold accents and their undergarments with practical leathery brown tones. On their shields and other decorative features such as barding on the war goats however, I would take a more personal approach – a quartered pattern of bright orange and a warm off-white. I took pains to ensure the hair and beards on my Spearmen were as varied as possible – including red, blonde, light and dark brown and black hair – though I tried to limit how much dark brown and black there were as those particular colours didn’t quite pop as well as the others over the steel plate.
The final, universal consideration for this army was basing. Certain things were out of my hands – I universally base my Middle-earth armies with either a ‘Good’ or an ‘Evil’ theme – with the Good usually involving some warm, light brown earth and bright blue waters, and the Evil a muted brown with snow, dead plant-life and maybe some dark and dingy puddles. With that being said, this was a fancy army, and a fancy army demands a little extra effort.
For inspiration, I looked to the scenic basing on Dáin Ironfoot himself. Nothing too crazy, there’s some textured earth on there and some big stones, and maybe the odd stray helmet or weapon. I had a little look in my basing-bitz box and found a big bag of slate pieces that I bought some time ago (and, come to think of it, have barely used). I do rather like slate – particularly compared to the rather popular corkboard that I’ve seen a lot of people use – because aside from adding a satisfying and stabilizing weight to the bottom, it’s a really organic and natural looking material. Slate is worn and chipped and shaped in a very unique way that scales nicely with 25mm miniatures and doesn’t have that slightly contrived/man-made look that corkboard sometimes has. As it needs to be large enough to stand upon evenly, the slate itself takes up much of the 25mm base, leaving just a little room for extra texture and flourish. I was worried that this would pose an issue of consistency due to the predominance of grey stone, however the natural look of the stones coupled with a drybrush of Vallejo Khaki over the stone itself keeps the base feeling as warm and vibrant overall as the basing on my Rivendell Elves.
As a final touch, I decided to apply my signature water effect to the base of each and every Iron Hills rank and file and not just the cavalry and characters. When I made this decision, it was really just to get a little more ‘me’ into the army as the metallic-heavy scheme didn’t leave a whole lot of space for personalisation beyond the the orange/cream shields. This ultimately worked out in my favour, as the bright blue really pops against the sea of muted metals and warm oranges and browns. Bonus.
After churning out the full compliment of 12 Spearmen3, I turned my eyes to Dáin Ironfoot himself to reward myself for my patience.

First up was Dáin on foot. It made sense to me to tackle the non-mounted miniature first, as this would give me a chance to focus on painting the man (Dwarf?) himself in isolation4 – without his mount complicating matters.
Both The Battle of Five Armies and the example paint job on the ForgeWorld website portray him wearing a sort of red leather jerkin under his armour, which differs from the usual brown colour scheme on the cloth and shield designs of the rank and file. I swithered over whether or not to change this to better suit my own colour scheme before ultimately deciding against it – as the only proper named character in the Iron Hills list, I decided I wanted him marked out a little as an individual. Aside from that, one of the great things about the on-foot version of Dáin is that his helmet is on the base – meaning his full, braided locks are out on display. Fortunately for me, his hair and moustache are a bright orange and white respectively, which effortlessly ties him back into my armies colour scheme.
A few points about this model – the hammer was a massive pain in the arse. Trying to cleanly paint those itty bitty little red panels with a golden trim and centre point that was stark enough to look consistent but thin enough so as not to show up the red was extremely difficult, and I’d be really happy to never do that ever again.
I tried to put a little effort into the fur cloak and – using thin glazes and careful drybrushing – push the contrast by darkening the slumped areas while bringing up the raised bits. I think it worked out pretty good in person, but I don’t know how well it comes across in photography.
Finally, I thought the scenic base was a little drab, so I tried to cut away a section of it to apply my usual bright blue water effect, just to get a little more colour onto the miniature – I think that really improved the overall look.
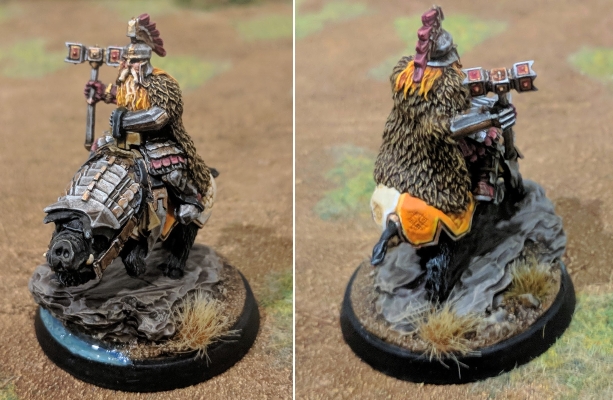
With infantry Dáin completed, it was time to move onto the cavalry version – starting with his war pig, Daisy.

A nice bonus of this project coming together slower than usual is that I’ve had a lot of time to read and re-read the rules before even putting half of this stuff together. One fateful Monday morning commute to work, it occurred to me to check and see if Dáin’s war pig mount had a courage value – as this meant that it might stick around should Dáin be slain or dismounted. It did, as a matter of fact, and so when I was putting the model together I made sure to magnetise the mount and it’s rider. As it turns out, this was quite handy – as it meant I could paint them both in sub assemblies where necessary. This helped a lot for keeping the pig free from metallic overspill and getting a proper paint job on the saddle.
I was considerably more divergent on the colour scheme of the pig; the big brown leather barding was a little bland for my tastes, so I applied my quartered orange and cream scheme here and saved the brown leather for the saddle and straps. As far as the pigs fur went, I opted for black fur with a light drybrush of black with a little off-white mixed in – I wanted him to look darker than the ForgeWorld version to help balance out the bright orange of my own scheme.
Much the same as with Dáin on foot, I cut away some of the rubble under the rock of the scenic base and filled that space with a little water feature as a final touch.
Not a lot to say about the mounted Dáin model himself – the paint job was largely the same as the foot version, albeit a little faster now that I knew what I was doing. I can’t say I really enjoyed painting the damn hammer a second time though, and this time the hammer was at a more awkward angle, to boot!
With Dáin and the first 12 Iron Hills Spearmen finished, it was time to move onto phase 2. Not wanting to burn myself out on the project, I took some time out and worked on ‘finishing off’ my Iron Warriors and Space Wolves legions for the Horus Heresy – all the while figuring out what I had planned to bring in my 500 points list.
When all was said and done, my primary motivation for this army was how cool the minis looked, so it followed that I absolutely had to get me some Goat Riders. As an expensive unit in an expensive army (both financially and in points), a little restraint was in order, so I opted for a single pack of 3. They’d also need some dismounts, so I picked up a 3-pack of Iron Hills Spearmen – as these are the only Warriors with war spear sculpts that had the option of assembly without a shield. I also knew I was going to have to get a Ballista (THE OL’ TURLY WHURLIES) and probably a Banner for the army as well, so threw a Command pack into my cart.
This left me with exactly 10 points to fill – the only thing cheap enough in the list being an extra Crewman for the Iron Hills Ballista. I sure as heck wasn’t going to buy another ballista for the sake of a single crew model, and so I went hunting for a suitable alternative. My eventual solution was found in a pack of Dwarves with Mattocks. These Dwarves ticked a few boxes – no special adornments, and no shields, either – just a two-handed axe.. hammer.. thing. My plan here was to take the least obviously fighting looking one and replace the head of the axe with some sort of repair tool like a spanner or something. Much cheaper than a second Ballista, and leaves me with a couple of spare Mattocks should I ever wind up needing to shave a couple of points somewhere.
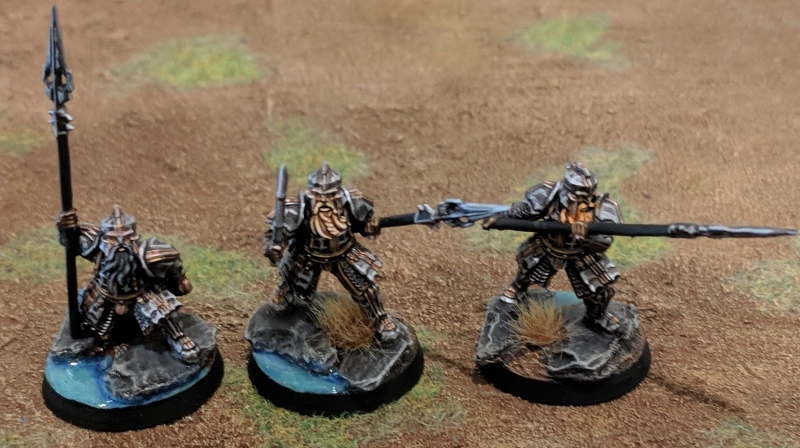
Soon enough, my models arrived and I got cracking on the home stretch. For the same reasons as Dáin before them, first up on the painting table were my Goat Rider dismounts.
I don’t really have a lot to say about painting these guys – the process was exactly the same as the standard Spearmen, except without having to paint any shields. This was a welcome reprieve, as building up all those layers of orange and cream was certainly up there with the most time consuming elements of my Spearmen.
One thing I will say for these models though is that the models themselves are noticeably higher quality than the standard 12-man Spearmen unit – whether this was the sculpt or just the cast though, I can’t say for sure. Maybe this was just a bonus for paying almost half the price of the 12 for only 3 of them, but in any case I really was blown away how crisp the detail looked. Beyond the depth of detail, the poses of these Warriors were exciting and dynamic – in my opinion, some of the best in the range. It’s almost a shame that they’re “just” dismounts for the Goat Riders.
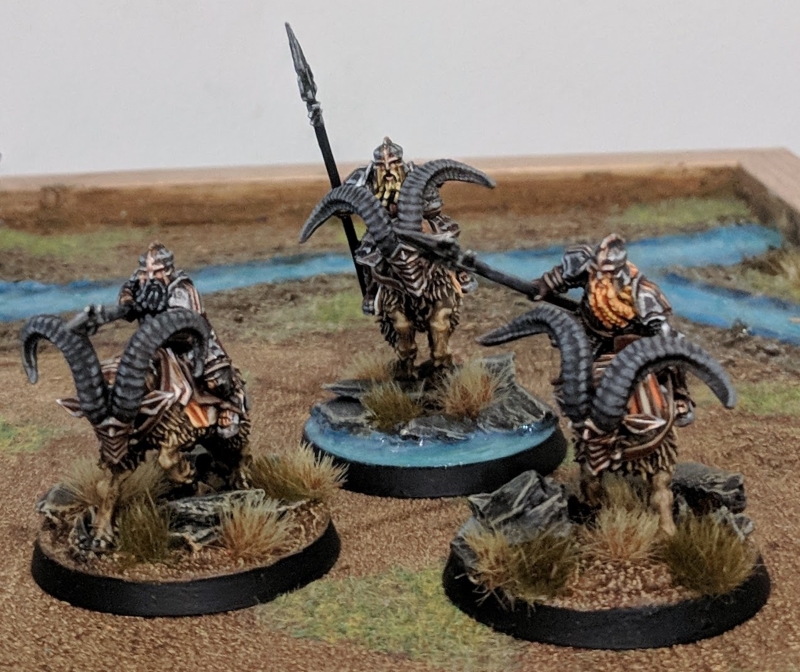
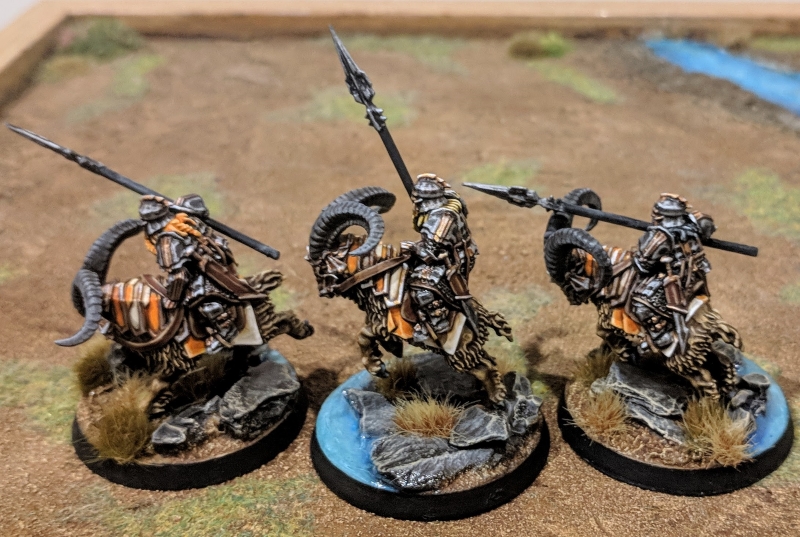
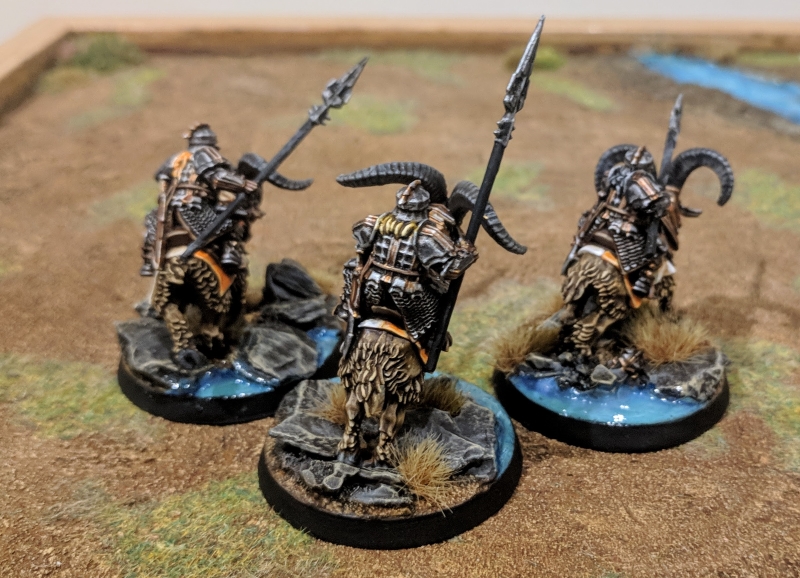
Next up were the Goat Riders themselves. With the dismounts done and dusted, I was really looking forward to cracking on with this unit. On paper they were a hobbyists dream – the models are beautifully sculpted and finely detailed, but not numerous enough become tedious5.
Honestly, I should have known better.
On paper, the Iron Hills army seems like it would be a pretty easy project. The army is not especially numerous, the models small without too much surface area to cover – and much of it could be covered by a quick blast with a can of Leadbelcher. Easy, right?
.. Right?
Unfortunately, the reality is that smaller really isn’t easier, or even faster. This would perhaps have been the case with some of the older Middle-earth sculpts – in particular the fairly flat and shallow plastics – but these are finely detailed ForgeWorld resin casts with some crazy tiny details. Whether it’s the ultra-delicate etchings on the gold bits of the plate mail or the teeny tiny little buckles on the leather straps that connect their plate mail together, you’ve got to be paying close attention or you’ll mess something up. And that’s just the base coats! Going further, the tiny surface area really limits the space you have to build contrast with your highlights – I personally found it incredibly hard to make the tiny details pop without the transitions looking way too jarring up close.
These Goat Riders were like the infantry models dialled up to 11.
There were some obvious challenges to painting these guys – the Dwarves were ultimately more of the same, only posed in such a way that some of their details would be harder to reach with a brush. That, I had anticipated. Nothing could have prepared me for the neck-armour though.
Of course, I probably could have gotten away with painting the neck armour a solid brass; a quick shade and a highlight with silver, no-one would’ve have ever thought twice. That would have been easy – but it didn’t sit right with me. Being that the Goat Riders didn’t come with a shield like the Iron Hills Spearmen did, the only element of colour (beyond the mush of metallics and browns) would have been the blanket under the saddle, which felt a little understated to me for such an impressive miniature. Instead, I decided to paint my alternating cream and orange scheme on the barding, which turned out to be a massive headache – getting opaque coverage without the paint getting too thick, as well as appropriately shading the recesses was immensely fiddly with two bright colours. But I managed, and I think the miniatures look all the better for it, which is what really matters.
Given that my colour scheme incorporated creams and oranges, I didn’t want to use the creamy colour scheme that ForgeWorld did, opting for a warm but bright brown with grey/brown horns and hooves. I based coated the fur with Vallejo Heavy Brown, drybrushing up several layers of Leather Brown mixed with increasingly more Elfic Flesh. Finally, I made a few light and deliberate strokes across the flat/untextured areas to give the impression of fur, before finishing off with a big all over wash of Seraphim Sepia. When the wash was dry, I went over the goats with a drybrush again to help pick out the extremities and tidied things up a bit with a small detail brush. The horns were pretty simple – Mechanicus Standard Grey, with an Agrax Earthshade wash, and a Mechanicus Standard Grey/Elfic Flesh blend drybrush – not a million miles off how I do the slate on the bases, come to think of it.
Everything else about the riders was pretty by the book – I even made sure to match the hair colours of the Riders to their dismounts, matching the hair/beards and types of sword scabbard as best as I could for pairing them, which I thought was a nice little touch.
Onto the home stretch now – just a Ballista and a Command Pack to go!
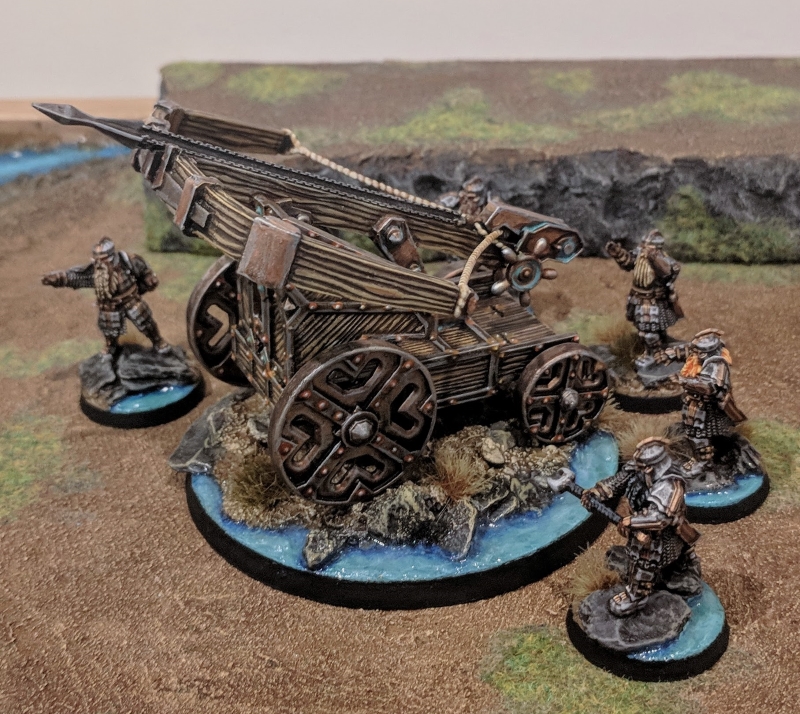
Ah, the infamous Iron Hills Ballista. This was a fun model to put together, but not especially fun to paint6. I had thought initially that a simple drybrush would likely suffice for the wood, but the depth of the grain wasn’t especially conducive to this. Despite my best efforts to drybrush it, it just wasn’t for happening. In the end, I just gave up and painted the entire thing by hand. And yeah, that was every bit as tedious as it sounds. Just when you think you’re making good progress, you’ll discover another panel you haven’t gotten onto yet – or another panel that’s really awkward to get a brush into. Of course, you can’t just paint one layer over a base coat either, or it looks a bit too much like you’ve hand painted some squiggly lines – no, you need a base, a wash and at least two layers of increasingly bright highlights to make it look anywhere approaching natural.
I do rather enjoy painting rivets though, so I took the opportunity to paint a little rust effect behind the nails/rivets in the metal trim, making sure to use a blue veridris on the copper and orange rust on the iron. I was a little exhausted by the model at this point, so I was a little sloppier than I’d have liked, but I think it worked out okay in the end.
The rope was pretty easy though. That was just Elfic Flesh and Seraphim Sepia. Good old rope. I also enjoyed doing the base, which I textured and painted separately from the model in order to properly highlight the underside of the Ballista itself. The base itself is an 80mm, and it doesn’t actually come with the kit – but is sort of essential for the whole ‘magnets under bases’ storage/transportation solution that I use. That, and it helps tie the engine in with the rest of the army.
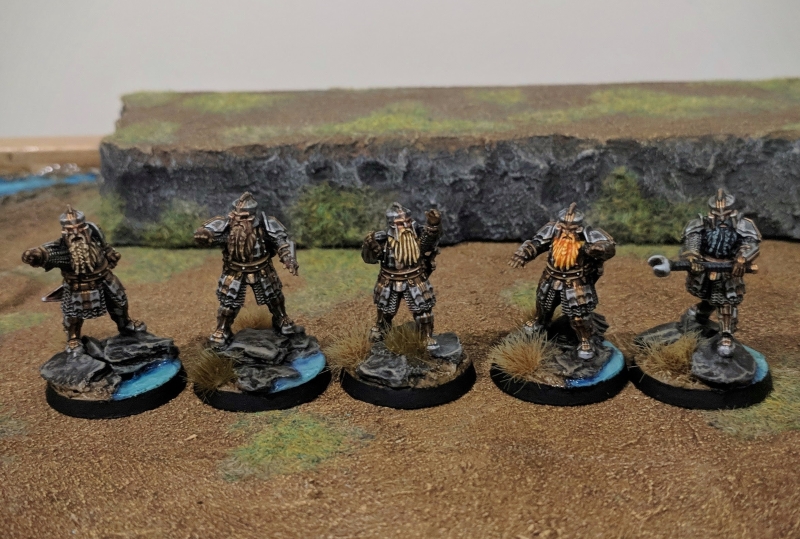
As for the Ballista crew.. yeeaaah, that was more of the same really. If anything, they were marginally easier to paint than the standard Spearmen in the army – not only were they missing the big shield with a wide expanse of two bright colours to labour over, but their open hand poses even made getting at their belts and fingers that much easier. I’d even say I really enjoyed painting these guys, if I weren’t sick of painting Iron Hills Dwarves by this point.
At very least they went quickly. I managed to smash these five out about as quickly as my first pair of prototype Spearmen, so that was pretty good.
I will say, I really laboured over the whether to base each of the crewmen individually or glue a pair of them into the engine itself – particularly given that the scenic base that I gave the Ballista itself already makes it take up a bit more space than it ought to. In the end, I settled on the more playable option and based them individually, as this meant I could take models off as casualties without needing any wound markers. I’m still not 100% sure I made the right decision here, but I figure that it’s trivial to pull a resin model off of a slate base, file the feet down and reglue them to the Balllista than it would be to remove them from the Ballista itself; that it saved me messing around with subassemblies was just the cream cheese7 frosting on the cake.
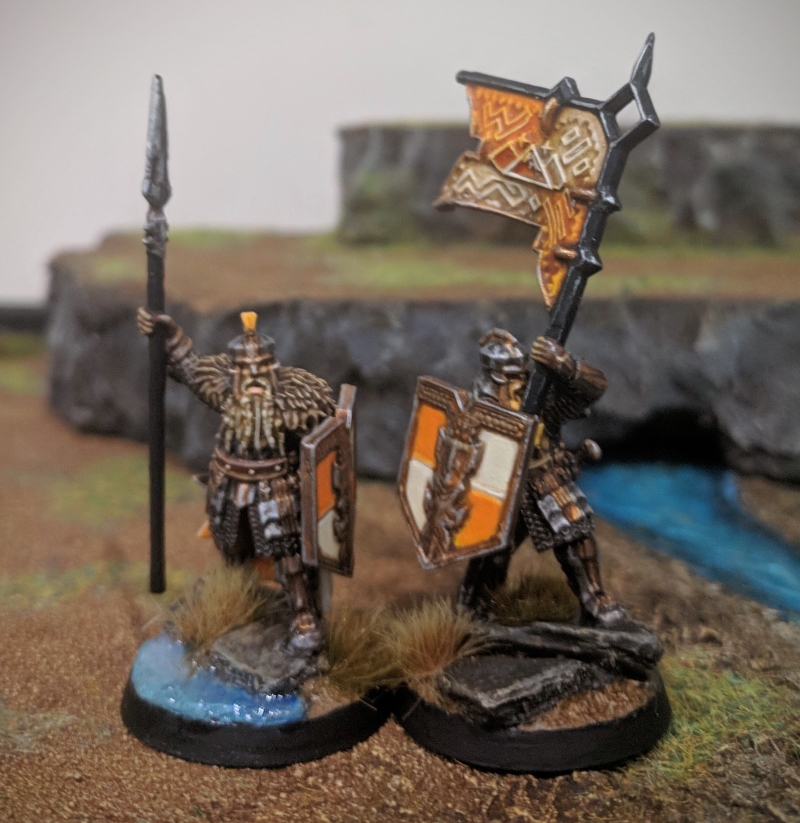
Here we go. The last8 of my Iron Hills – the Command Pack.
Well, I say ‘last’. Technically, I finished the banner somewhere between the Goat Riders, Ballista and the Ballista’s crew. And the Captain was already basecoated before I started the Ballista. A little technique I use to keep myself motivated is that when I absolutely cannot face doing whatever it is that I’m working on, I’ll start working on something else that’s maybe a little more menial. Changing gears like this, I’m at least continuing to make progress instead of outright procrastinating. Sooner or later, I’ll pick up my momentum again and I’ll go back to finish off whatever it was I took a break from. In this particular case, it was laying and edge highlighting my Goats – I just couldn’t face it one evening, so I instead threw some base coats on my Captain and Banner minis and gave them a wash before returning to the Goat Riders.
Come to think of it, I also went on to build, basecoat and wash both the Ballista and 3/5 of the crew before I finished off the Goat Riders. Have I mentioned how much I hated painting those Goat Riders?
Having already completed the basing, base coat and wash stages on my Banner and Captain, they took an evening a piece to completely finish off.
The Banner I got done somewhere between the Ballista and the Crew. The main body of the miniature was business as usual, but the flag was.. something else. Richly textured, with plenty of chunky detail ripe for drybrushing, I sort of assumed that the standard itself would be a piece of cake. Once again, how wrong was I.
I can’t really fault the miniature itself this time. The fault here lies squarely with my choice of colour scheme. Ivory and orange are just.. not the easiest colours to paint, at least in my experience. This is exacerbated by when you decide to paint them together in a quartered pattern, and worse yet when you have used them as flat colours on your shields; finding the right amount of shading such that the flag does not look flat, yet not so much that it ceases to look orange and ivory is hard. Very hard. So hard, in fact, that I probably spent as long painting the damn standard as I did painting every other part of the miniature. I’m reasonably pleased with the final outcome, but I wouldn’t say I’m delighted – the cream, especially, looks a little too dark and a little too brown for my tastes. You live, you learn.
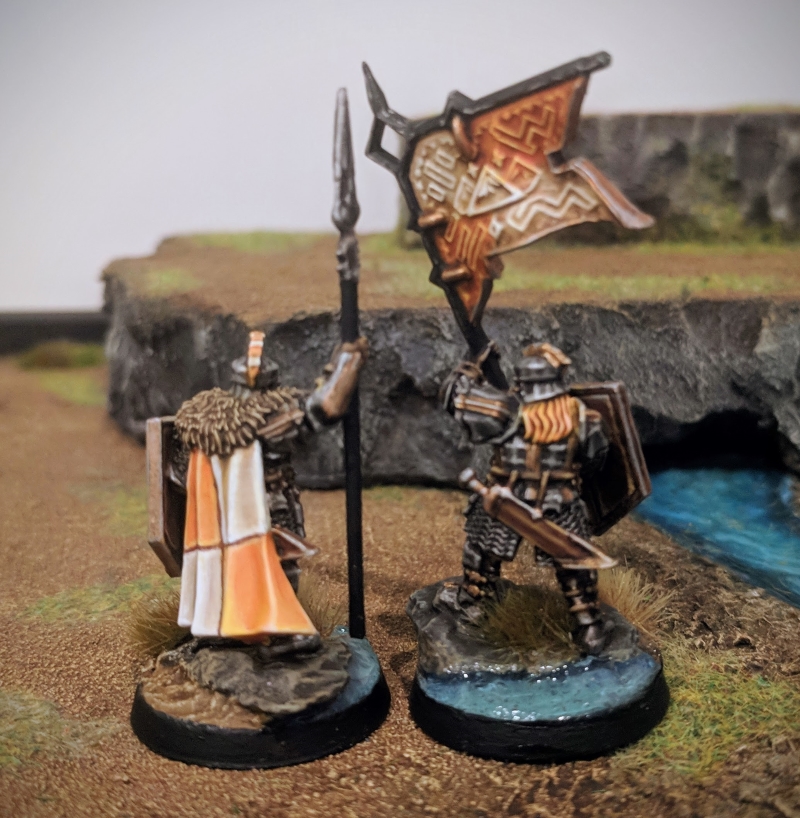
The Captain was a little bit easier, maybe due to the experience of painting the flag or perhaps simply because his cloak was a slightly less challenging surface to paint. Nevertheless, once again, I spent about as long painting the damn blends on his quartered cloak as I did painting the armour, fur and face put together. I’m considerably happier with the final result though – and I’m absolutely thrilled to say that marks the very last8 of my Iron Hills.
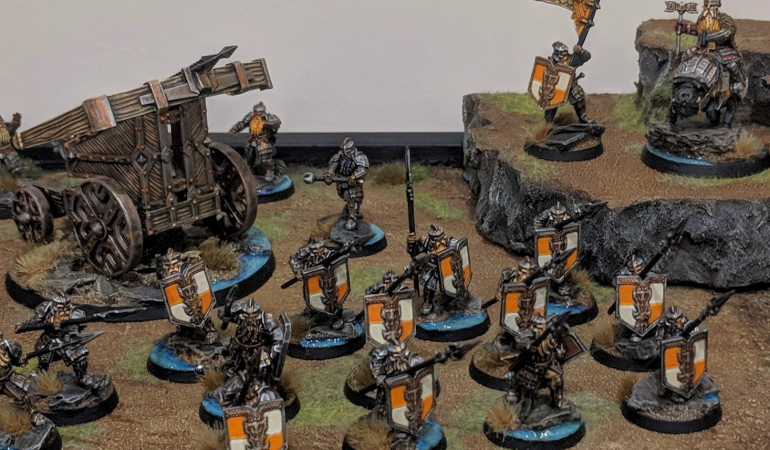
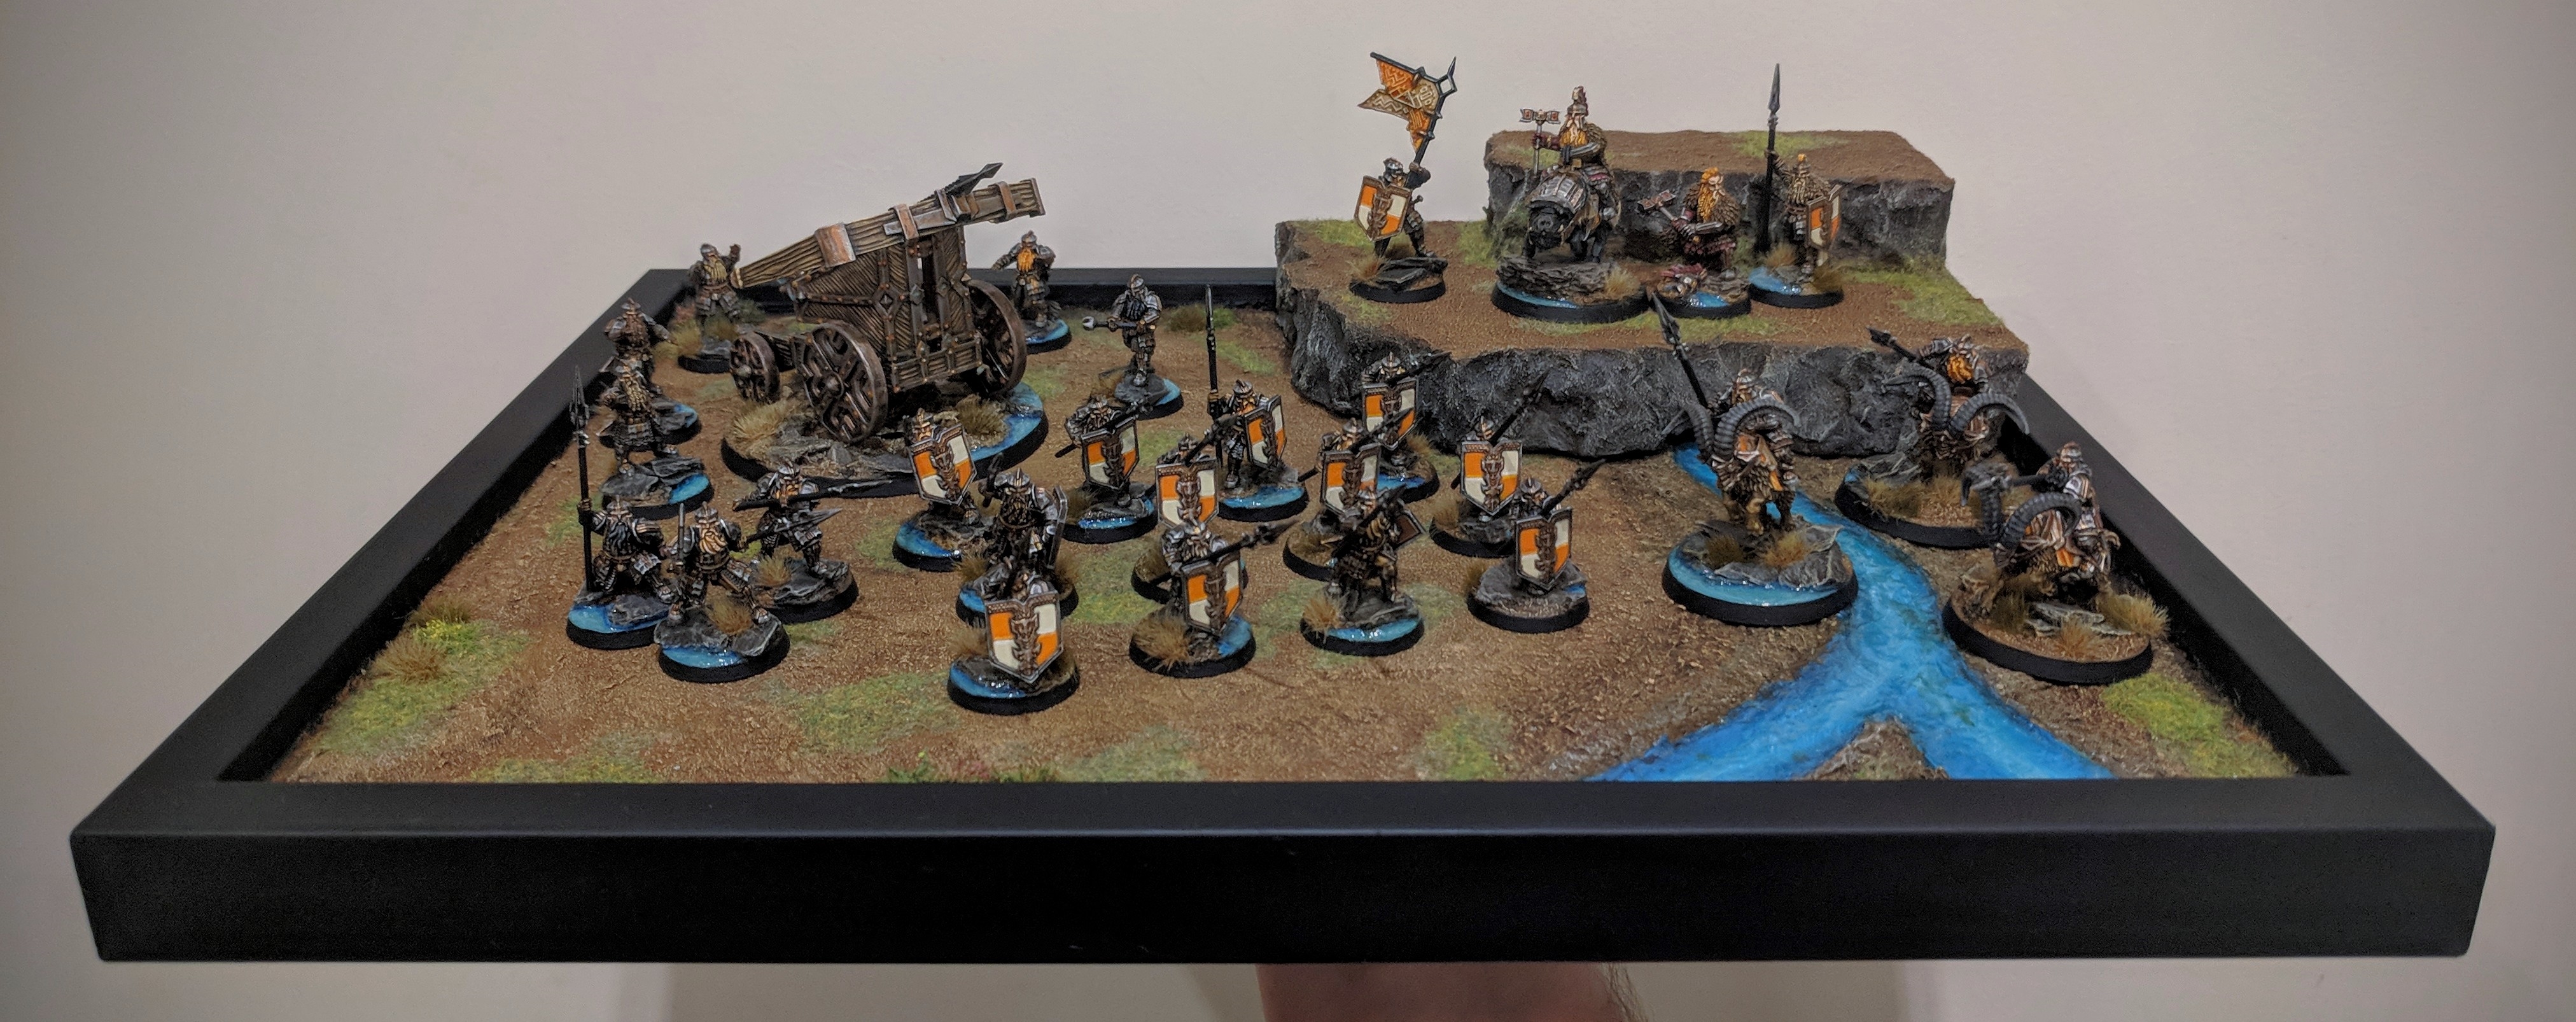
And what better way to finish up here than with a nice group shot?
Well, that’s about it for now. What’s next? Well, for starters I’d like to return to making preparations for my Fellowship of the Ring Narrative Campaign – I’ve got some Watcher in the Water tentacles to get painting for the Doors of Durin, as well as some used-but-serviceable Uruk Hai Scouts that I picked up for cheap on eBay that I’d like to do some renovations on. Alternatively, I might prepare for October and add a couple of Beasts of Nurgle to my Maggotkin Army (which rumour has it may be getting a second life as the foundations for an new Death Guard/Daemons of the Ruinstorm Heresy army – watch this space).
Until then, thanks for reading, and happy wargaming!
1 In particular, I’d been thinking for some time that I’d like an army for each Men, Elves and Dwarves. It’s been something of a toss-up between the Army of Thror and Iron Hills for the Dwarves.
2 That is to say, suppressing my inner rabid collector geek that always wants MORE, MORE, MOOOOOORE…
3 This was something of a slog. Edge highlighting all that metal is extremely tedious, and there’s a lot of really fine detail that you have to be especially careful not to completely blot out with your paint. Getting highlights on the individual fingers, and those tiny buckles on the leather straps is something of a challenge. I did them in four batches of three, and frankly, was pretty sick of the sight of them by the time I finished.
4 Of course the real reason is that I always prefer to paint the dismounts for any given Middle-earth miniature first is that you can field a dismounted miniature on the tabletop. With a mounted one, if your mount gets shot or you want to dismount for any reason, you’re totally scuppered – but a hero on foot is a nice, standalone ‘finished’ model. It doesn’t matter that there’s absolutely no way that I’d be fielding this model without it’s mount any time soon; logic like that does not apply here. I think I just prefer to feel like I’ve ‘finished’ a hero and then I’ve ‘finished’ an event better hero rather than ‘finishing’ the mounted hero and then feeling obliged to paint the dismount. Does that make sense? No? Oh, okay.
5 COUGH, RIVENDELL KNIGHTS, COUGH
6 Sensing a pattern here…
7 Icing sucks, and you know it.
8 I mean ‘last’ in this sense as the ‘last’ of the miniatures I needed for my 500 points army. I began this project on the understanding that it would be a small, no pressure project without ballooning out of control – as these things so often do. I do have tentative plans to expand this out to 800 points in the future by adding 6 Crossbowmen and an Iron Hills Chariot, but honestly, I can’t bare painting any more of these in the short term. I don’t even want to think about it.
Amazing article to read, thanks a lot for posting this! Have my first iron hills models arriving in the coming days and this has been very inspirational. One thing that stuck with me the last days was the blue water effect, would you care to share the secret recipe for that? 🙂 best wishes from Belgium
Hi there! Sorry for the incredibly late response here, but the water effect is:
Nihilakh Oxide for the majority. Then a little bit of watered down blue ink in the recess towards the shore. I used Guilliman Blue Citadel Glaze, which is long out of production but you can replace this with any kind of deep blue, Vallejo Blue Ink, contrast paint or whatever. Once all of that’s dry, a little bit of Vallejo Water Effects gel goes on over the top. It’s the stuff that comes in a big jar of white gel.
Simple as that! Hopefully this helps. Cheers.