
Every now and then someone will tell you something that you just can’t unhear, no matter how much you want to.
On this particular occasion, I was having Games Workshop’s Azog miniature ruined for me. By all accounts, both the foot and mounted versions are nice looking sculpts. The White Warg looks dynamic and well proportioned (unlike Bolg’s longboi Fell Warg) while Azog himself looks suitably menacing, his visage entirely recognisable from film. You know, I might even go a step further and call him remarkably underpy.
So, what’s the issue?
Well, there’s the small matter of that optional ‘heavy armour’ on his profile. As an elite, high point Hero of Legend with very little in the way of Fate, there’s absolutely no reason why you wouldn’t fork out the extra 10 points to give him that extra couple points of Defence. The only problem here is that Games Workshop’s Azog is about as armoured as a cardboard box. Other than a pair of metal boots and a wrap of leather around his waist that barely amounts to more than a massive belt, he’s pretty much naked. Heck, I wouldn’t even go as far as to call that ‘Armour’ let alone ‘Heavy Armour’.
For a while, you could probably get away with equipping the heavy armour on the basis that there really wasn’t actually any other miniature available for Azog. That is, until ForgeWorld released Thorin Oakenshield & Azog, a mini (remember these are 25mm bases on there – it’s really quite small) diorama piece depicting Thorin and Azog’s final duel on the ice during the Battle of Five Armies.
When this model was originally released, I didn’t really think very much of it. Well, that’s not entirely true, I suppose “Oh look, another Thorin sculpt” might have crossed my mind as I dismissed it entirely. Several months passed and I found myself discussing Azog’s Legion with a fellow hobbyist – they were planning a Legion army of their own, but were putting it on the backburner for the moment due to the expense of the project.
This wasn’t too much of a surprise, to be honest. While the Middle-earth SBG is largely one of Games Workshops more affordable systems – largely due to the comparatively low model count – Azog’s Legion is up there with Iron Hills as one of the most expensive of armies to collect. Despite being a relatively elite and compact army in an already low model count system, the expense of collecting Azog’s Legion can mount up quickly. Miniatures from The Hobbit series are generally more expensive than equivalent miniatures from Lord of the Rings1, and Azog’s Legion is no exception to this. Worse yet, the basic Troops of the army are only available in much pricier Finecast (Azog’s Hunters being the only Evil Hobbit miniatures produced in more affordable plastic) while the rest of the range is only available through our good friends at ForgeWorld.
What did surprise me was that he wasn’t talking about any of that, he was talking about Azog. He was talking about how he’d feel bad ‘proxying’ an unarmoured model for an armoured one, and how you’d have to get two sets of the Azog vs Thorin kit and the Azog foot and mounted kit just to make an armoured foot and mounted. The costs – in both time and money – begin to add up on what should be about the only points-per-pound efficient model in the whole army.
And just like that, I couldn’t unsee it. Azog was naked. Model ruined.
On the other hand, he was as of yet unassembled. You can probably guess where I’m going with this – this was just the right kind of crazy for my tastes. A quick trip to ForgeWorld.co.uk later and I had everything I needed right in front of me in less than 48 hours.
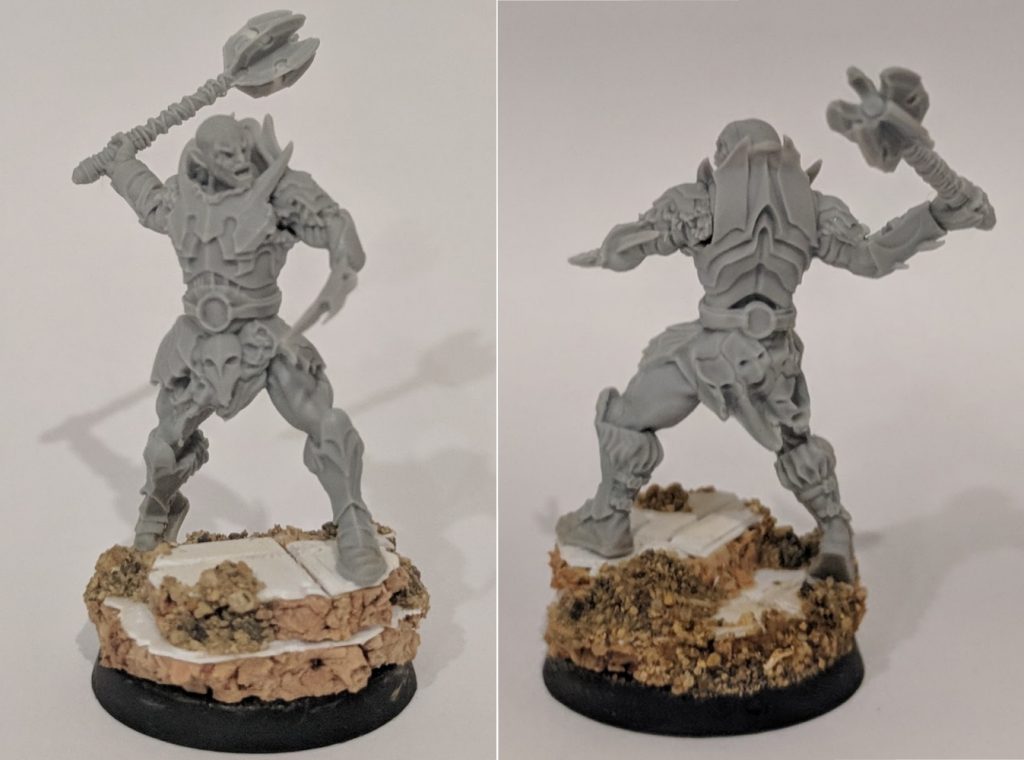
I had three real options for making this conversion work, as far as I could see. The first two would involve sawing Azog off at the waist and replacing the top half with the armoured version – this would leave two ways to deal with the legs – I could either try my best to file down and resculpt my new mounted armoured Azog’s fancy armoured boots and faulds out of green stuff in an effort to match the on foot model, or I could simply apply the exact same conversion to the on-foot model as well. This would give me a somewhat unique looking Azog that would be a less faithful to the film, but ultimately still an armoured Azog – his boots were the only armoured part of the original miniature, after all. My remaining option would be to cut Azog off the White Warg and replace the entire model with the ForgeWorld one.
Each approach had their merits and their pitfalls. The first approach was pretty much immediately ruled out. Despite having some reasonable success recently with my Treebeard extension, sculpting ornate sheets of smooth metal armour was way out of my green stuff comfort zone, and I really didn’t feel up to what pretty much amounted to learning a brand new skill on a very expensive conversion. I wrestled with the second approach for a good while longer – producing a unique dismount miniature for Azog could even be argued as a ‘feature’ rather than a pitfall, after all. It seemed a little too easy though – and once again, reminding myself how much this conversion was going to end up costing me in time and money, I felt I owed it to myself to try and do it right. And so it was that I decided on option three – the complete model replacement!
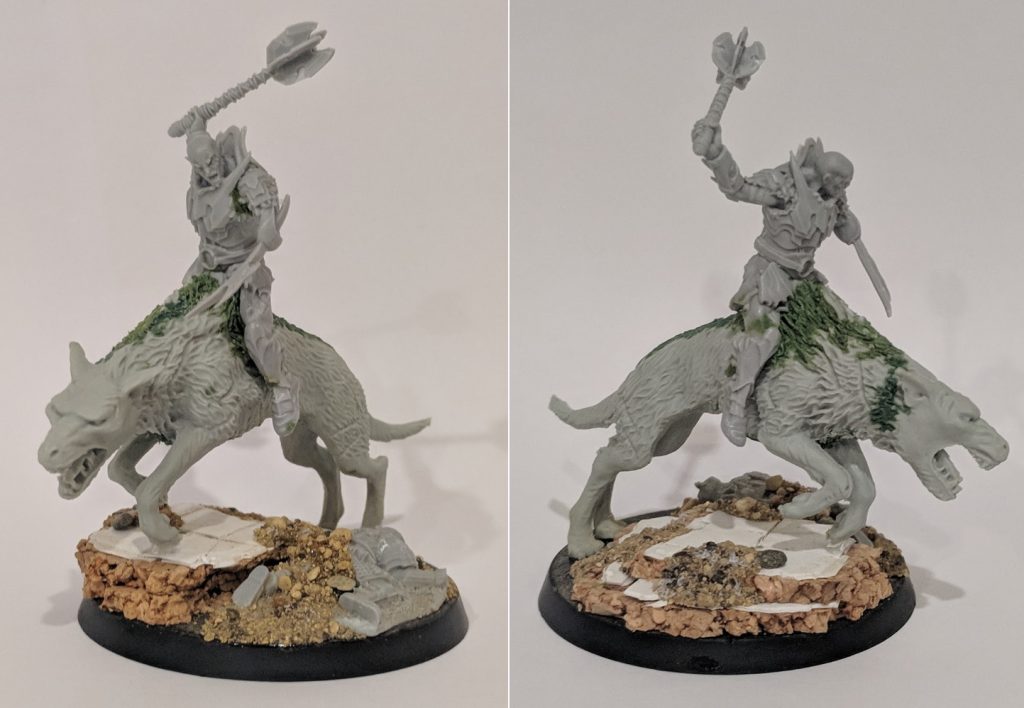
Taking full advantage of the fact that my Azog was still completely unassembled, I went about clipping his legs off the White Warg. This was a little easier thanks to his faithful albino mount being split in two halves, giving me good purchase with the clippers. I managed to get the legs off fairly cleanly, and sliced away at the remaining resin until it was just about flush with the rest of the fur. At this point, I glued both halves together to give myself a complete Warg.
Next up, it was time to get Azog on the White Warg itself. To do this, I clipped the resin gates off of my armoured Azog off, cleaned up the mould lines and assembled him as normal, sans his weapon hand. Gluing the mace on at this stage wouldn’t have helped in any way for fitting Azog on the Warg – and given I was likely to be manhandling the miniature a lot at this stage, it only would’ve gotten in the way and been a snap risk. When this was finished, I had an initial dry fit of the legs over the Warg just to see how much work would actually be required.
The initial fit was… better than expected, actually. Predictably, things were a little too tight as you approach the crotch, and so the both the top end of the Warg and Azog’s inner thighs would need shaving down a little bit so as to fit. Once this was carved down and Azog could sit flush on the Wargs back, I started to look at repositioning his legs.
Although a little fiddley, this wasn’t really all that hard to get right. Since I had to clip away the unarmoured Azog from the Warg, the smooth surface from where the legs used to be made for great guide lines as to where his legs should sit. Additionally, being a resin miniature, it meant that I wasn’t limited to just hacking away at the joints – I could heat it up and bend the legs into place.
This was a larger, thicker piece of resin that needed bending in a more extreme fashion than I was used to – my prior experiences limited to straightening swords, axe hilts and flattening large armour panels – and for the first time I actually found the boiling water method2 to be a little inadequate. In the end, I grabbed my partners hairdryer and used that to heat up the model on the table for long enough that the legs became flexible. I also found that the resin started slowly reforming into it’s original shape as it cooled, presumably because I was stretching the extremities so much. To resolve this, I made another cup of ice water to cool it faster so that it had less time to slowly return to it’s original shape – in doing this, small fractures did appear on the knees and back of the hips where I was bending the miniature. This was a little unnerving at first, but nothing that couldn’t be solved with a bit of green stuff – after all, I wouldn’t have thought twice about having to fill areas if I was cutting up the leg to repose him.
In short, the thighs needed raised and the knees a little more bent. Both the feet needed pointing downwards slightly. Additionally, the back foot needed straightening as this was originally sculpted as if he was standing on his toes. I also tried to make him leaning forward a little like the original Azog on White Warg miniature. After I was completely happy with the legs, I glued him down with super glue.
With Azog now on the White Warg, I just needed to clean everything up again – there were some gaps between the legs and the fur that wanted filling, as well as some smooth areas where the previous legs were cut away still visible. Finally, there were some gaps from regular assembly that needed filling – particularly where the two halves of the Warg’s body met across the centre of his body. This was a pretty typical job – smoosh some green stuff down, and start dragging tiny little lines, following the grain of the rest of the fur where possible. Remove excess green stuff and repeat until the gaps are filled the the putty blends well with the miniature’s fur detail.
With that, the scary part of the miniature was completed. All that was left was the base.
For the basing, I had three objectives:
- Continue to be consistent with the rest of my Middle-earth ‘Evil’ miniatures. This meant dark water features, green leaf litter, low-contrast brown mud and Valhallan Blizzard snow.
- Maintain consistency with the rest of my Azog’s Legion miniatures. A lot of these, I managed to get second hand in various stages of assembly – some of which are already based. Normally, I’d just rip the minis off and redo the base myself, but the method was actually pretty cool. Layers of corkboard with plasticard stone slabs that give a ‘ruins of Dol Guldur’ kind of look. It’s a departure from my usual style, but one I could still make consistent despite the extra visual feature – a little like how I made heavy use of slate on my Iron Hills.
- Make it look a little special. Azog’s got a nice big base (by Middle-earth standards) and he’s a big impressive character with a big expensive conversion – he deserves a little something extra.
I had a rummage through my bits collection, and was inspired by a dead Iron Hills Dwarf left over from the Gundabad Ogres kit. I had a mental image of Azog bounding across a ruined battlefield on the White Warg, leaving behind a dead Dwarf face down in the mire, bloodied Mace in hand.
That was the idea, anyway. I glued the dead Dwarf as close to the edge of the base as I could and built a short stairway of cork, each step topped with two layers of 0.5mm plasticard glued down with 4 small blobs of CA glue and then cut at with a craft knife to create the stone slabs. The reason for using two layers of 0.5mm plasticard instead of one thicker layer is that uneven cuts will produce a slightly more interesting and 3D edge – not unlike the striations of slate. When I was happy with the layout and how well Azog would fit over it, I filled in some of the gaps with a little sand and gravel glued down with CA glue, and textured the rest of the base that the water effect would cover.
For the dismount, I used the same basic process, though without any space for water effect – there’s only so much you can fit on a 25mm base, after all.
My conversion was now completely finished, and it was time to begin painting.
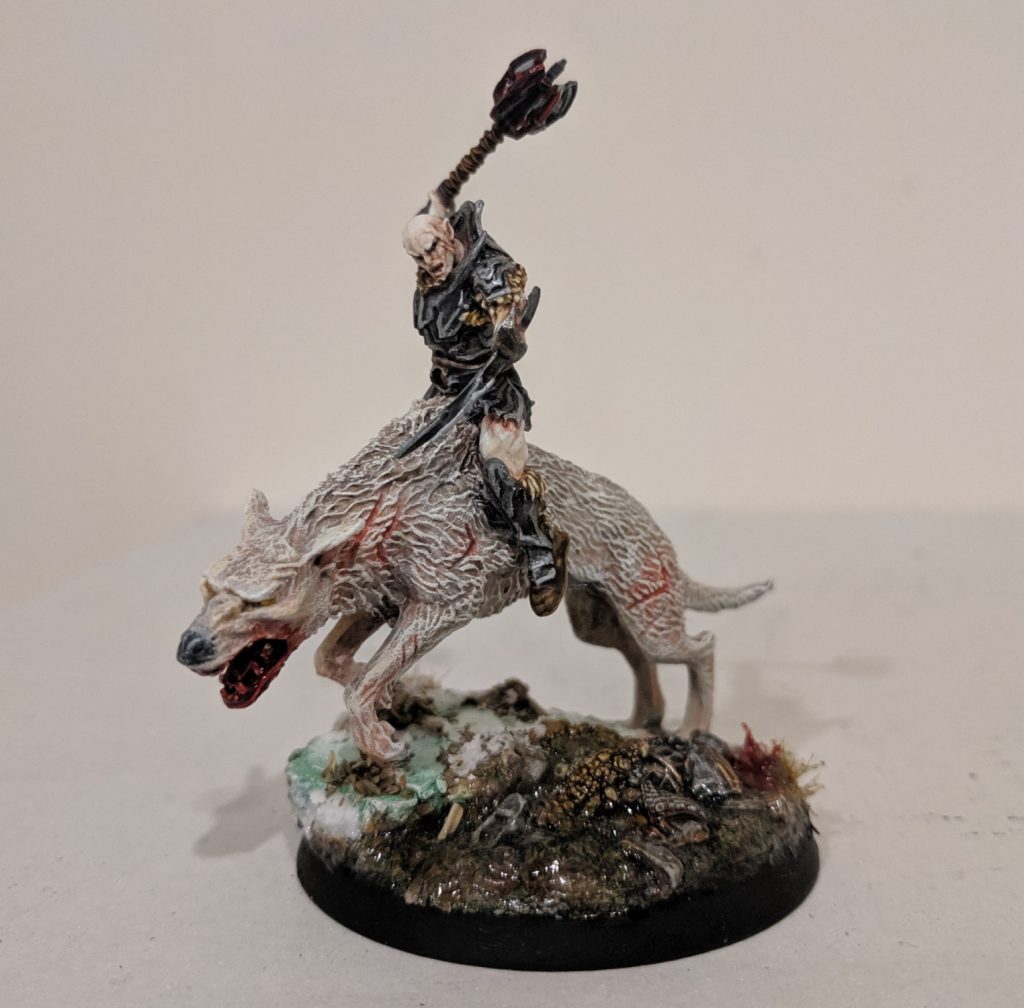
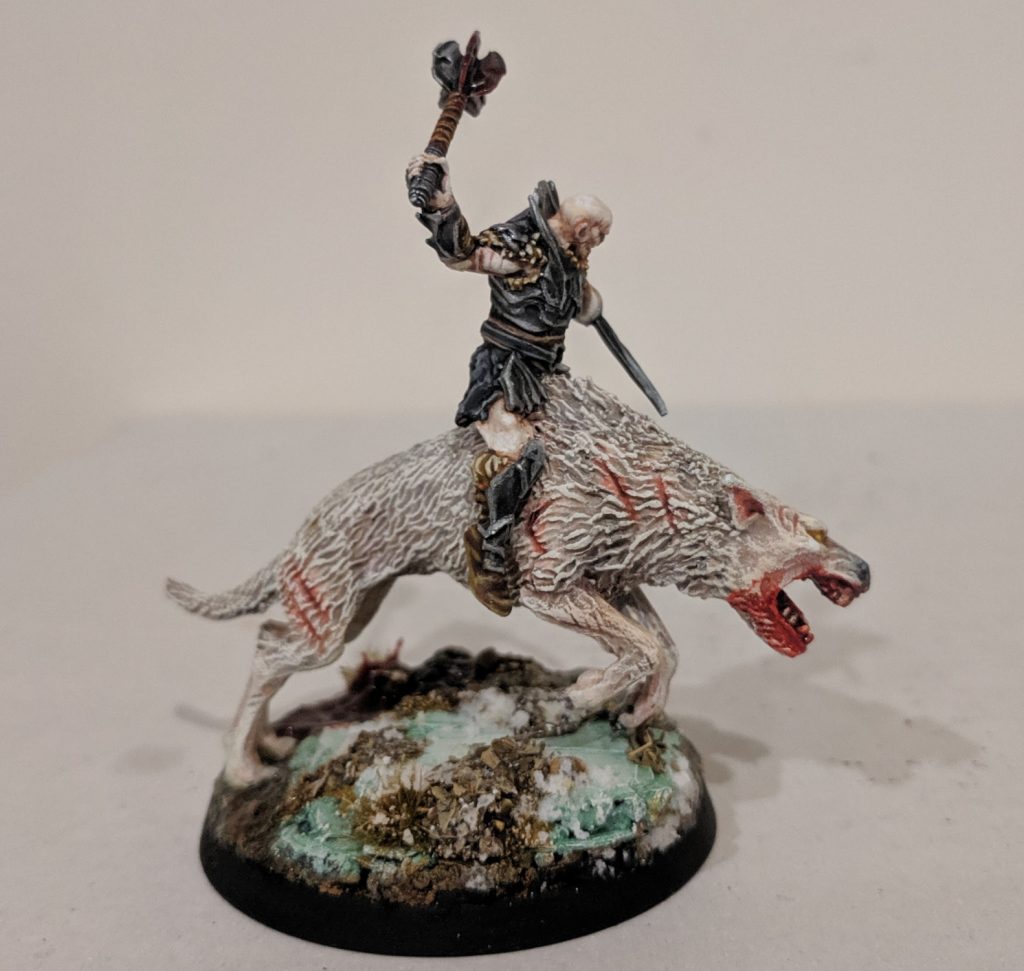
Believe it or not, the vast majority of time spent painting this miniature was on the damn Warg. Try as I might, I just couldn’t get the right tone of white – getting the right balance subtle pink undertones, brownish grey shading and white highlights without looking too bright or too creamy. I must have painted, washed, drybrushed, glazed, washed, drybrushed and glazed about 20 times before I decided to call it a day. I think you can sort of see some of that in the final result – it’s a little ‘chalkier’ than I would’ve liked, but… ehhh.. it could be worse. I’m reasonably pleased with how it turned out, and I learned a good few lessons in the process. After picking out the mouth and claws, I carefully put a little Bloodletter Glaze into the scars onto the Warg and he was complete.
Azog himself was a piece of cake, or at least his skin was – after all the practice on the Warg itself, his few exposed areas of flesh were pretty simple to glaze, layer and highlight. I largely achieved this coming from a white basecoat, glazed with Reikalnd Fleshshade diluted just a little with Bloodletter Glaze and Lahmian Medium. Afterwards, this was layered up with Vallejo Game Elfic Flesh and White. For his scars, I just put a very thin, slightly thinned Bloodletter Glaze into the recesses of his skin to tint it a little more pink.
The armour was a little more annoying. Being such a small and finely detailed miniature, there was a lot of fine detail to try and find a balance of subtley vs contrast. The biggest offender here was the fur undersuit poking out from the edges of his armour. That all being said, the relatively small size of the miniature was probably the single biggest issue here as the rest was just.. metal armour and leather boots, really. I wanted to really accentuate the the menacing sharp edges on the armour, so after basecoating it with AP Plate Mail, I gave the whole thing a wash with Basllicanum Grey Contrast paint so as to really darken the whole thing down. Afterwards, I highlighted all the edges with AP Chainmail Silver, and applied a recess wash of Nuln Oil anywhere my clumsy fingers highlighted a little too broadly.
The metals on the mace and prosthetic sword arm were handled in the exact same way as the plate metals, which left only really the leathers and furs to do on the model itself.
Azog’s under armour furs were a bit of a pain to paint – normally, there’d be a drybrushing component to these, but they were really way too small for that. Instead, they were basecoated Vallejo Game Leather Brown, highlighted by hand with Elfic Flesh, washed with Seraphim Sepia and highlighted again with Elfic Flesh at the tips. Not a complicated recipe, but it took a fair few attempts to pick out those indvidual little tufts without my hand slipping.
The leathers on the other hand were pretty business as usual – Vallejo Game Brown Fleshtone, layered with Leather Brown then Elfic Flesh. All washed with Reikland Fleshshade to bring it back down and blend the layers together. Easy on the boots, and the leather wraps on Azog’s mace, but the belt was a little tricker. Once again, a lot of detail is condensed into a tiny area, and after carefully painting the leather ‘outer belt’, I had to paint the black over belt carefully without ruining the work I’d just done on the outer part – my technique here was painting the whole black belt area in grey and doing a steady line of black across the centre. Very fiddley, but very satisfying to look at when it’s finished.
With Azog and the White Warg finished, it was time to move onto the base and the blood effects.
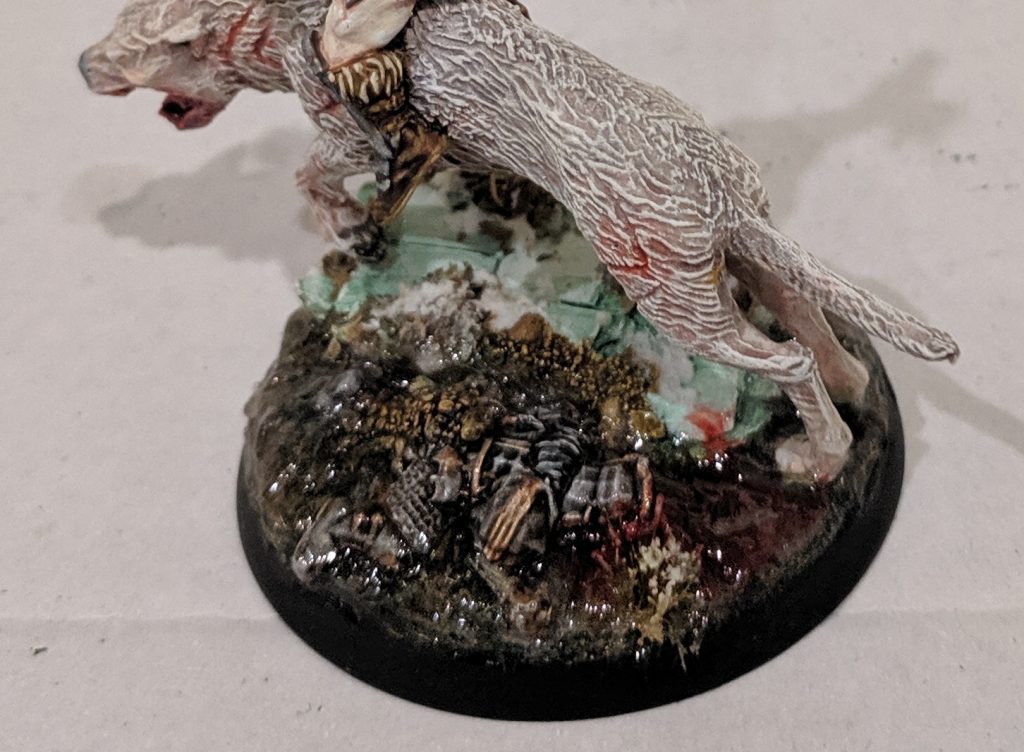
The basics of painting the base were the same any of my ‘Evil’ forces – basecoat Vallejo Beastial Brown, drybrush Elfic Flesh and then wash the whole thing with Agrax Earthshade. The section that would be under water effects were given a secondary wash with Biel Tan Green to give the water area a slightly scummy look tint. With the heavy drybrushing finished, I basecoated the stone steps area in Ghost Grey and did a light drybrush of White. Following this, I thinned down some Biel Tan green with Lahmian Medium and washed the whole thing, taking extra care to have it pool in the recesses. When this was dry, I did another light drybrush with White. Finally, I painted the dead Iron Hills Dwarf on the base – the technique was pretty much the same as with my ‘live’ Dwarves, only about three times as quickly – it was only base decoration, after all.
At this point, the painting finished, I took the model outside for a quick blast of Testor’s Dullcote and waited patiently for it to dry. After the varnish had completely cured, I stuck a couple of tufts down onto the base, glued on some leaf litter and spread the snow effect on the steps. I then started putting on the water effects.
I wanted the dead Dwarf to look fresh, as if Azog himself had just ended his life, so I decided to have some blood pooling out of his head into the water. To achieve this, while I was putting down my first layer of Water Texture, I spread a little Blood for the Blood God in the water texture spreading outwards from where his face would be. While I was doing this, I also put a whole bunch of blood on the business end of Azog’s mace (and a little around the White Warg’s mouth too, I just can’t stop myself on a white miniature). To really sell the idea that the blood was bleeding into the water, I put another thin layer of water texture over this area when the first layer had dried, just to make sure it didn’t look like the blood water ‘floating’ on top of the water.
It took a few days for the water effects to 100% cure to full translucency (one of the major hold-ups for this post, actually), but when it finally did, the miniature was complete.
On the whole, I’m pretty happy with how my Armoured Mounted Azog turned out. The conversion looks natural, the base is interesting and the paint job looks pretty serviceable too. Were I to do it again, I might have made more of an effort with Azog’s sword arm, which is floating above the Warg a little higher than his hook hand on the original miniature. If I’m ever able to muster up the courage to risk messing up the paint job, I’d also quite like to sponge some muck onto the underside of the White Warg also – he’s very clean for an animal running through a puddle after all! Heck, I may yet do this when I go back to paint the dismount mini.
Still, this was very satisfying little project. It’s been a little while since I spent this long on a single miniature of this size, and it was a good fun converting the model to achieve what I had in my minds eye.
Until next time, thanks for reading, and happy wargaming!
1 A good example of this is comparing the Knights of Dol Amroth kit to Rivendell Knights. Both produce 6 multipart plastic miniatures with head and banner options. The former, based on the Lord of the Rings license, is £20 while the latter kit from The Hobbit license is £30. This is not an isolated case, and you can see it throughout the range. The general consensus is that this is down to New Line charging Games Workshop a lot more for The Hobbit license than they did for The Lord of the Rings.
2 The hot water method being submerging the resin piece into a mug of boiled water for a few seconds until it’s soft enough to bend.