Hello, and welcome to the second entry in my three part series on (was would have been) my Golden Daemon 2020 entry, Barrels out of Bond. As the name implies, it’s a recreation of the scene from The Desolation of Smaug using the Barrels out of Bond miniatures from Games Workshop. In Part One, we left off having built, primed and textured the diorama. In this post, I’m going to discuss the painting, flocking and application of water effects to the diorama itself.
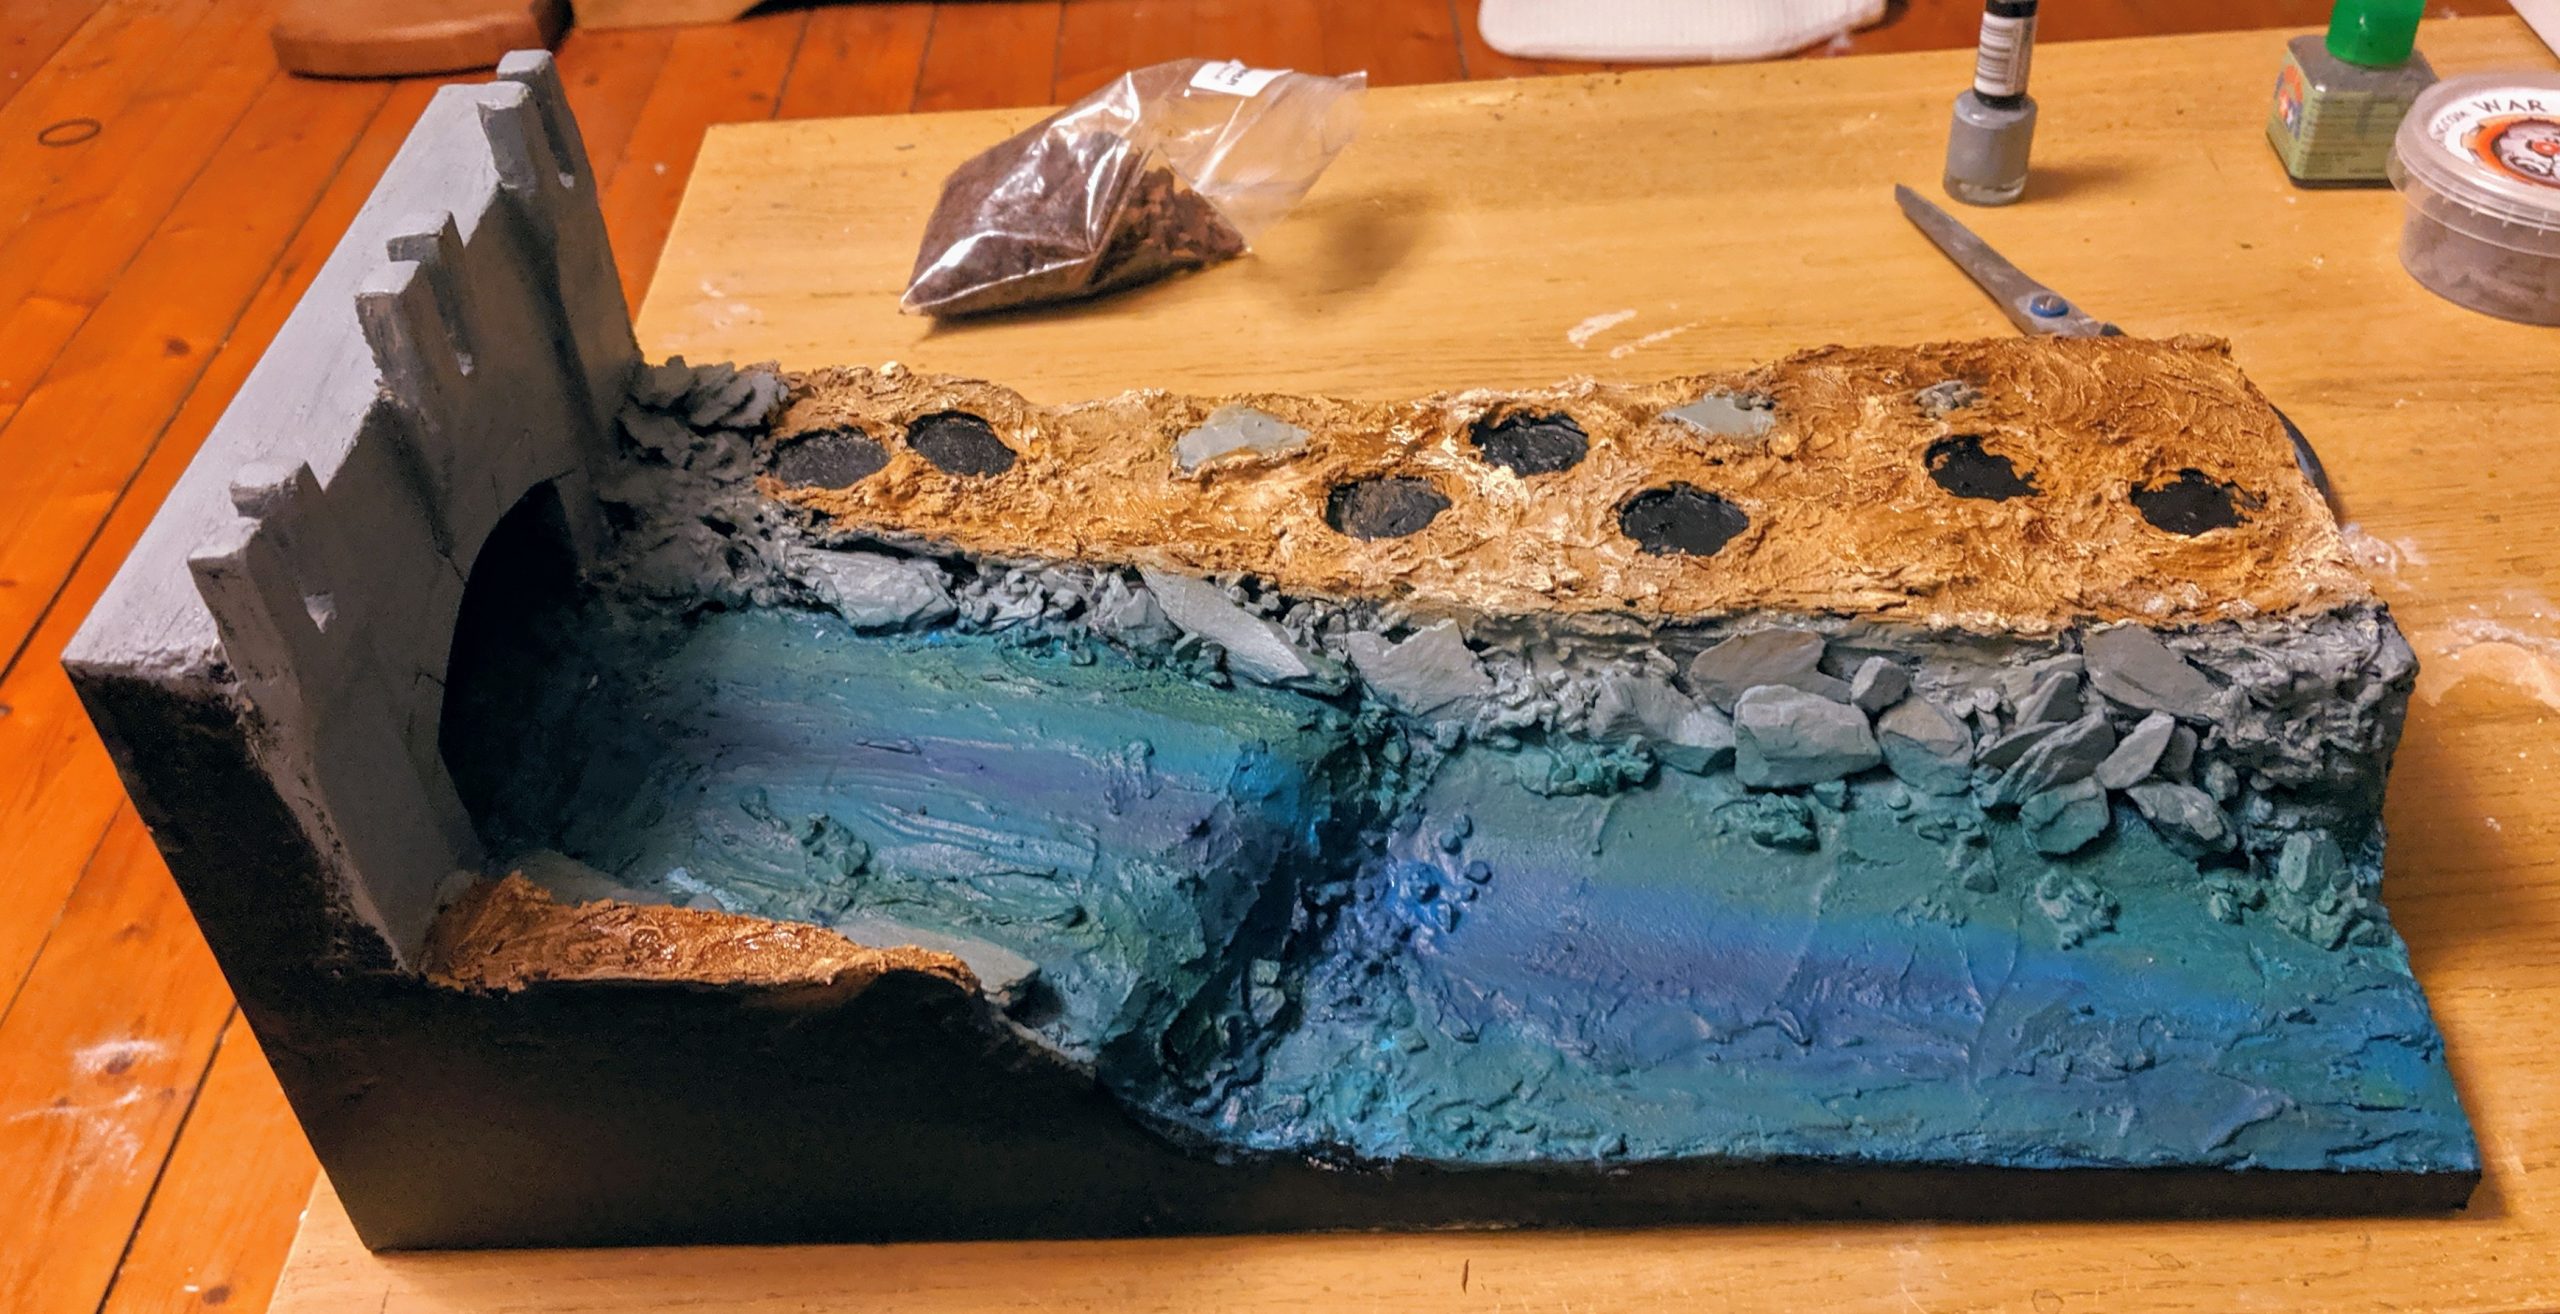
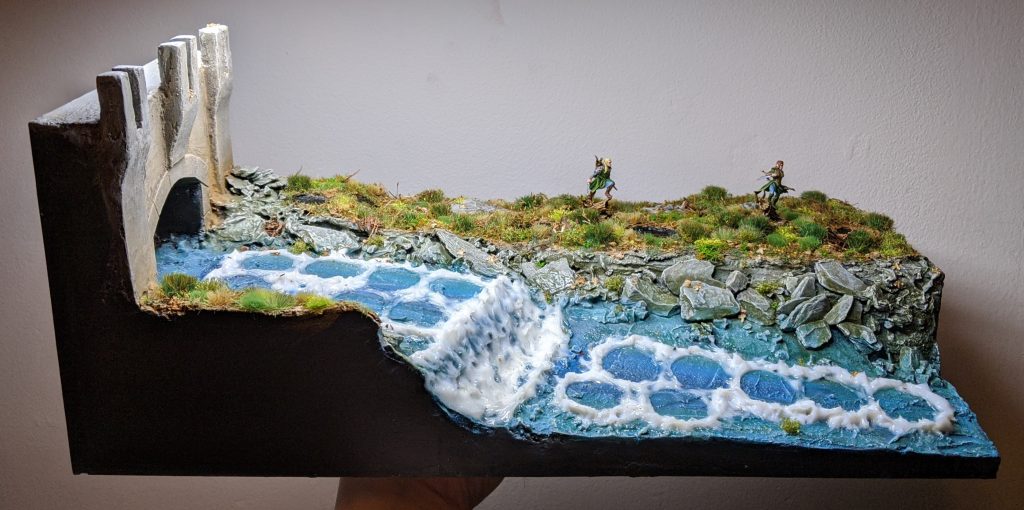
For a start, I whipped out a large brush and base coated the keep and the rocks in Mechanicus Standard Grey, followed up with a quick and dirty wash of Agrax Earthshade. The river was base coated in Turquoise, and to add depth I applied a few thin layers of Guilliman Blue glaze towards the centre, Nihilakh Oxide towards the river bank and Nighthaunt Gloom a little in between.
When all of my washes had dried, the Earth texture was drybrushed in Elfic Flesh and the rocks were in Heavy Bluegrey, followed up with a lighter drybrush of Khaki. The Keep was done using Stonewall Grey, Khaki and then Elfic Flesh in successively lighter layers while the water bed was similarly layered using Turquoise, Electric Blue and Elfic Flesh – just enough to pick out the texture and bring together the various blue tones.
For shading, the Earth texture was shaded with a nice thick coat of Seraphim Sepia and I applied some Vallejo Slimy Grime between the rocks on the river bank to give them a damp, algae-tinted look. For the Keep, I took advantage of the rough, porous texture of the plaster and – referring back to a technique I learned on Weathertop – brushed some Burnt Umber and Rust Oxide weathering powders downwards into the lower recesses of the surface. The orangey brown combination isn’t a million miles off the colour of the Earth texture, and it creates a warm shade which contrasts nicely against the cold grey of the stone. The rough texture also meant that much of the powder would cling to the surface without having to apply any pigment binder, helping preserve the dusty, weathered effect of the powders.
We’ll come back to the gate later, but that really was just about all there was to painting this thing. As I was finishing up for the night, I laid some some thick rings of Vallejo Water Texture around where my Dwarves would sit, plus the waterfall effect where the water slopes down. Vallejo Water Texture – especially spread thick like this – can take a long time to fully cure, so I wanted this done as soon as possible so that it wouldn’t delay things later on. Looking back on this, I really wish I’d built up these rings using plaster like I had done with the miniatures topside – but we’ll get into that later.
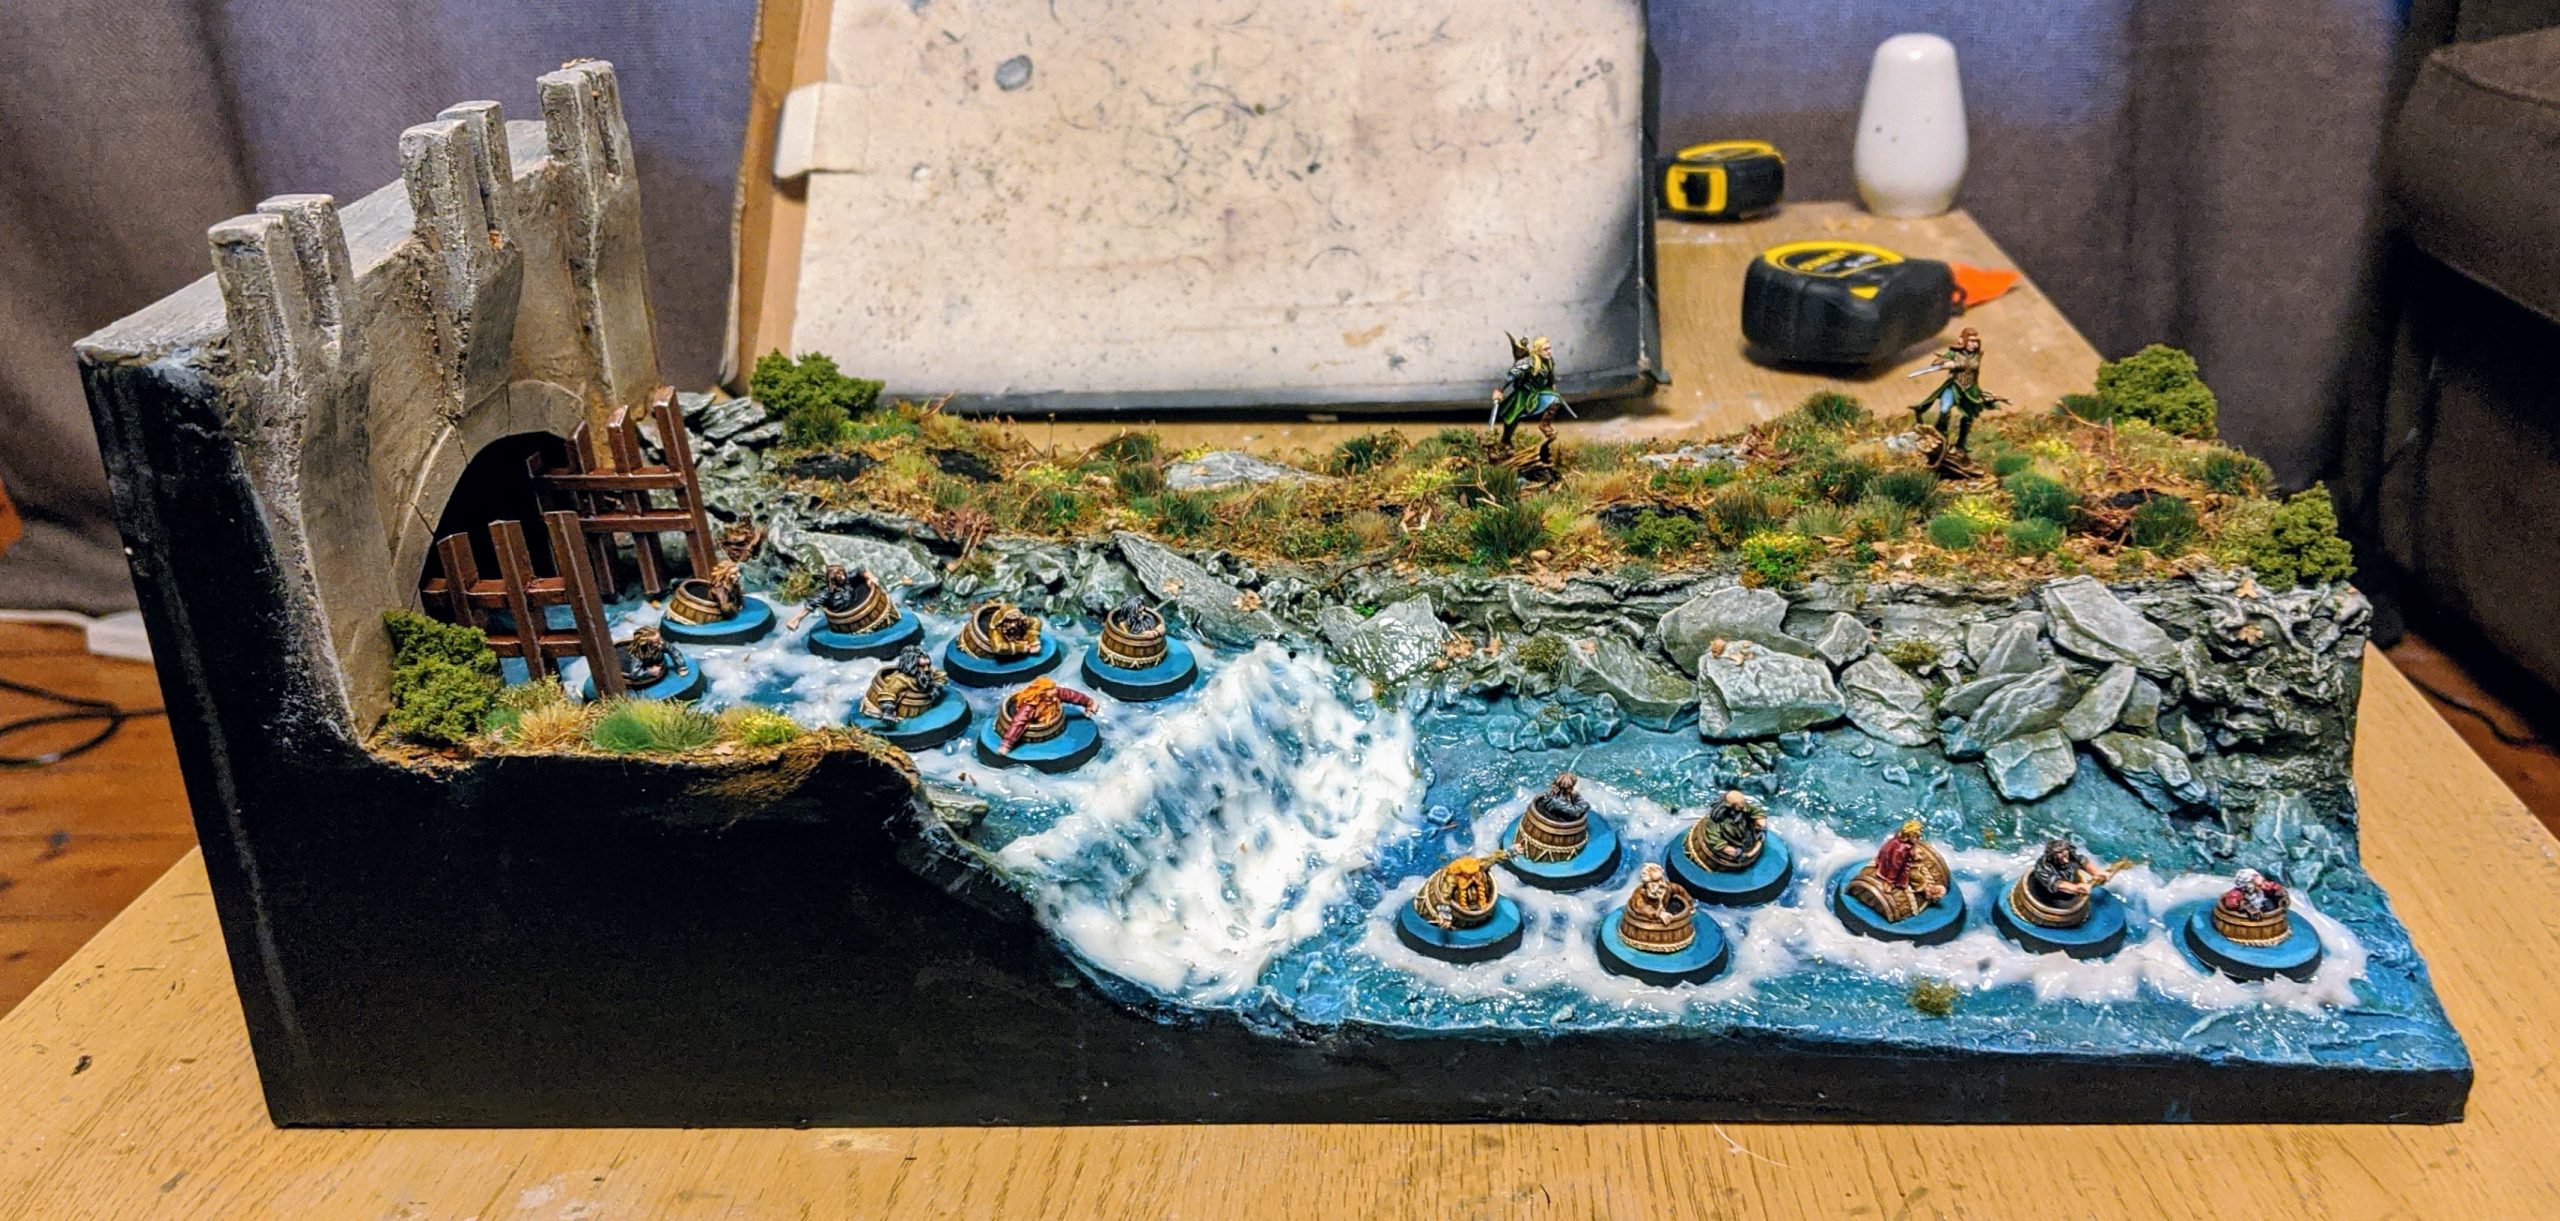
Okay, now we’re getting into the fun bit – gluing stuff down.
An important trick to making convincing looking nature is diversity. Look carefully at any woodland scene and you’ll notice that the ground is not just a sheet of consistent blades of grass, but a wide variety of plants, weeds, flowers and shrubbery in all manner of tones and hues. I wanted to capture this adequately in my diorama, so I laid out seventeen1 distinct types of tufts, scatter and static grass before I began sticking things down.
My system for adequately spacing the various tufts was to place 1-3 tufts in a location, then move a few inches left and do the same. When I ran out of uncovered ground, I’d switch tuft and repeat the process. Eventually, when I had placed a few of everything, I had a closer look at the terrain and tried to fill the larger bare spaces with whatever style of tuft was most obviously absent. When that was finished, I started gluing down fine wood chippings, static grass and patches of twigs anywhere that the tufts hadn’t covered well enough. The ground itself was textured and painted, so it wasn’t the end of the world if any of it showed through – but this is an Elfish forest, so I didn’t want anywhere to seem bare when it could look dense and teeming with life.
This was by some considerable margin the most rewarding step of the process for me – the addition of all of the plants and shrubbery brought the display closer to the vision in my minds eye than just any other individual step. What a difference.
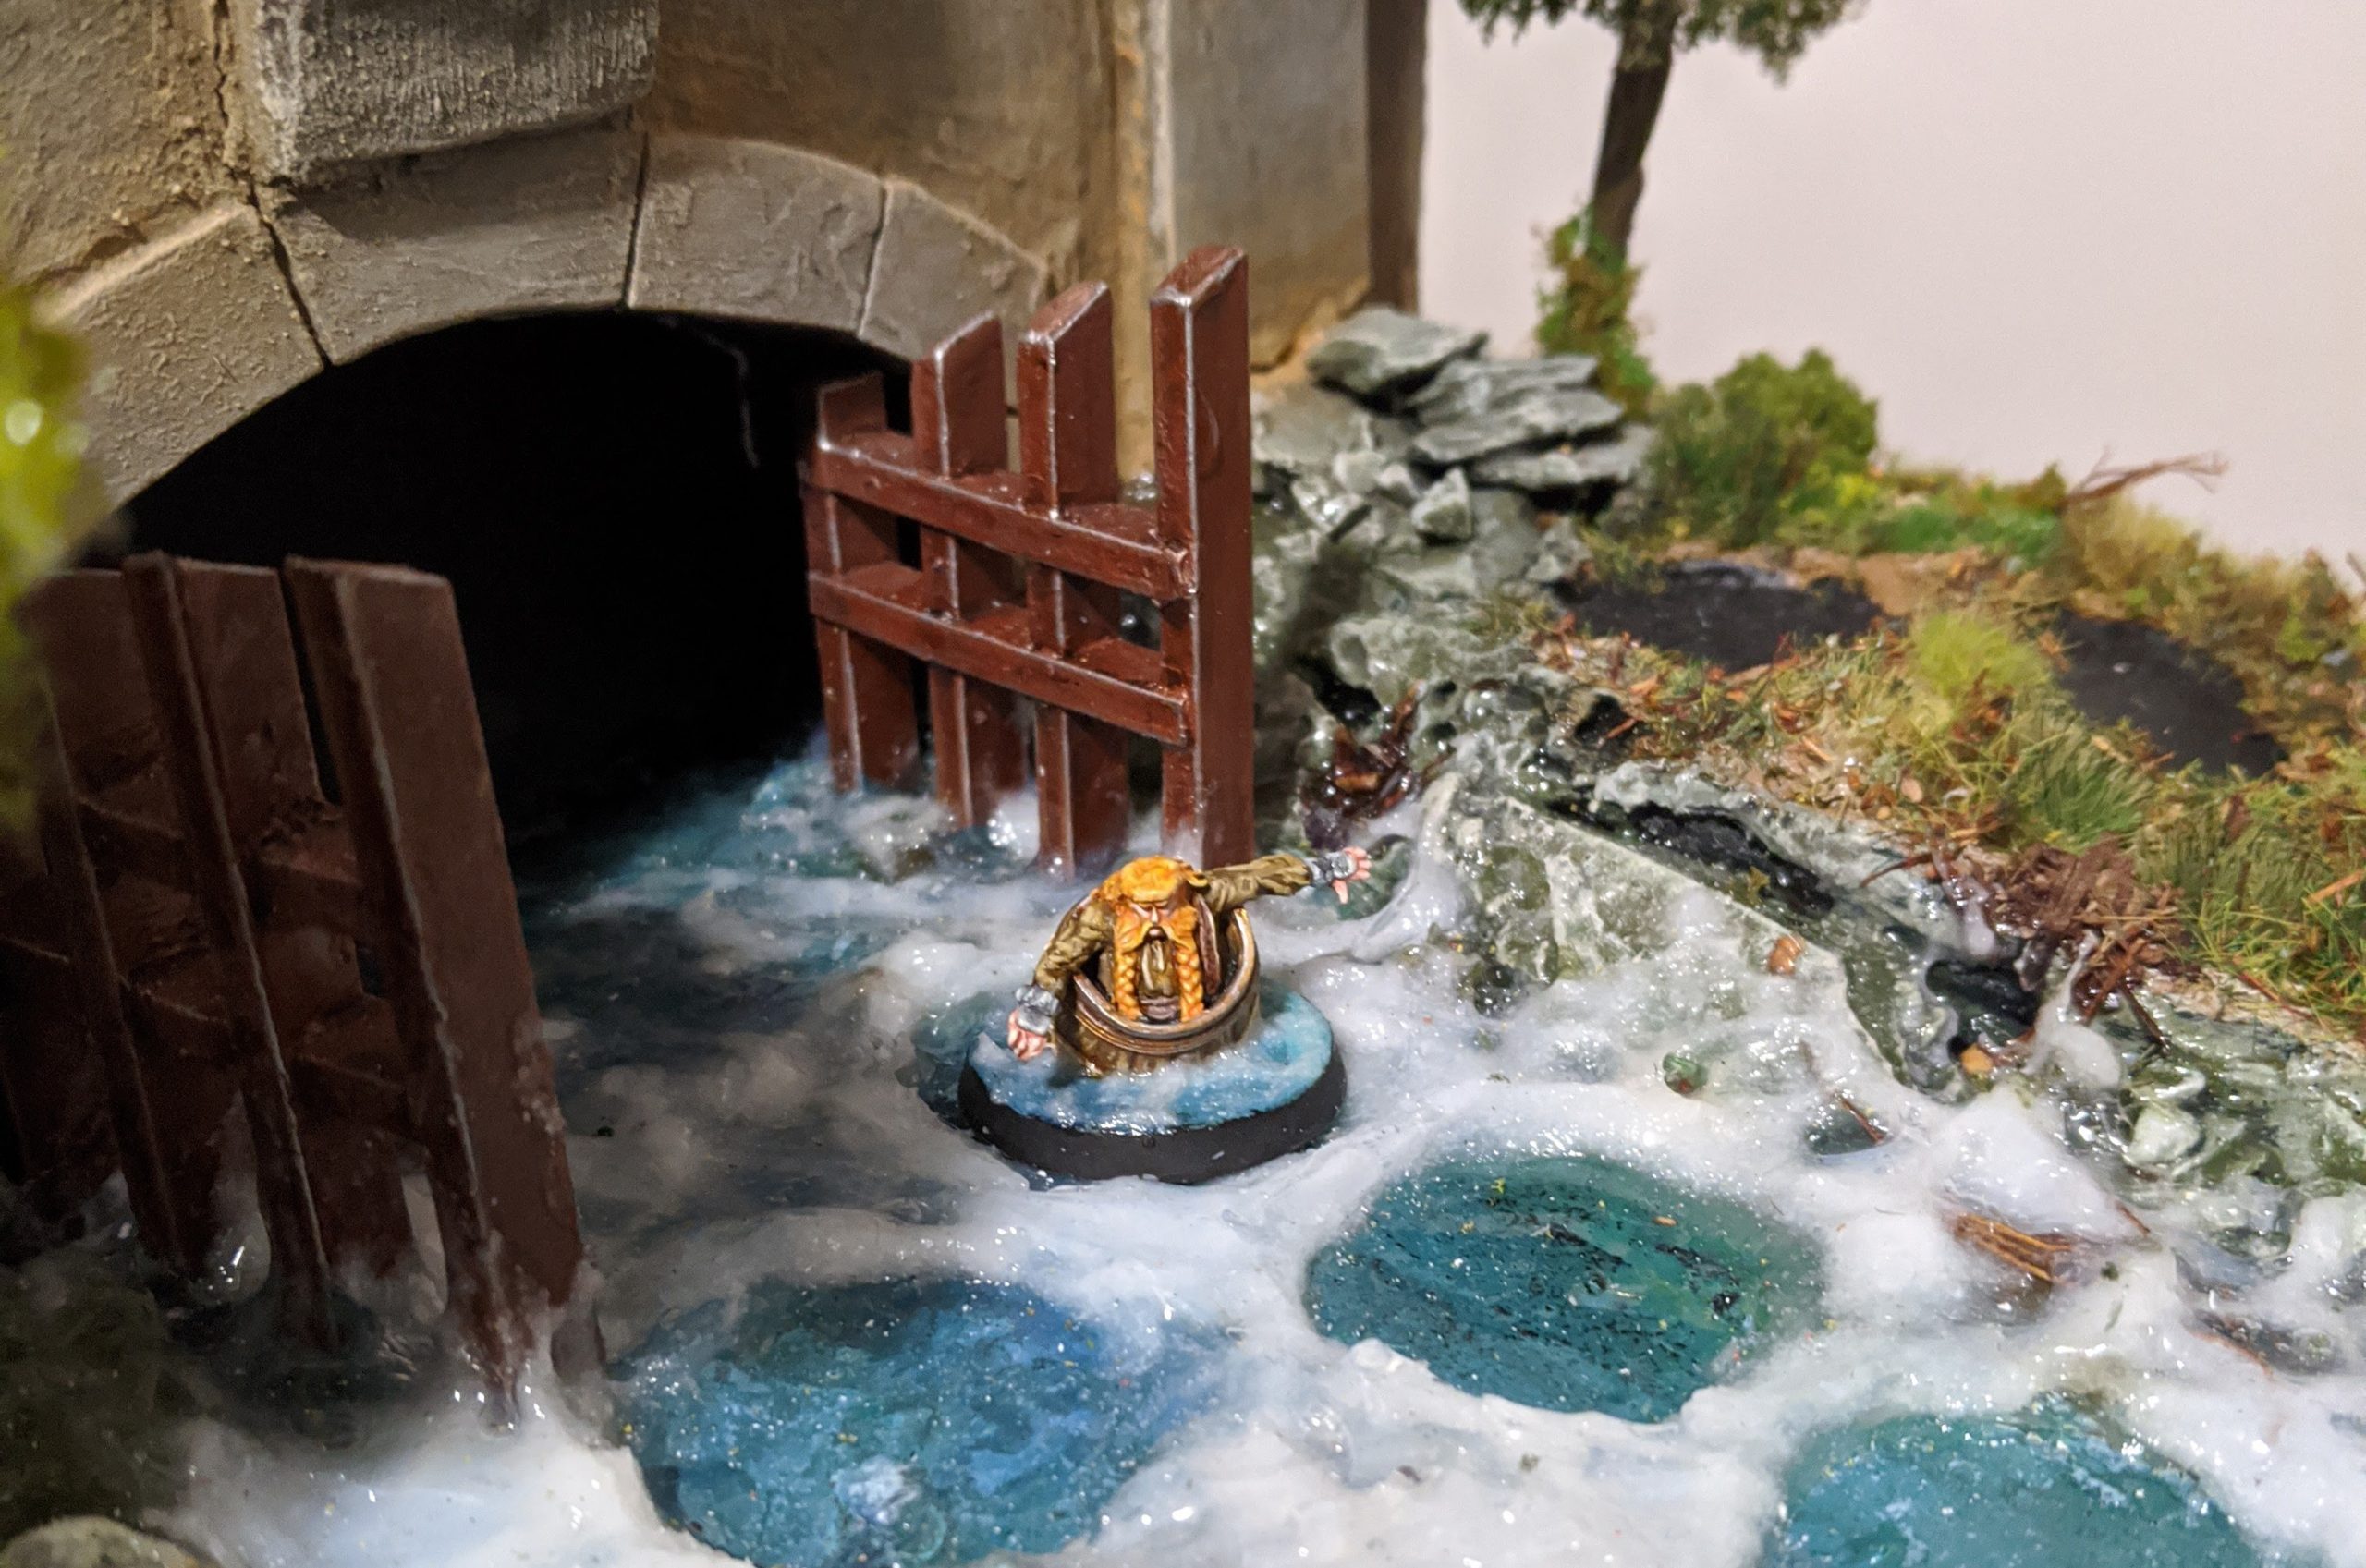
Around about this point, it was time to deal with the gates subassembly. This was a piece of cake really – I primed them in black and base coated them all over in Hammered Copper. This was washed with a 50/50 mix of Agrax Earthshade and Reikland Fleshshade (to keep the shading dark, but preserve the reddish colour), then drybrushed Hammered Copper again to bring back some of the sheen. Another quick drybrush of Weapon Bronze, followed by an edge highlight with Shining Silver and they were good to go. It took a little fiddling to get the gates in at the right height/angle, but this was otherwise pretty painless to do. As the bottom would be submerged in resin water/water effects, it didn’t really matter if the gates themselves were perfectly flush with the riverbed – just that they were straight, flush and could physically fit inside the keep closed.
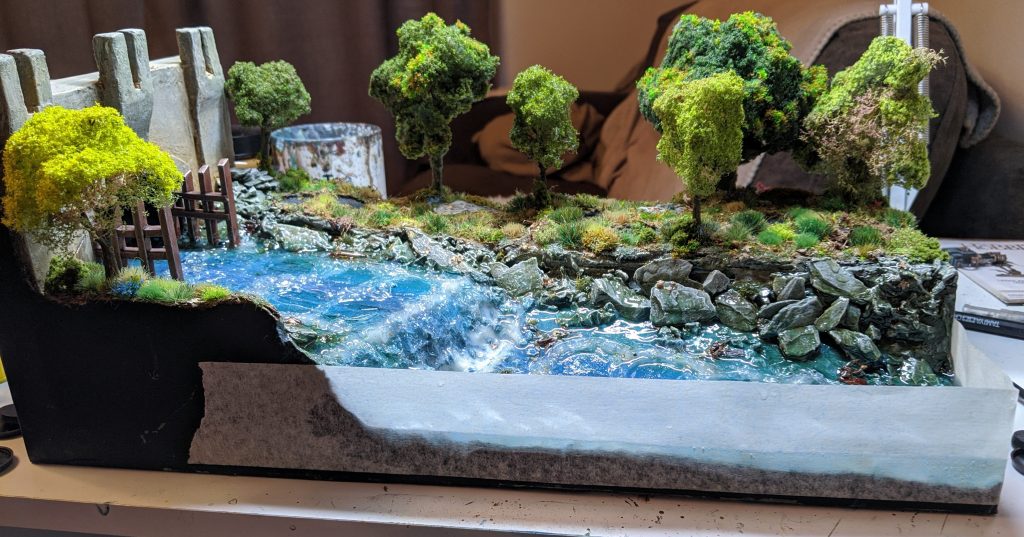
There’s still one glaring omission from the so-called forest scene – the trees! I’d originally planned to use the same sorts of trees I’ve used for Middle-earth terrain in the past – but I’ve learned the hard way that the stems on those organic trees can be a little bit fragile. Given that I was going to be taking this display in my carry-on luggage on a flight to Birmingham, the stems needed to be sturdier than what I’d used in the past. My initial purchase was a set of 60mm plastic trees from Woodland Scenics, though I discovered on arrival that 60mm was just a little dinky, even for 25mm Middle-earth minis. I returned to the internet, where I found The Model Tree Shop. Not only did they have a vast array of plastic, twisted wire and DIY trees in every scale conceivable, but the service was super quick – they were same-day dispatched and I received my parcel of trees the very next day.
These trees were a considerable improvement over the Woodland Scenics ones, but they were far from perfect. There were gaps in the plastic where branches had been connected, mould lines and all the other foils you might expect from cheap, mass produced plastics. Worse still, I soon realised the downside to using preassembled trees – it’s kind of hard to get paint on all the nooks and crannies when there’s a canopy of leaves already covering the branches. Still I pressed on, determined to make these trees fit in with my diorama. I used some watered down paints and a base colour that was darker than the bare plastic in attempt to make any unpainted extremes that I couldn’t reach appear as highlights and drybrushed where I could. This resulted in a little staining on the upper canopy of the lighter trees and bare plastic exposed through the gaps on the darker ones. I attempted to conceal these unsightly blemishes by gluing the closest matching flock and static grass that I had to the areas in question of the affected trees. On some of the more brighter trees, I also glued some of the branches from my otherwise unsuitable seafoam trees beneath the canopy, filling out the more bare looking trees and introducing some finer, bare-looking branches.
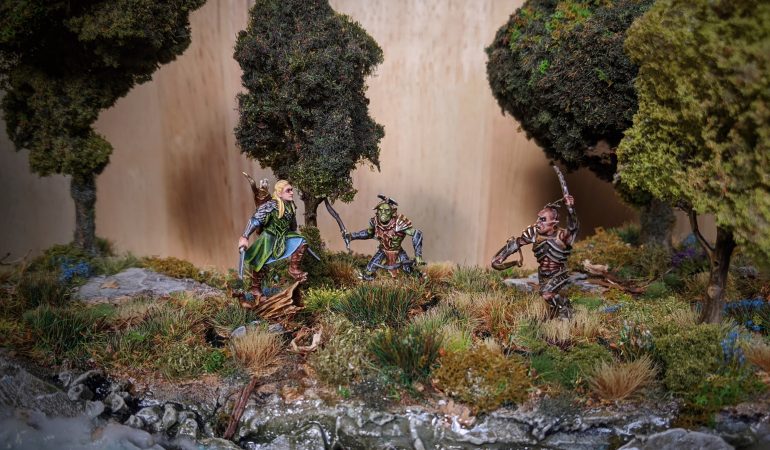
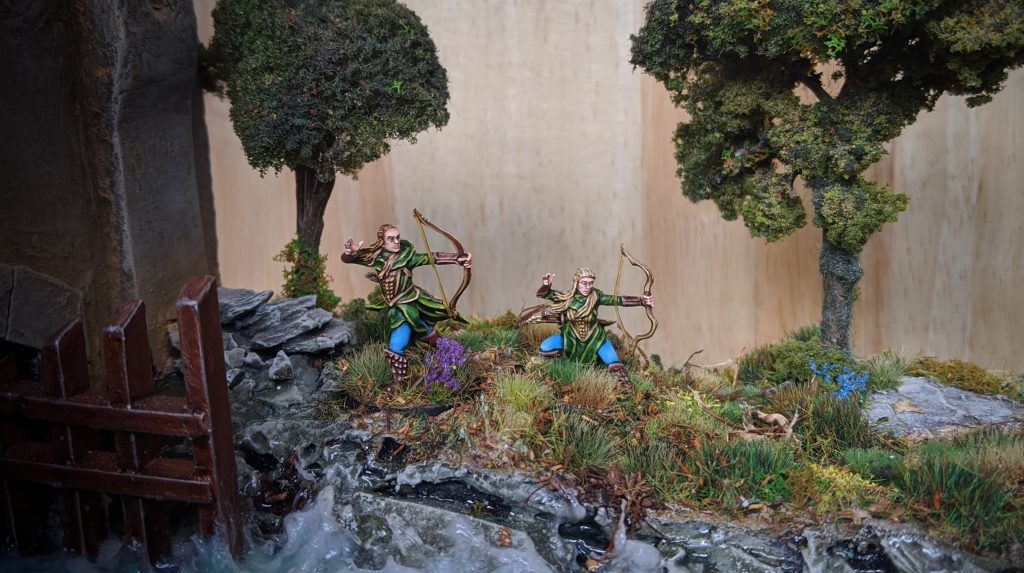
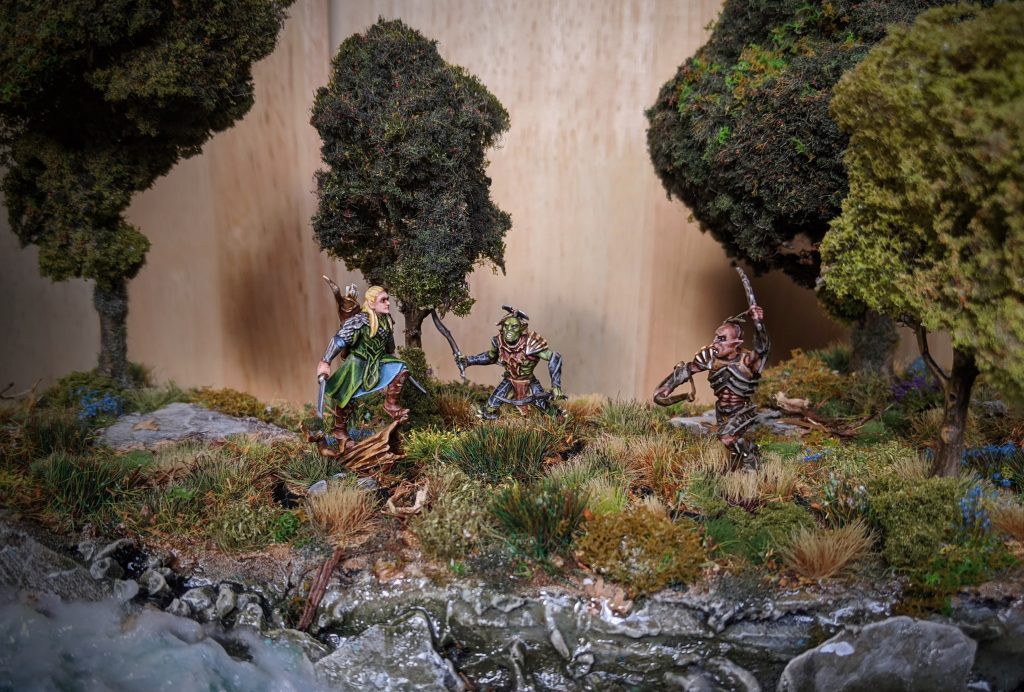
At the time, I was reasonably happy with how the trees looked. I predominantly placed them towards the back of the diorama to serve as something of a backdrop to the action, with a little variation in spacing to create a sense of depth. The smallest tree I placed on the other side of the river against the keep – I felt like this helped fill out the scene without obscuring too much in it’s shadow. The next smallest I placed a little closer to the water bank on the right side of the forest – this helped to divide up Legolas and Tauriel, which I think helps present more of an impression that she was running on ahead (as she does in the film).
I wish I had a photograph of this step to put here, because this is where things start to go wrong.
Shortly after gluing my trees down, my display plinth arrived. And how glorious it was! Immaculate, well finished and with a nice felt underside to protect the mantelpiece. I was thrilled – until I sat my display down upon it. Somehow, I’d managed to make the diorama just a little too long. I double checked the plinth – 200mm, as agreed. I checked my display – about 210mm, maybe just shy. When I consulted the plasticard base, I realised there was a little overhang on the foam – it extended out a little further from my 200mm plasticard foundation. How or why this never occurred to me in the first instance perplexed me, but here we are.
As far as set backs go, it could’ve been worse. The keep facade was pretty thick and could stand to lose a couple centimetres off the back – this meant we wouldn’t need to sacrifice any actual display area. Not only that, but it turned out this was also the side that was overhanging the plasticard base, making it a much easier cut. There would be some maintenance required for sure, but the fix was doable. I measured 200mm across my display, marked the area to cut and started hacking away at the plaster with an X-Acto Knife2. Eventually, I prized enough away to get at the foam with my hot wire cutter, and got enough of the back off to start sanding the surface down to a smooth 200mm in length. When I was happy this was of the both smooth enough and the correct size, I sprayed a thin piece of card (not wanting to risk the extra .5mm of a piece of plasticard) black and glued it flush to the piece (to both smooth the back and cover over the back of the tunnel) and we were back to where we started. Crisis averted – and it was worth it to see the display sit all nice and snug on the plinth!

Terrain and foliage down, it was time for the main event – the water. I had previously used water texture to build up the rings around my barrel miniatures to hold them in place – as well as create a sort of dam for the rest of the water. I had also applied this over the waterfall, the upwards splashing performing a similar sort of function. To fill out the main body of the water, I used Solid Water from Deluxe Materials, a two part resin water product.
I attached some masking tape nice and taught around the edges where I would be pouring the resin, and sealed the bottom of the tape with a little PVA glue to prevent any leaks. After mixing the resin as per the instructions, it was time to start pouring. One important factor that I had to take into consideration was the slant of my river – this came down a little bit towards the closest edge of the diorama, whilst the river also dipped ‘downhill’ the further it got from the keep. This meant that, were I just to start pouring, I ran the risk of the water sliding down from the ‘shallow’ end, levelling out ‘deep’ end and overflowing my water texture dams. My solution to this was to prop my diorama up at the front corners, levelling out the slope and preserving the downwards slant of the river.
Best laid plans and all that – this step went poorly. The process of mixing the Deluxe Materials Solid Water was a lot simpler than the Woodland Scenics stuff – I didn’t need to heat the resin up to activate it, it didn’t smell of anything and it mixed together pretty quickly to boot. Unfortunately, both of the mixing cups supplied were a little bit brittle and managed to crack at the bottom in transit – so fine were these cracks, in fact, that I did not notice the cracks on inspection. It took until halfway into stirring before I noticed that my tabletop was getting wet and sticky. Not having anything appropriate to pour the mixture into to hand, I had to press on with thick stack of paper towels and the added stress of a time limit to the pour.
Sealing the underside of the masking tape with PVA glue proved to be a godsend, and very little – if any – managed to seep through. Unfortunately, as it wasn’t sealed with PVA at the top, there was considerable down into the gap between the tape and the diorama, which needed sanded down again afterward. Additionally, masking tape was a poor choice of sealant, as the exposed sides of the resin had a bit of a porous finish, rather than the transparent, glassy finish that I was hoping for. Some of this was offset when sanding down the edges, and I cleaned up the scratches and imperfections this caused with some wet 800 grit sandpaper, followed by a thin coat of gloss varnish.
To really round out the stressful resin pour, the circular dams I made out of water texture for the miniature bases were not tall enough, which allowed some of the resin managed to get into the little base recesses. This was unavoidable while the resin was wet, though I did manage peel the most problematic seepage off when the resin was partially cured.
Despite the stress and the setbacks, the water still turned out reasonably close to how I had envisioned it. My precarious balancing and attempts to preserve the slant of the river had failed me completely, but other than that things turned out pretty okay. The miniatures still weren’t quite ‘recessed’ enough in the water effect, but this was alright for a first pass – there would be further water texture going over the top, after all.
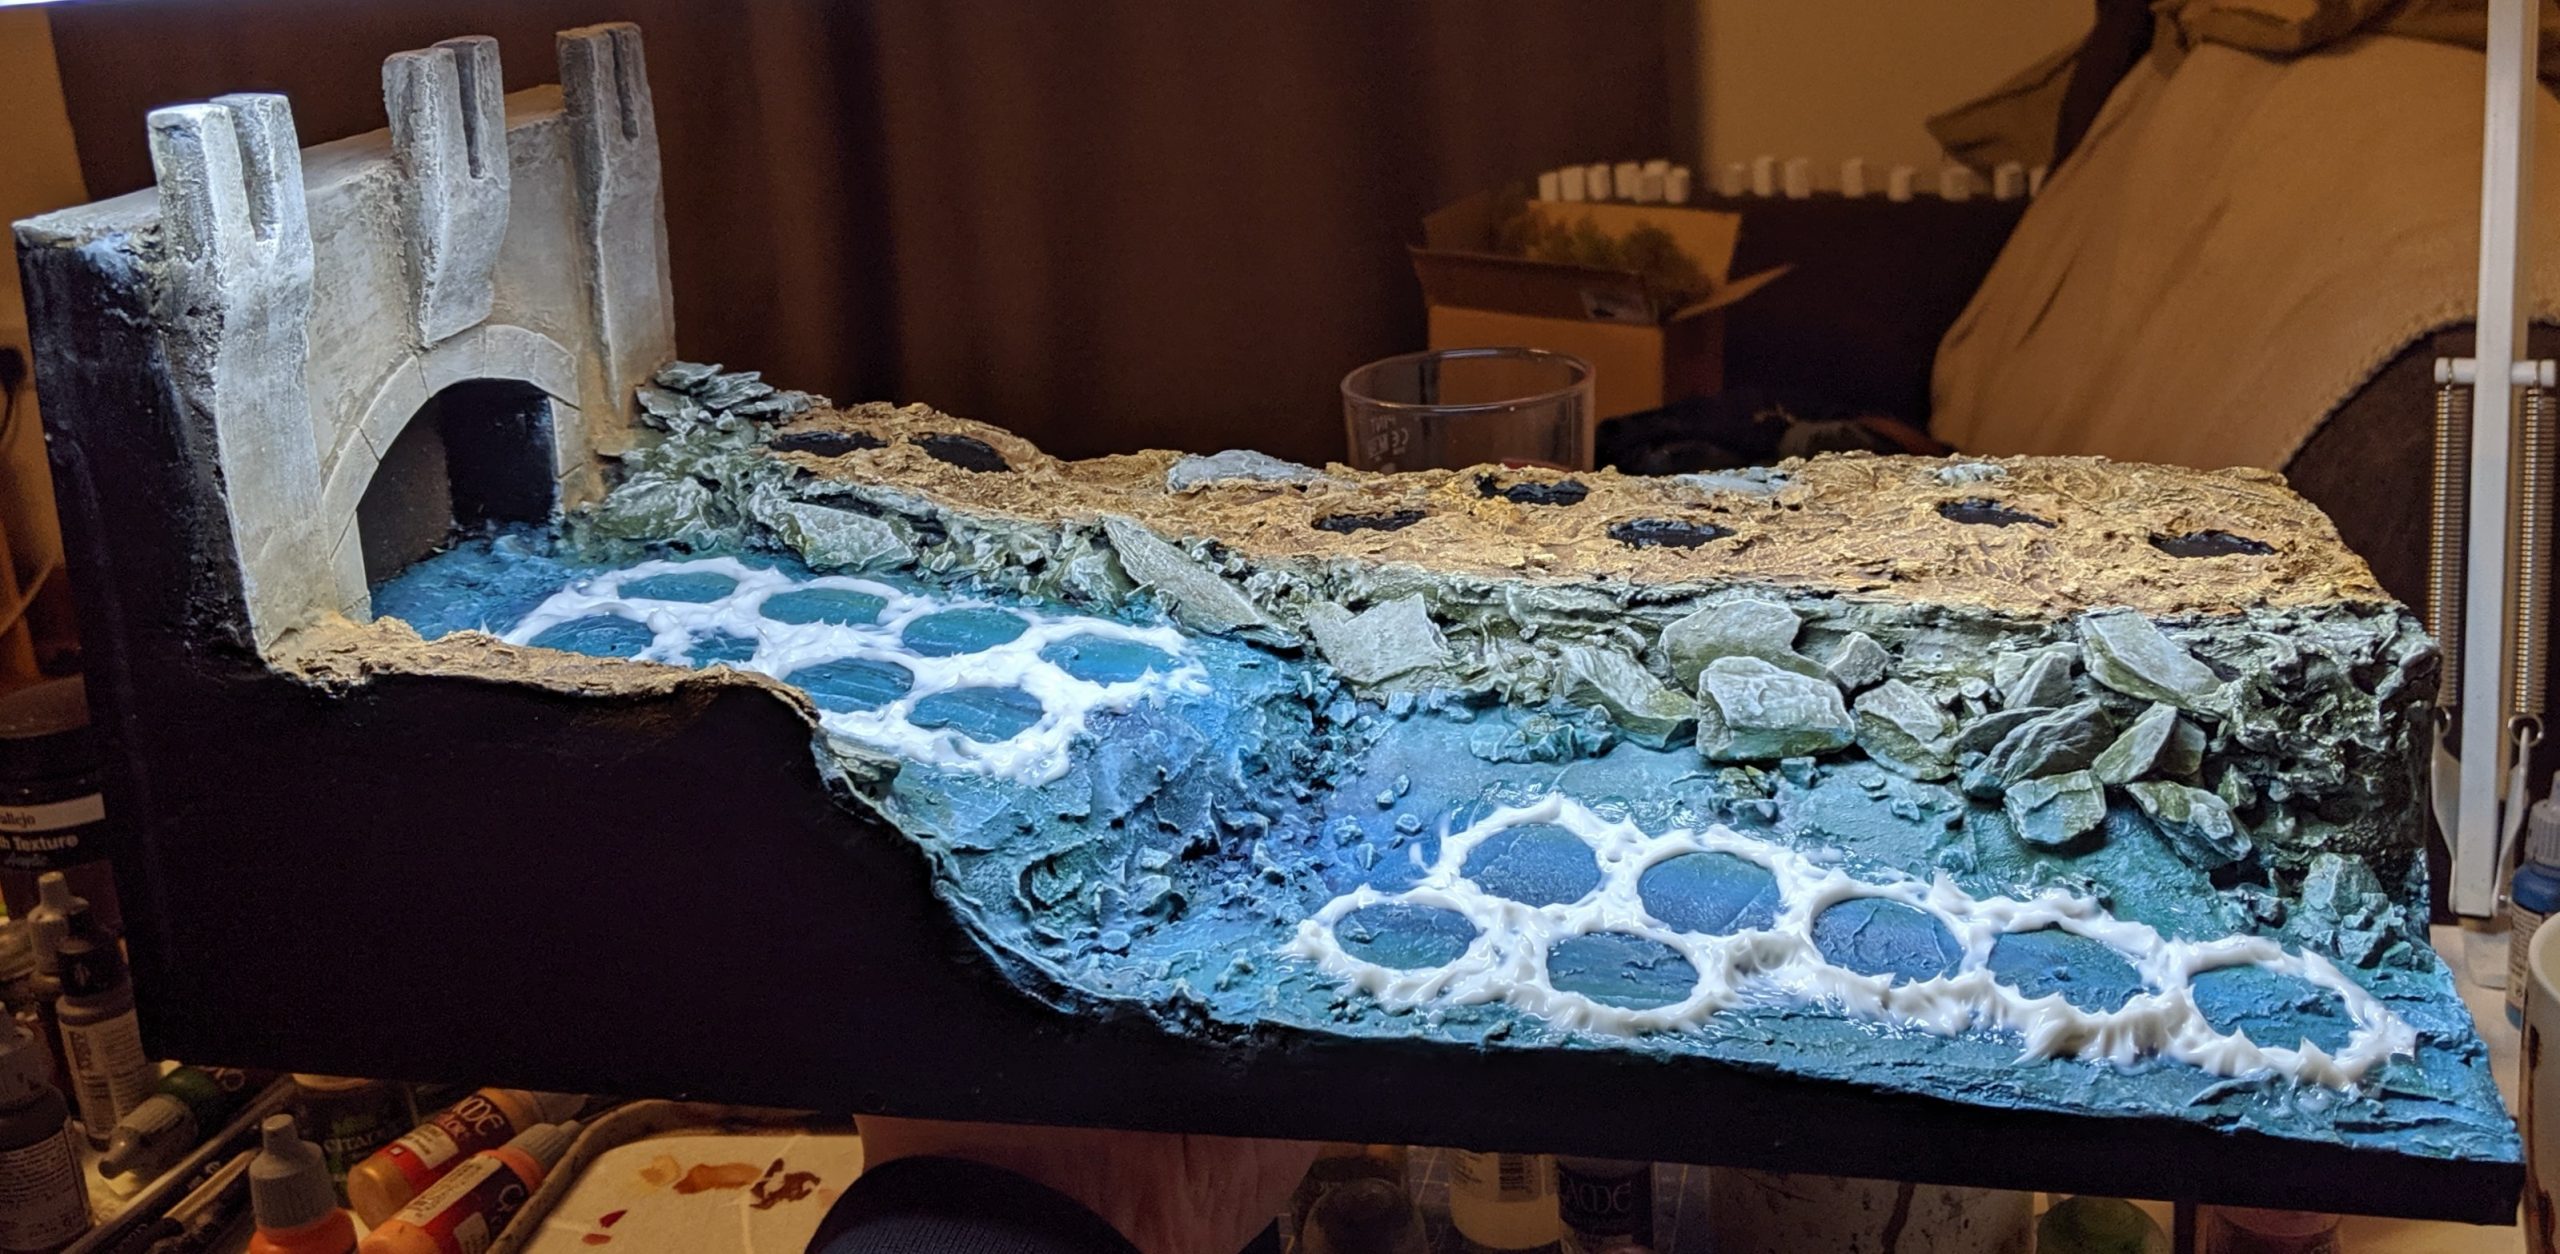
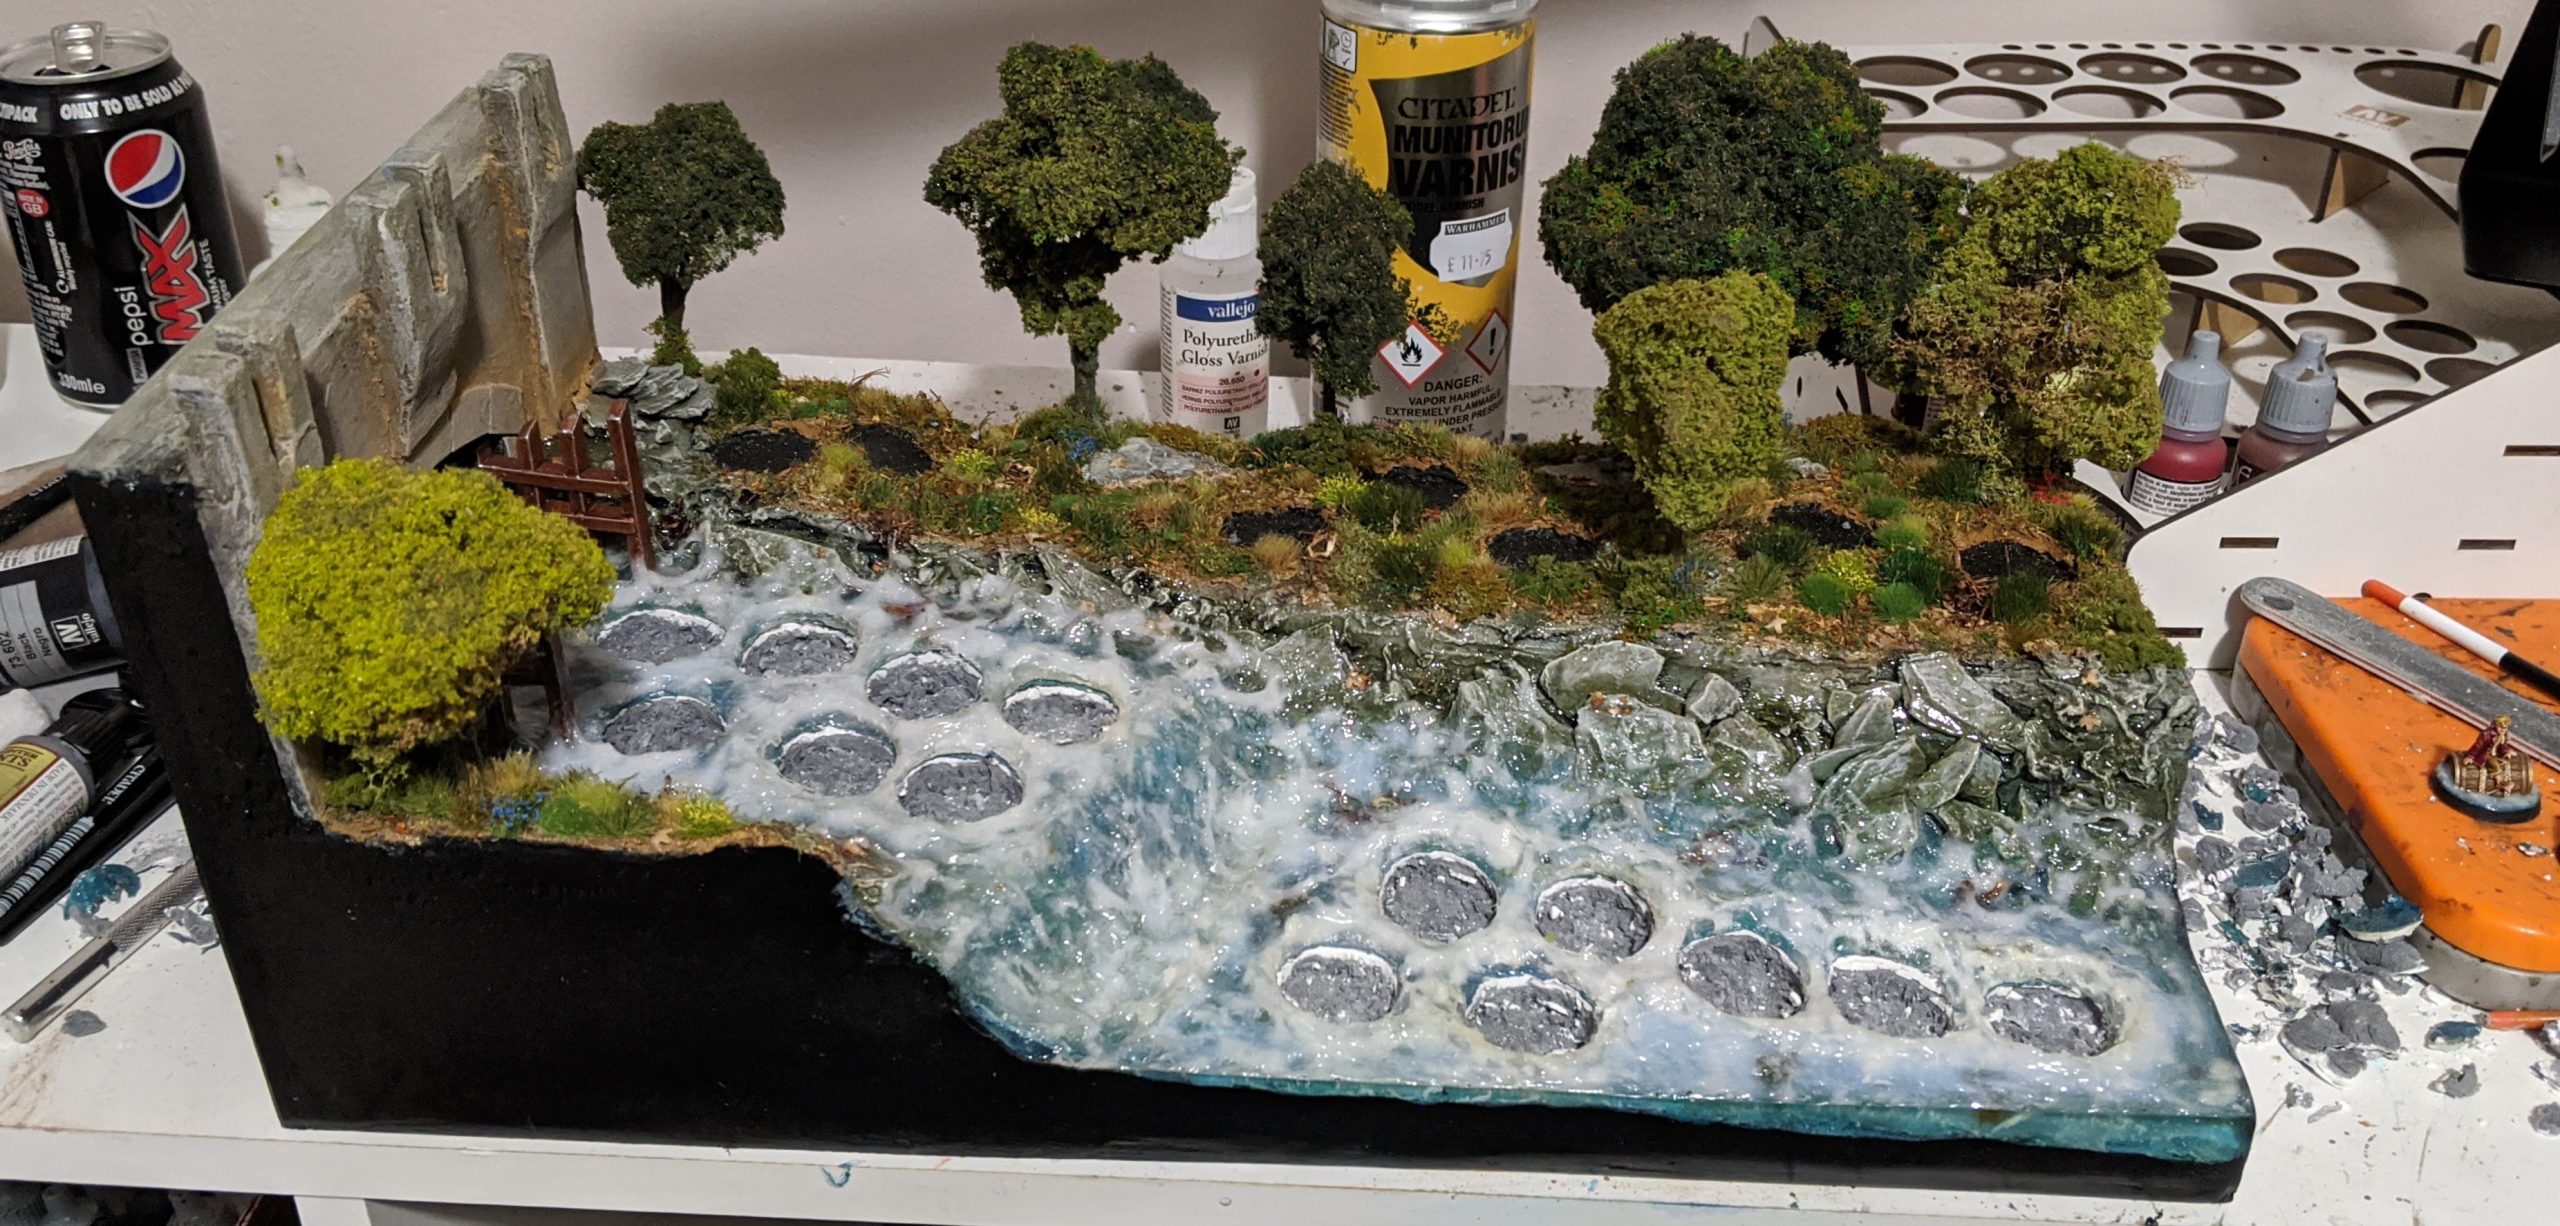
I wanted to convey a sense of motion in the water – splashes from the waterfall, waves crashing upon the shore, and barrels thrashing in the whitewater river as they’re carried downstream. To achieve this, I would need to model not just water texture, but foaming white water as well. I experimented with a number of techniques for this – including cotton wool and gloss white paint – but in the end decided that the best way to represent foaming, thrashing water was to mix in a little Valhallan Blizzard snow texture paint into Vallejo Water Texture effects, and spread this evenly across the diorama. I tried to take it easy around the already pronounced rings around the miniature inlays, but I did use some to help build up the height on the shorter rings, or fill in the gaps in the wider ones. I also tried to emphasise the foaming on the areas where the water met the stones on the riverbed and around the base of the waterfall.
As with previous layers of water texture, this was left overnight to harden. It would take some time to cure fully, so I decided to do a little tidy up work elsewhere in the meantime.
I turned a critical eye to the diorama and, upon some reflection, decided that I wasn’t 100% happy with the trees. Some were still very clearly unmodified model railway trees (having nothing but an overstretched canopy applied over cheapo plastic branches), while others – having been enhanced with a little additional flock – looked jarringly two toned and unfinished. I made a quick visit to the Element Games webstore and ordered myself some additional flock blends from Gale Force 9 – Dark Connifer, Meadow Blend and Spring Undergrowth. I bought all 3 of these on a hunch that they would make a good match for the trees on my display (having only worked with Dark Connifer before), and to my delight they matched up beautifully. These were applied using Wood Glue, diluted 50:50 with some tap water brushed onto the canopies with a large flat brush. I even very gently brushed the glue onto the sea foam trees attached to the underside of the lighter trees – the glue sort of beaded onto the exposed tips and jutting branches, which helped to blend the sea foam frame in with the rest of the tree while preserving the ‘sparse’ look and feel. After the glue had dried, they successfully concealed some of the staining or exposed plastic tips of the unflocked trees, helped blend in the existing added foliage and generally gave the tree canopies a little more depth with a subtle change in hue. Much better.
With things looking better above sea level, I decided to clean up the black edges of the diorama with some Gloss Black paint and see where we were.
Home stretch now! Miniatures aside3, there were only two things left to do to the diorama, as far as I could tell – getting the plinth to match the sides of the diorama, and the final layer of water texture.
The first issue was obvious at a glance – Gloss Black was not ‘glossy’ enough to match black lacquer finish of the plinth, and the dichotomy between the two finishes was jarring. It had been on my mind for some time as it is that a high-gloss plinth might distract the eye from the important part of the display anyway, so I opted to reduce shine across the board. I took the plinth outside and gave it a nice even coat with a can of Citadel Munitorum Satin Varnish. This helped to greatly reduce the distracting glossy sheen on the lacquer finish without bringing it down to a completely flat black like Dullcote might. I didn’t trust myself not to get satin varnish over the topside of the diorama, so I spread a mixture of 4 parts Vallejo Matt Varnish, 1 part Gloss Varnish and 2 parts water across all of the black edges of the diorama with a nice wide brush.
Okay, we’re really starting to look just about finished now. One more coat of water texture on the surface and the diorama is finished… or so I thought. I looked at my diorama long and hard and a number of things started to bother me more and more. The first of these was how poorly recessed the barrel miniatures looked in comparison to the miniatures on land. The raised lip around the barrels were still so shallow, and the black base rims were so blatantly obvious.
MY IMMEEEERRRSIIIOOOOOONNNN!!!!
I decided that enough was enough, and I whipped out my handy 25mm hole punch and started punching into the recesses through plaster (and in some places a thin layer of hard resin) to deepen the inset. This whole process took about two hours – and I was reasonably happy with how well I managed to achieve this without completely ruining the diorama.
That pleased feeling lasted all of 10 minutes.
The number one thing that was starting to bother me was that the frothy snow effects were starting to yellow. Whether from some pigmented containment in the mixture or a chemical reaction between the snow and water texture effects I couldn’t say, but it was completely ruining the effect of my immaculate Elfish river. To add insult to injury, it was becoming painfully clear that it was a mistake it was to layer so much of the snow/water texture mixture together in clumps – I had thought they were taking a long time to cure, but in reality they were just completely opaque due to how thickly they were spread. Not a good look.
So, I’m in full panic mode at this point. I tried cutting it away with the aim to relayer with water texture, but the more I cut away the worse things started to look – the effects were too firmly bonded to simply peel off the diorama. I weighed my options for a time. With a heavy heart, I held my breath and completely painted over the water surface.
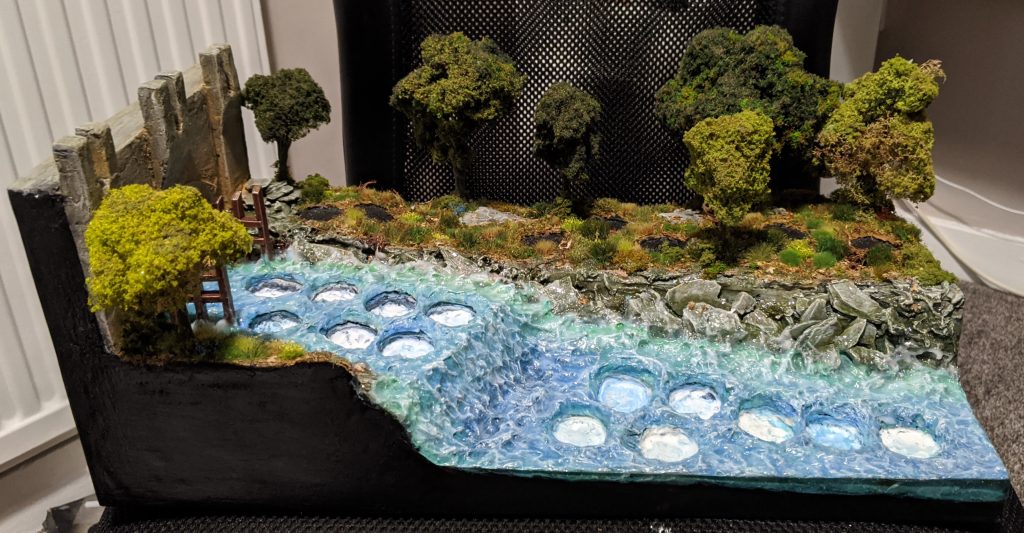
This painting process was quick and simple – Guilliman Blue in the deepest areas, Nihilakh Oxide towards the riverbanks. As this was the river surface, I avoided the Nighthaunt Gloom this time to keep things bright. I tried my best to wet blend them, then drybrushed the surface with a glossy white. This concealed the shame of the yellow snow beneath, but it came at the cost of making the river surface fully opaque. Still, I kept the edges of the diorama clear, sort of like a little window beneath the surface of the water.
Repainting the water in this manner has advantages and disadvantages. The diorama takes on a more ‘painted’ or cartoonish look overall – whether a good or a bad thing in and of itself, it could be argued that this better matches the style in which I painted the miniatures. At the very least, the bases on the Barrels miniatures themselves now closer match the style of paint under a couple layers of water texture.
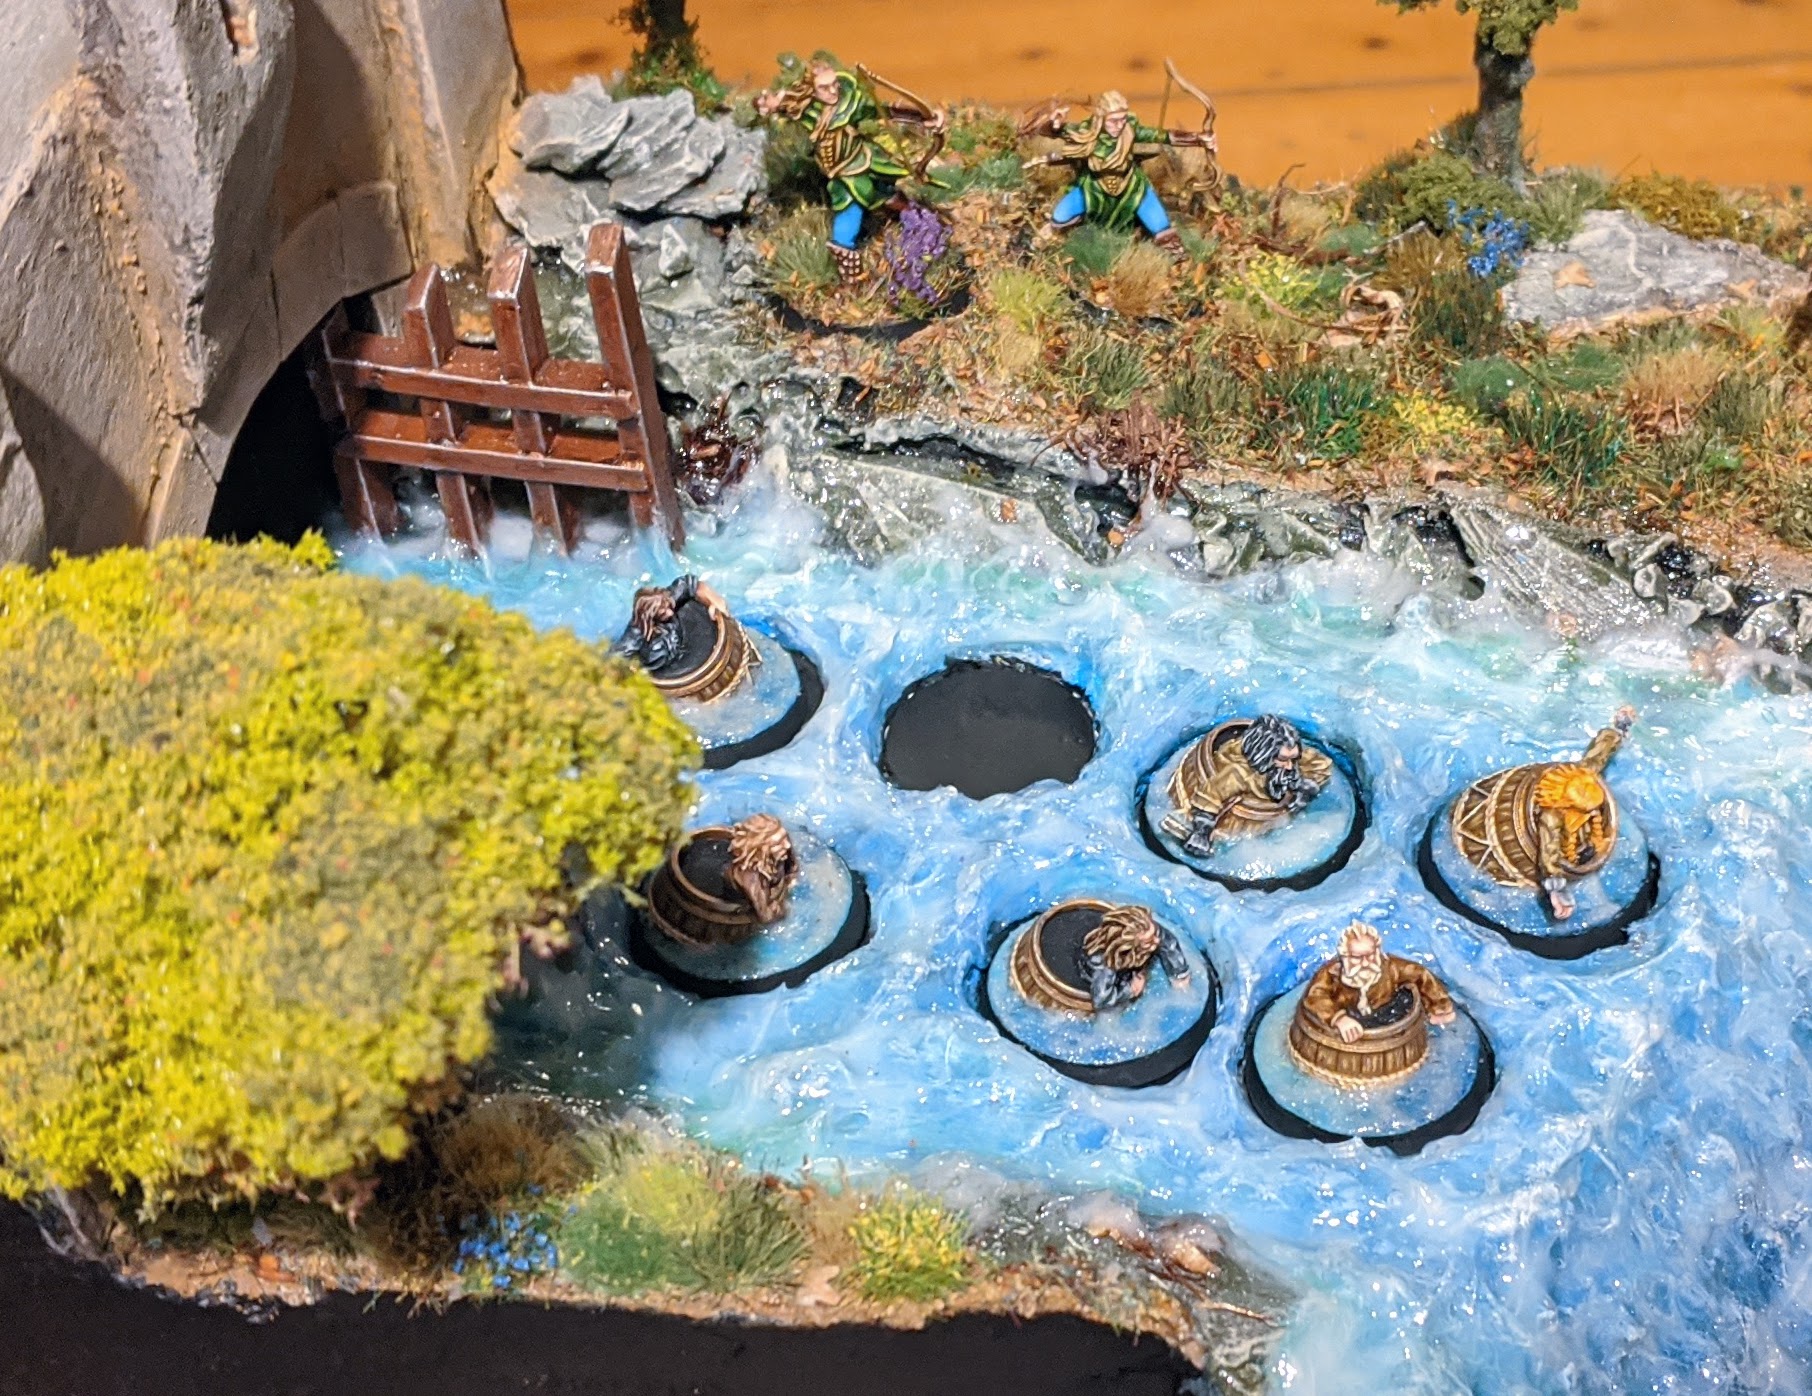
When I had finally recovered from the shock of entirely changing the focal point of my whole diorama, I decided to revisit the base inlays. I installed some 25mm bases into the new, deeper recesses in my water surface – this helped me to adjust the depth of the inlay such that the top of my miniature’s bases would sit flush with the top of the river, as well reducing wobble by giving the minis a nice flat surface to rest on.
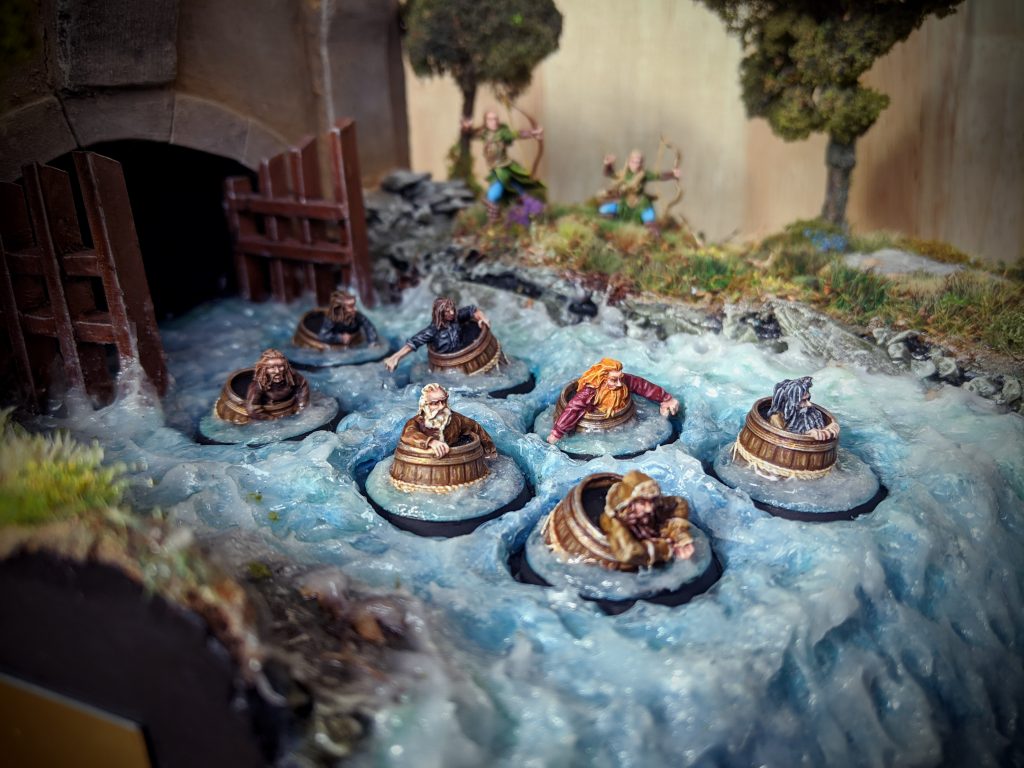
Over the next few of days I would (very carefully this time) apply a few thin layers of water texture over the surface before much more carefully introducing a little water texture foam again – taking care not to layer anything too high like before. Once again, I experienced a little browning of the foam in a few locations. Thankfully, this time the browning was a lot thinner and more localised, allowing me to carefully cut away at the affected locations, smoothing over the area that was cut with a little clear water texture. This ‘surgical’ approach worked wonders, and this time the snow mixture had the effect that I’d wanted originally – frothy, foamy areas of texture with good body and a believable opacity. When everything had dried, I was finally satisfied that the water was looking good once again.
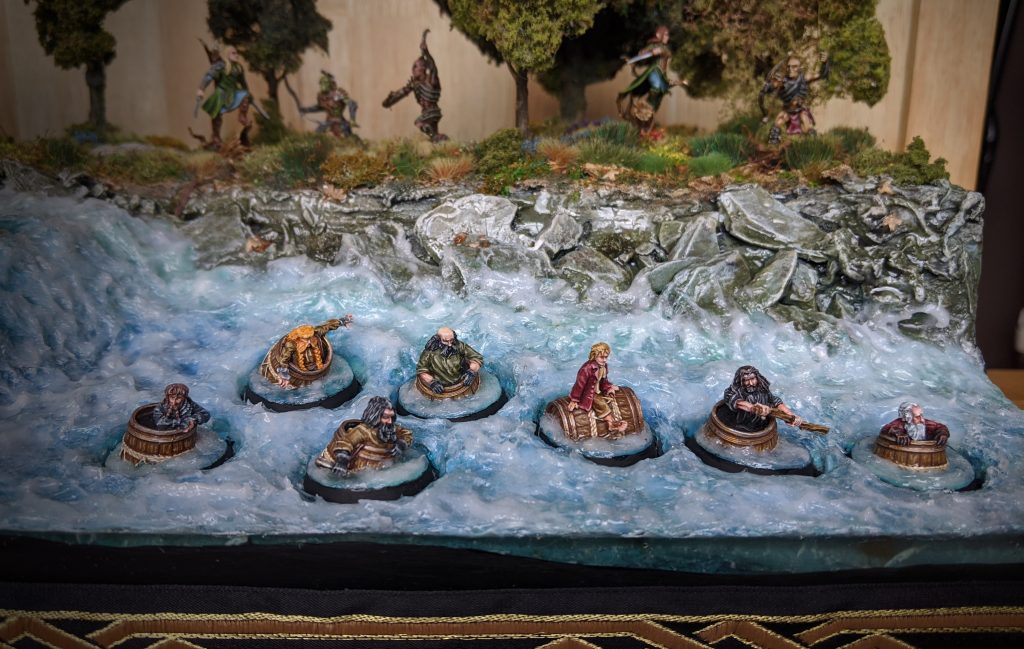
This photo illustrating the miniature is not indicative of the final look of the water. You’ll have to wait until the end of the post to see that!
Alright, so we’re getting somewhere again. By this point, I no longer hate the water effect, I’m happy with how the miniatures sit on the diorama. There’s just one thing that’s still bothering me a little – the seam.
Despite my best efforts, the diorama doesn’t sit perfectly flush with the plinth – and even if it did, you would still be able to see that it is a thing sitting on top of another thing. I needed something to conceal the join; my solution – ribbon!
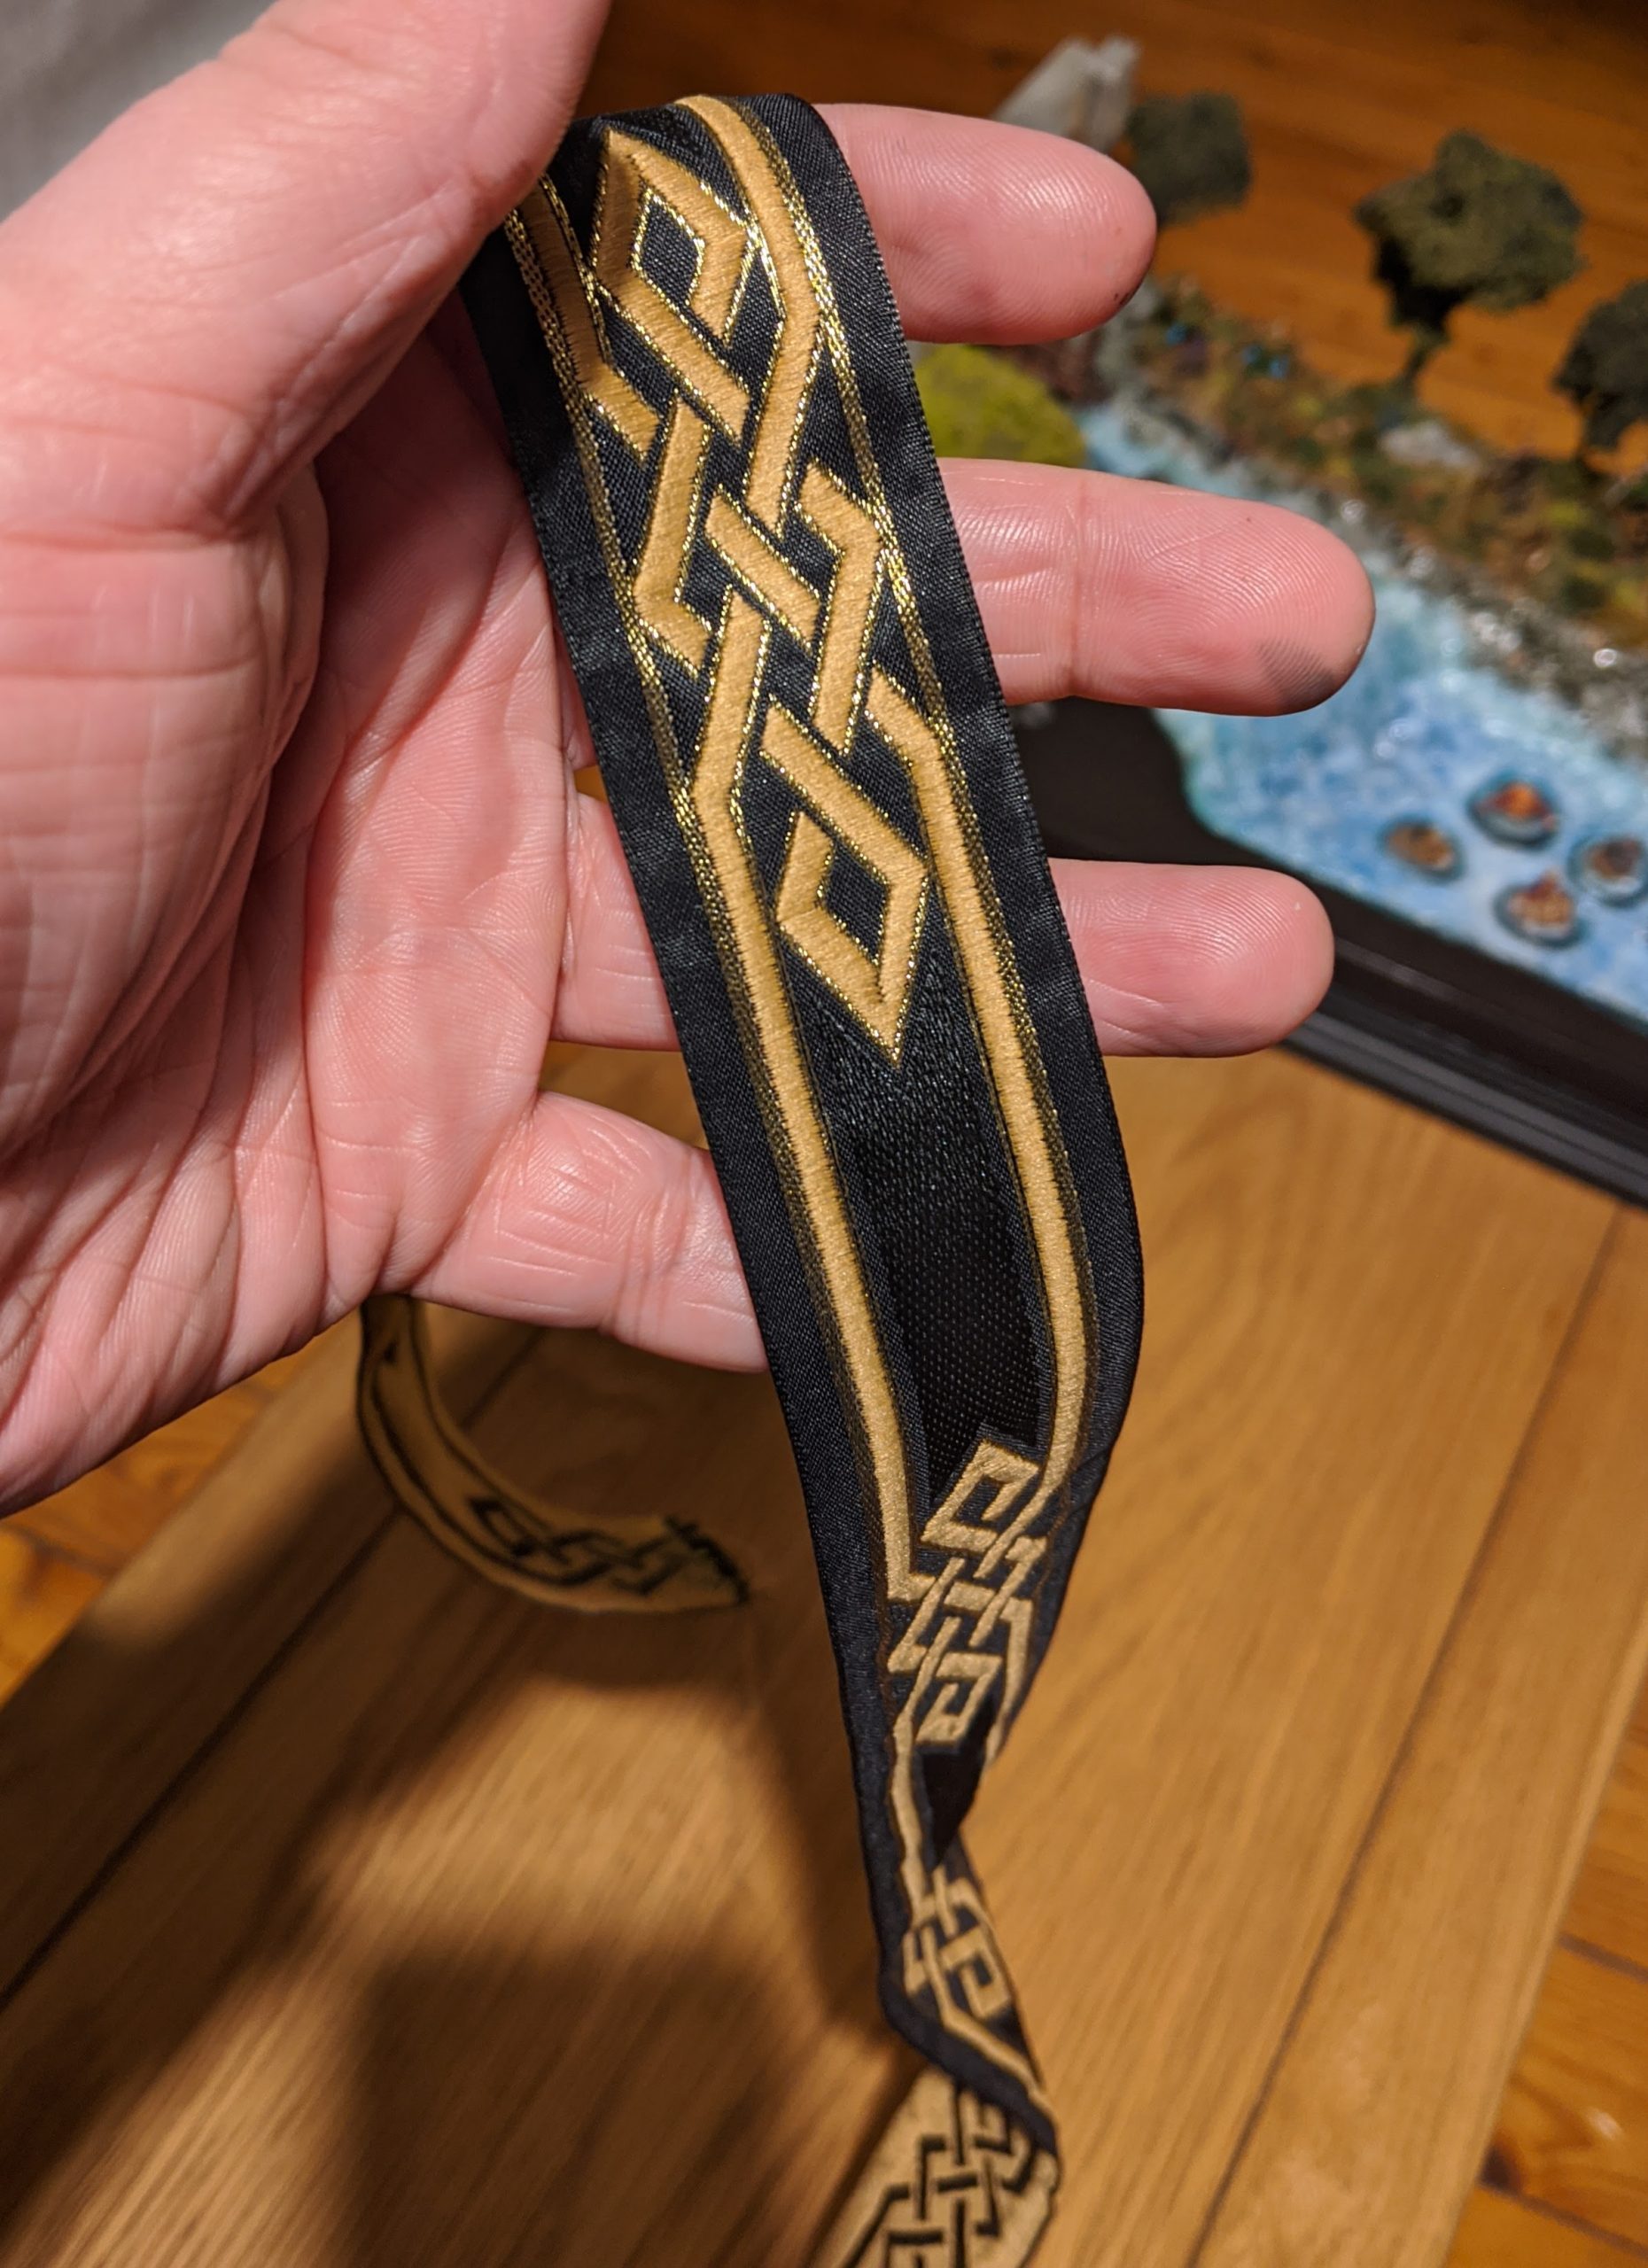
I thought of a lot of other potential solutions to this problem – printing, or even freehanding a little paper skirting, plain black (or another colour) ribbon. For logistical reasons around fitting the piece into my carry-on luggage, the plinth needed to be detachable for transport – it wouldn’t fit in my bag otherwise. This meant that the solution had to be somewhat rugged and not susceptible to tears or creasing, which pretty much ruled paper out immediately. After a failed attempt to find a ‘One Ring’ pattern ribbon4, I started looking for ribbons that might read as Elvish or Dwarven – which led me down the rabbit hole of Celtic Knotwork patterns. Much of this was too obviously Celtic to be suitable, although eventually I stumbled upon a nice, uncomplicated pattern with straight, rigid edges that screamed Tolkien Dwarf – what a score!
A day or two later, my ribbon arrived. I dutifully went to install it, excited to see my finished display and.. Oh. Right. The ribbon entirely obscured the nameplate. Thankfully, for once in this damn build, this was no big deal – the moment I put the ribbon on the plinth, the new location for the nameplate became obvious. No longer restricted by the height of the plinth5, I headed back to eBay and ordered a new etched nameplate. I twiddled my thumbs for a couple of days until it arrived, slapped it on the side of my diorama and finally, it was complete.
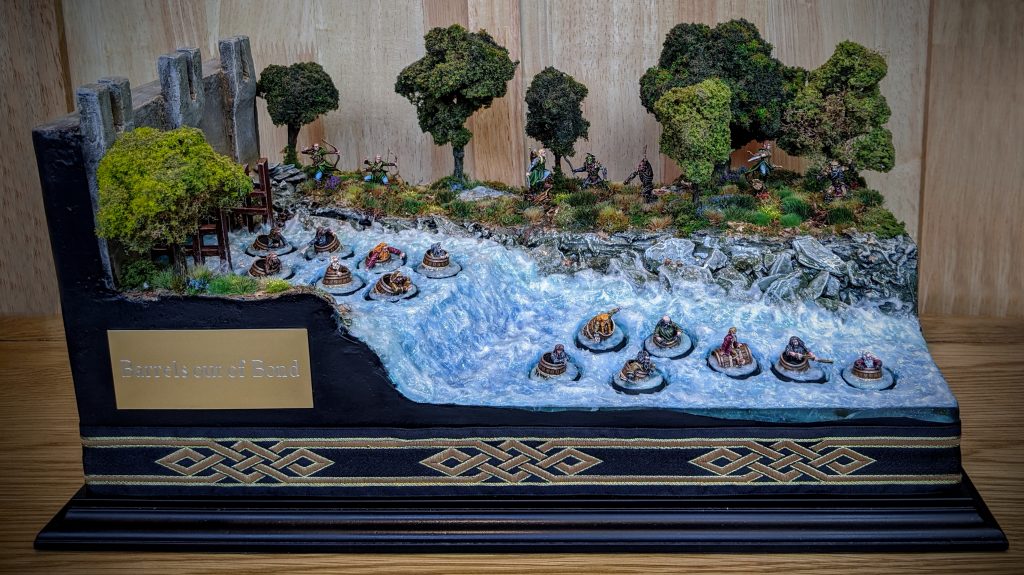

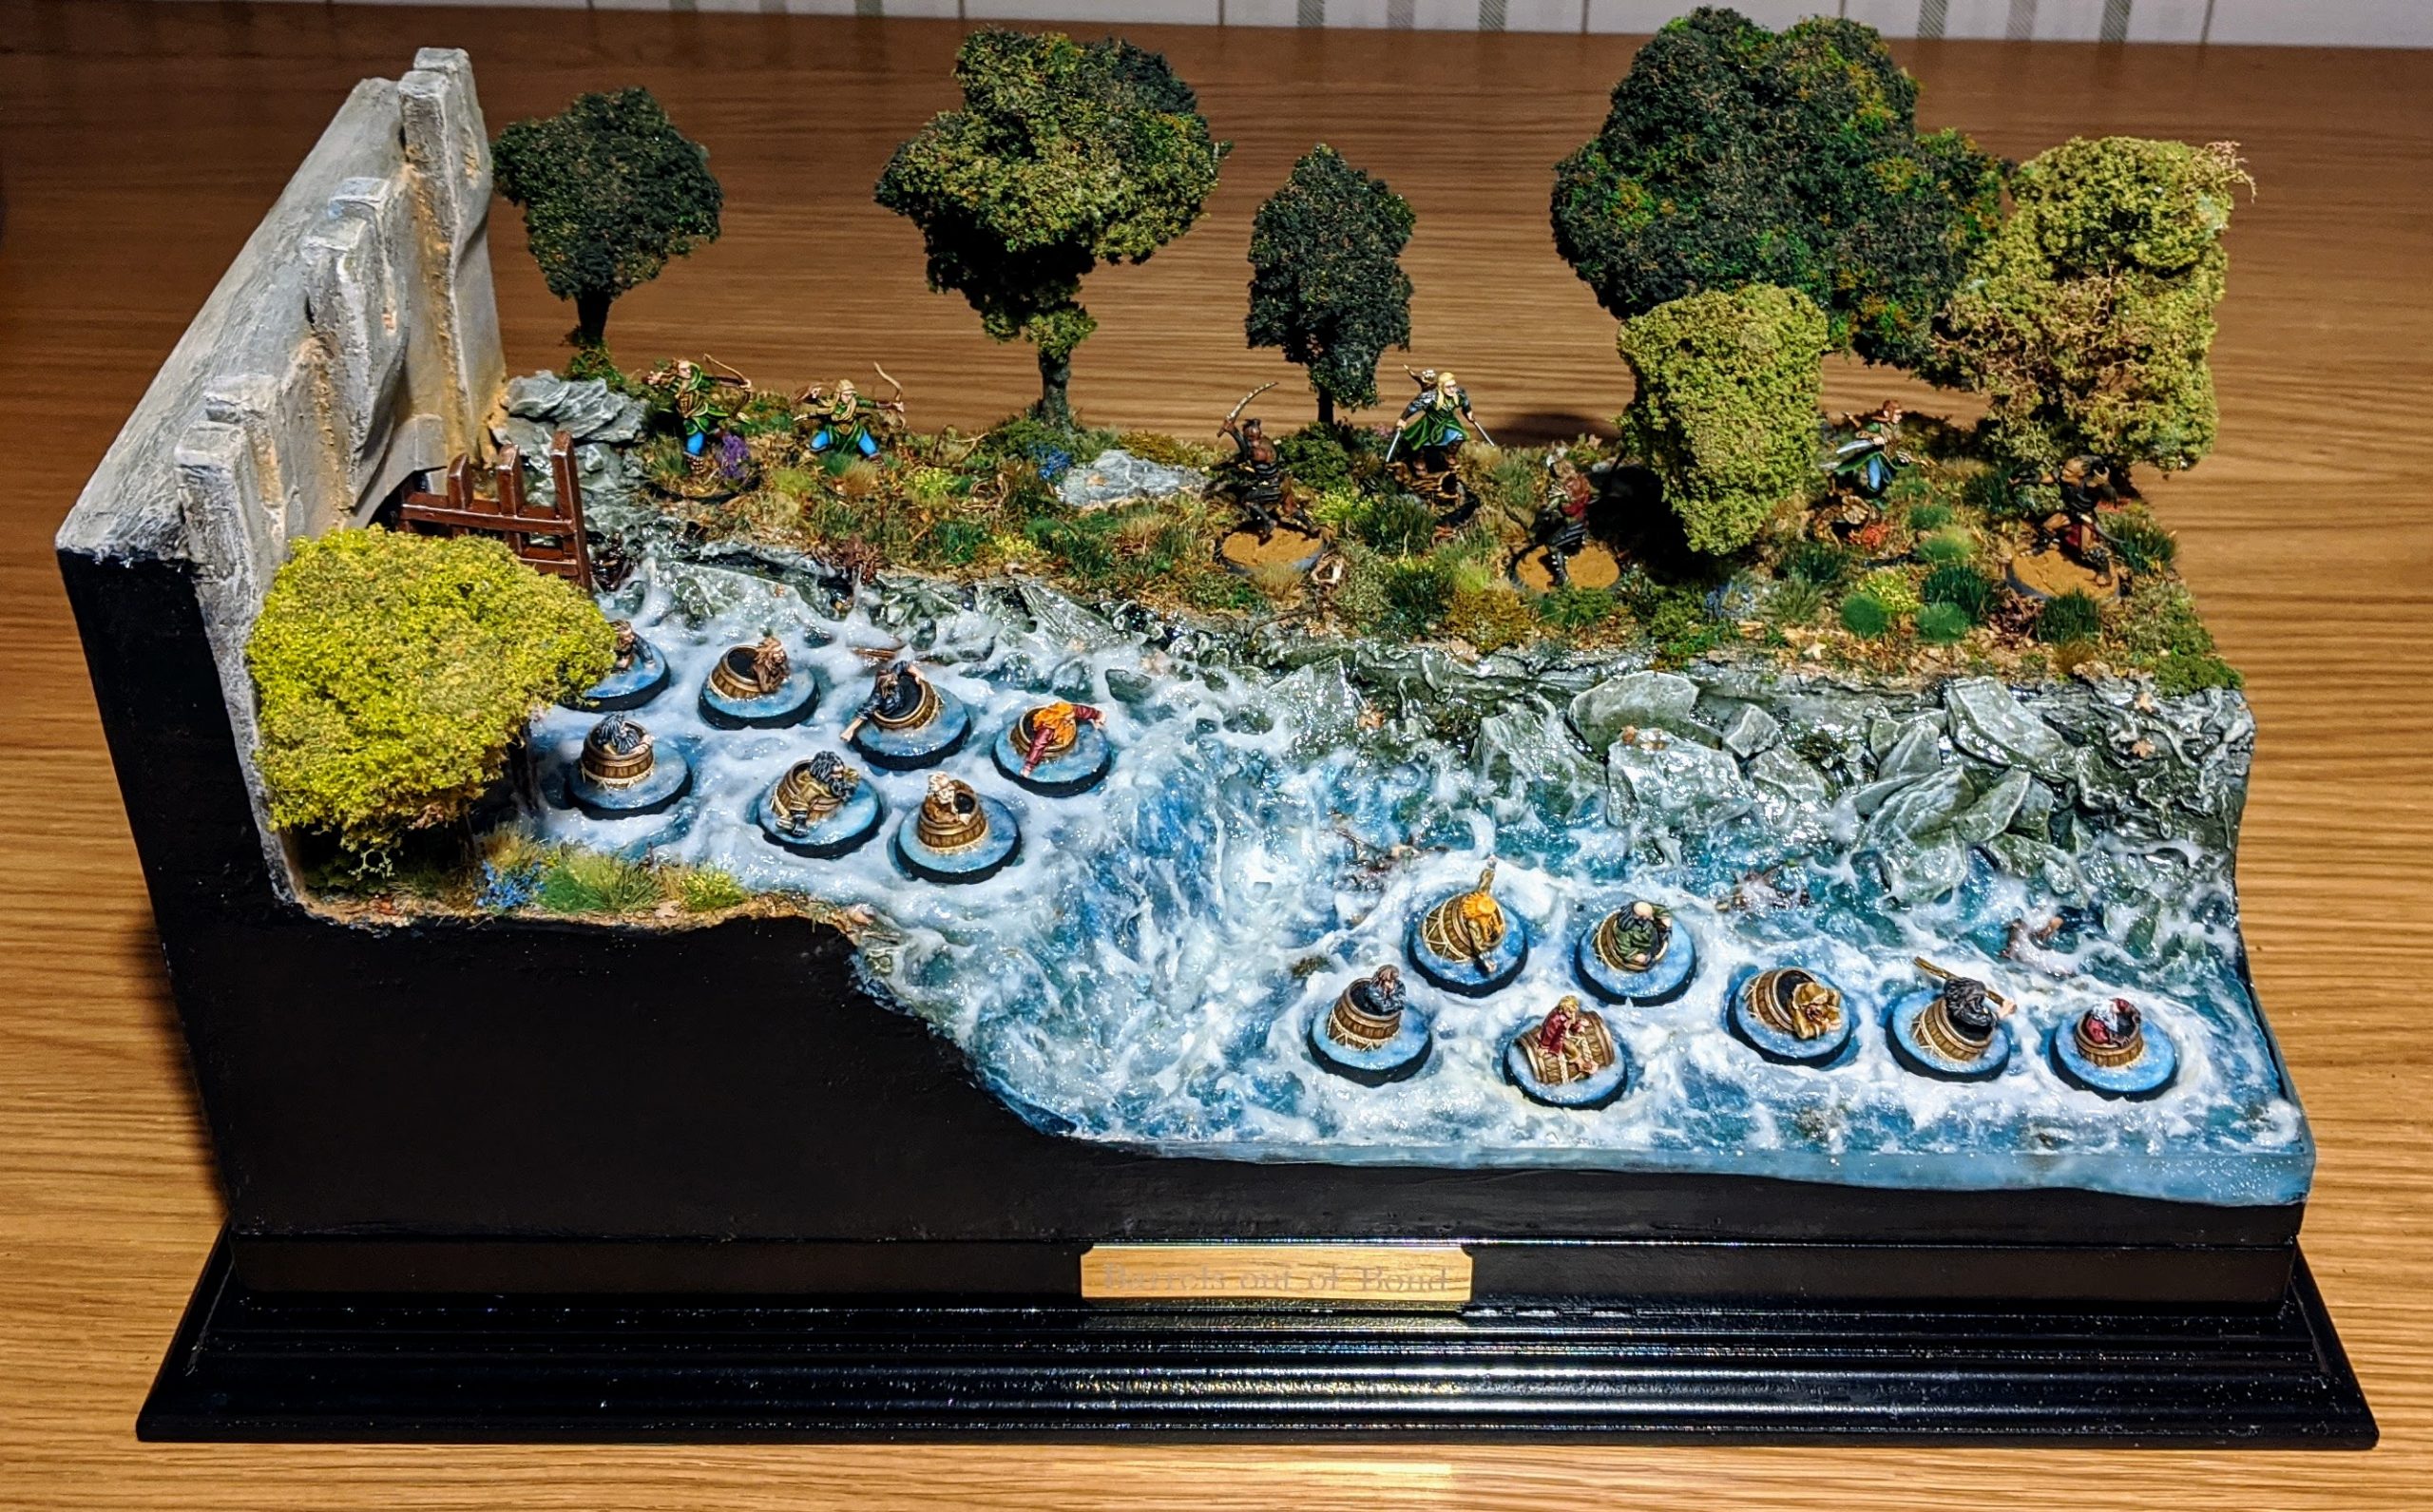
I’ll be honest, I considered holding back the money shot for part 3, but I’m way too excited not to share this everywhere immediately.
So, here is the completed diorama in all it’s glory. What a journey it’s been putting this behemoth together – I’m finding it kind of hard to process that it’s finished now. There’s been a lot of late nights and well over a hundred hours of work gone into making this diorama, and overall I’m very pleased with the end result. From the soaring highs of first putting down the tufts on the forest ground, to the crushing lows of the water effects curing opaque and yellow, it’s been a wild ride unlike anything I’ve attempted before in my hobby journey – and I certainly learned a lot of lessons in the process. There’s a laundry list of things I would change or do differently next time, but at the end of the day I’m just hugely chuffed to own his big old hunk of MDF, hard foam, plastic, resin, metal, plaster and acrylic that I made with my own stubby little mitts.
Still, the road goes ever on. I’m anxious to move onto my next big project – though there’s the small matter of Part 3 of this blog series to get through first! In Part 3, I’m going to deep dive into the miniatures themselves, with some close ups and my usual long winded ramblings about why I put what where – plus maybe a hint or two as to what’s up next on the painting table.
Until then, thanks for reading and happy wargaming!
1 Specifically, I used: Army Painter Highland Tuft, Swamp Tuft, Woodland Tuft, Mountain Tuft, Jungle Tuft and Lowland Shrub. I also used 4 colours of floral tuft (yellow, red, blue and lilac), a further 2 miscellaneous model railway tufts, Woodland Scenics Bush clusters, 3 types of Static Grass mixture and some ‘Forest Ground Cover’ (lots of tiny twigs) from World War Scenics.
2 Yeah… Don’t do this. A coping saw would be a much better idea for something like this, but I left mine in the attic and short term laziness won out in favour of using the right tool for the job. I’m an idiot, don’t be like me.
3 At this stage, I had 3 Hunters Orcs left to layer and highlight and a bunch of cleaning up to do on base rims.
5 I’m specifically thinking about the One Ring inscription in the Black Tongue of Mordor. I’m genuinely a little surprised that I couldn’t find some sort of ribbon for gift-wrapping with that printed on it.
6 And partially due to the fact I managed to scratch and bend the nameplate removing it from the plinth…
Well done. What a fantastic piece!
Thanks so much for taking the time to comment with such kind words, I really appreciate it!
can you make me one!