

Welcome back for the fourth instalment of The Emperor Protects, a series of posts following the growth of my Adepta Sororitas Order Minoris, the Order of the Dying Light. Over the first three entries in the series, we’ve seen my latest army grow from a Kill Team to a fully fledged Battalion with boots on the ground, named characters, heavy firepower and close range threats. In this instalment, I ready the army for the tabletop by building it up to 1500 point list – using my remaining points to fill out some of the most obvious gaps. Let’s jump right in with some proper long-ranged anti-tank – an absolutely iconic item of Sororitas armoury – the Exorcist tank.
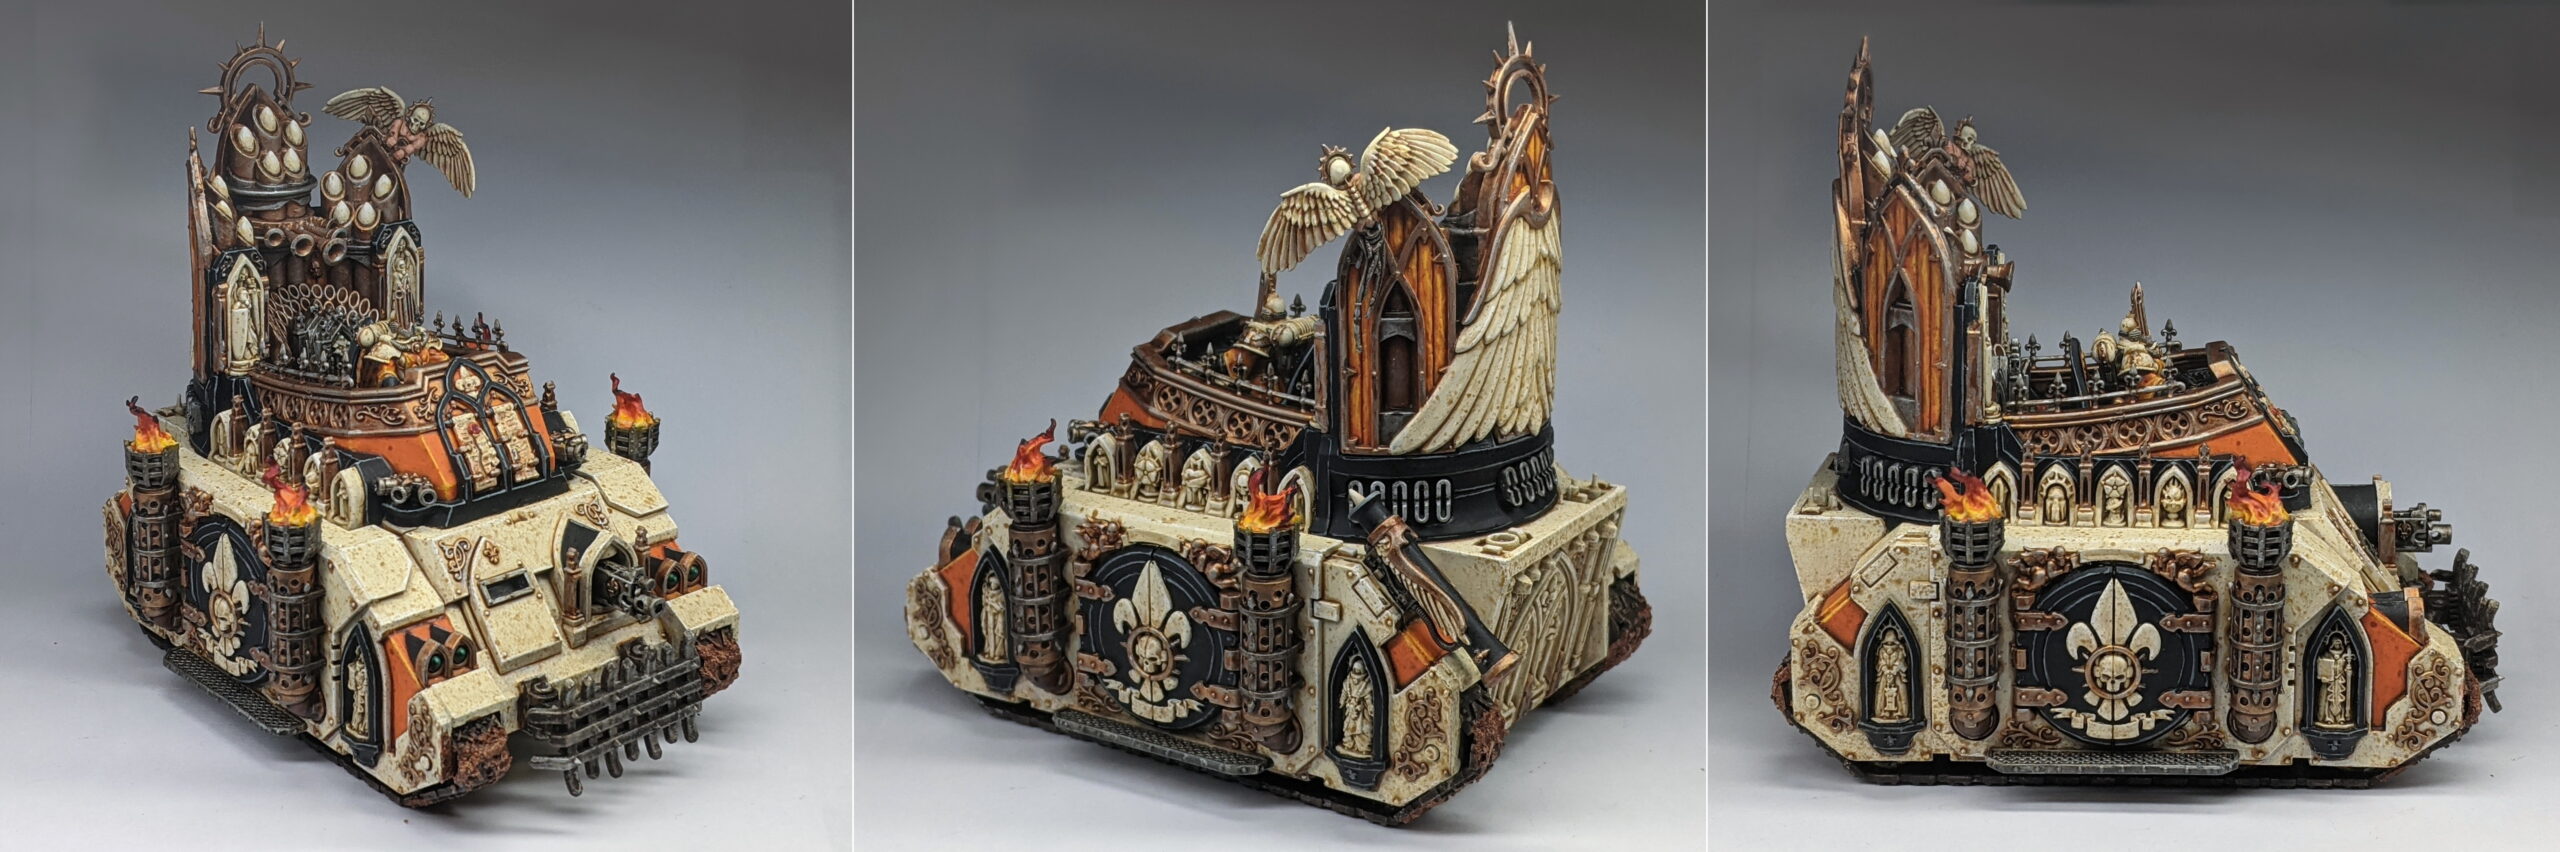
First impressions with the kit – holy cow this thing sure takes some time to assemble. It’s not especially fiddley or anything – the Cherub and decorative filigree above the organ are by some margin the most delicate pieces – but there’s just an awful lot to do. If you’re the type of person who enjoys assembling plastic kits, then you’ll love the Exorcist. Having built the Sororitas Rhino fairly recently, it’s interesting to see the ways in which the assembly process has evolved. For example, the wheels on the Sisters’ Deimos Rhino chassis comes partially tracked along the bottom, but you’ve still the tedious track pieces around the front and back of the treads to deal with. Speaking of which, a word to the wise – pay attention to which pointy wheel piece you use on each side of the tracks in step one of assembly; they are numbered 47 and 48 in the kit and they are not identical. If you get these mixed up, it’ll mess up the angle of your treads and cause issues when you try and put the front of the chassis down. You’ll notice that I put some texture paint over the treads of this tank (something I did not do for my Rhino) – this was mainly to hide the awkward join between the tread links that I had caused with my own negligence. I didn’t even understand how I’d managed to mess this up until I started building the second Exorcist (spoiler alert) and almost made the same mistake again. As ever with modern Games Workshop kits, it pays to pay attention.
Another piece of advice I have for this kit is with regards to subassemblies. The most obvious (and simplest) subassembly is the organist/gunner. Unfortunately, even without the gunner in place, you may still find yourself struggling to get your brush into a few areas in the cockpit. If you have the strength of will to do so, I also recommend not gluing in the little dollhouse looking relic sitting behind the gunners seat. I found painting that to be a bit of a chore, as well as getting in and around it to paint the carpet it sits on. Very easy just to paint that separately and attach it with super glue once it’s painted1. I might’ve gone to a little more effort on that little detail had I left loose for painting.
Outside of the cockpit, painting this model was a lot like painting the Rhino before it – only with a lot more going on. More raised panels. More hinges on doors. More rivets. More artefacts and filigree. And, of course more firepower. There’s just a lot to do on this model from a basecoat/wash standpoint before you even get onto edge highlighting or picking out the myriad little details such as the parchment across the front or the roses in the cockpit. With that said, I don’t really have all that much else to say about the paint job here. After four entries of The Emperor Protects, there’s just not all that much left that hasn’t been said already.
For what it’s worth, I really enjoyed much of the painting process on this miniature. The base coating was tedious for sure, but there were so many little bits and pieces to pick out beyond that made all the difference. With that said, I expect base coating to go a little faster on future Exorcists and Immolator tanks – if only because I now have something to reference with regards to what colour goes where.
After the massive time sink that was the Exorcist, I started looking for something quick and easy to break things up a bit – such as a character model. Enter, my Imagifier – not only a handy miniature on the tabletop, but also one of the few conversions of significance in this army.
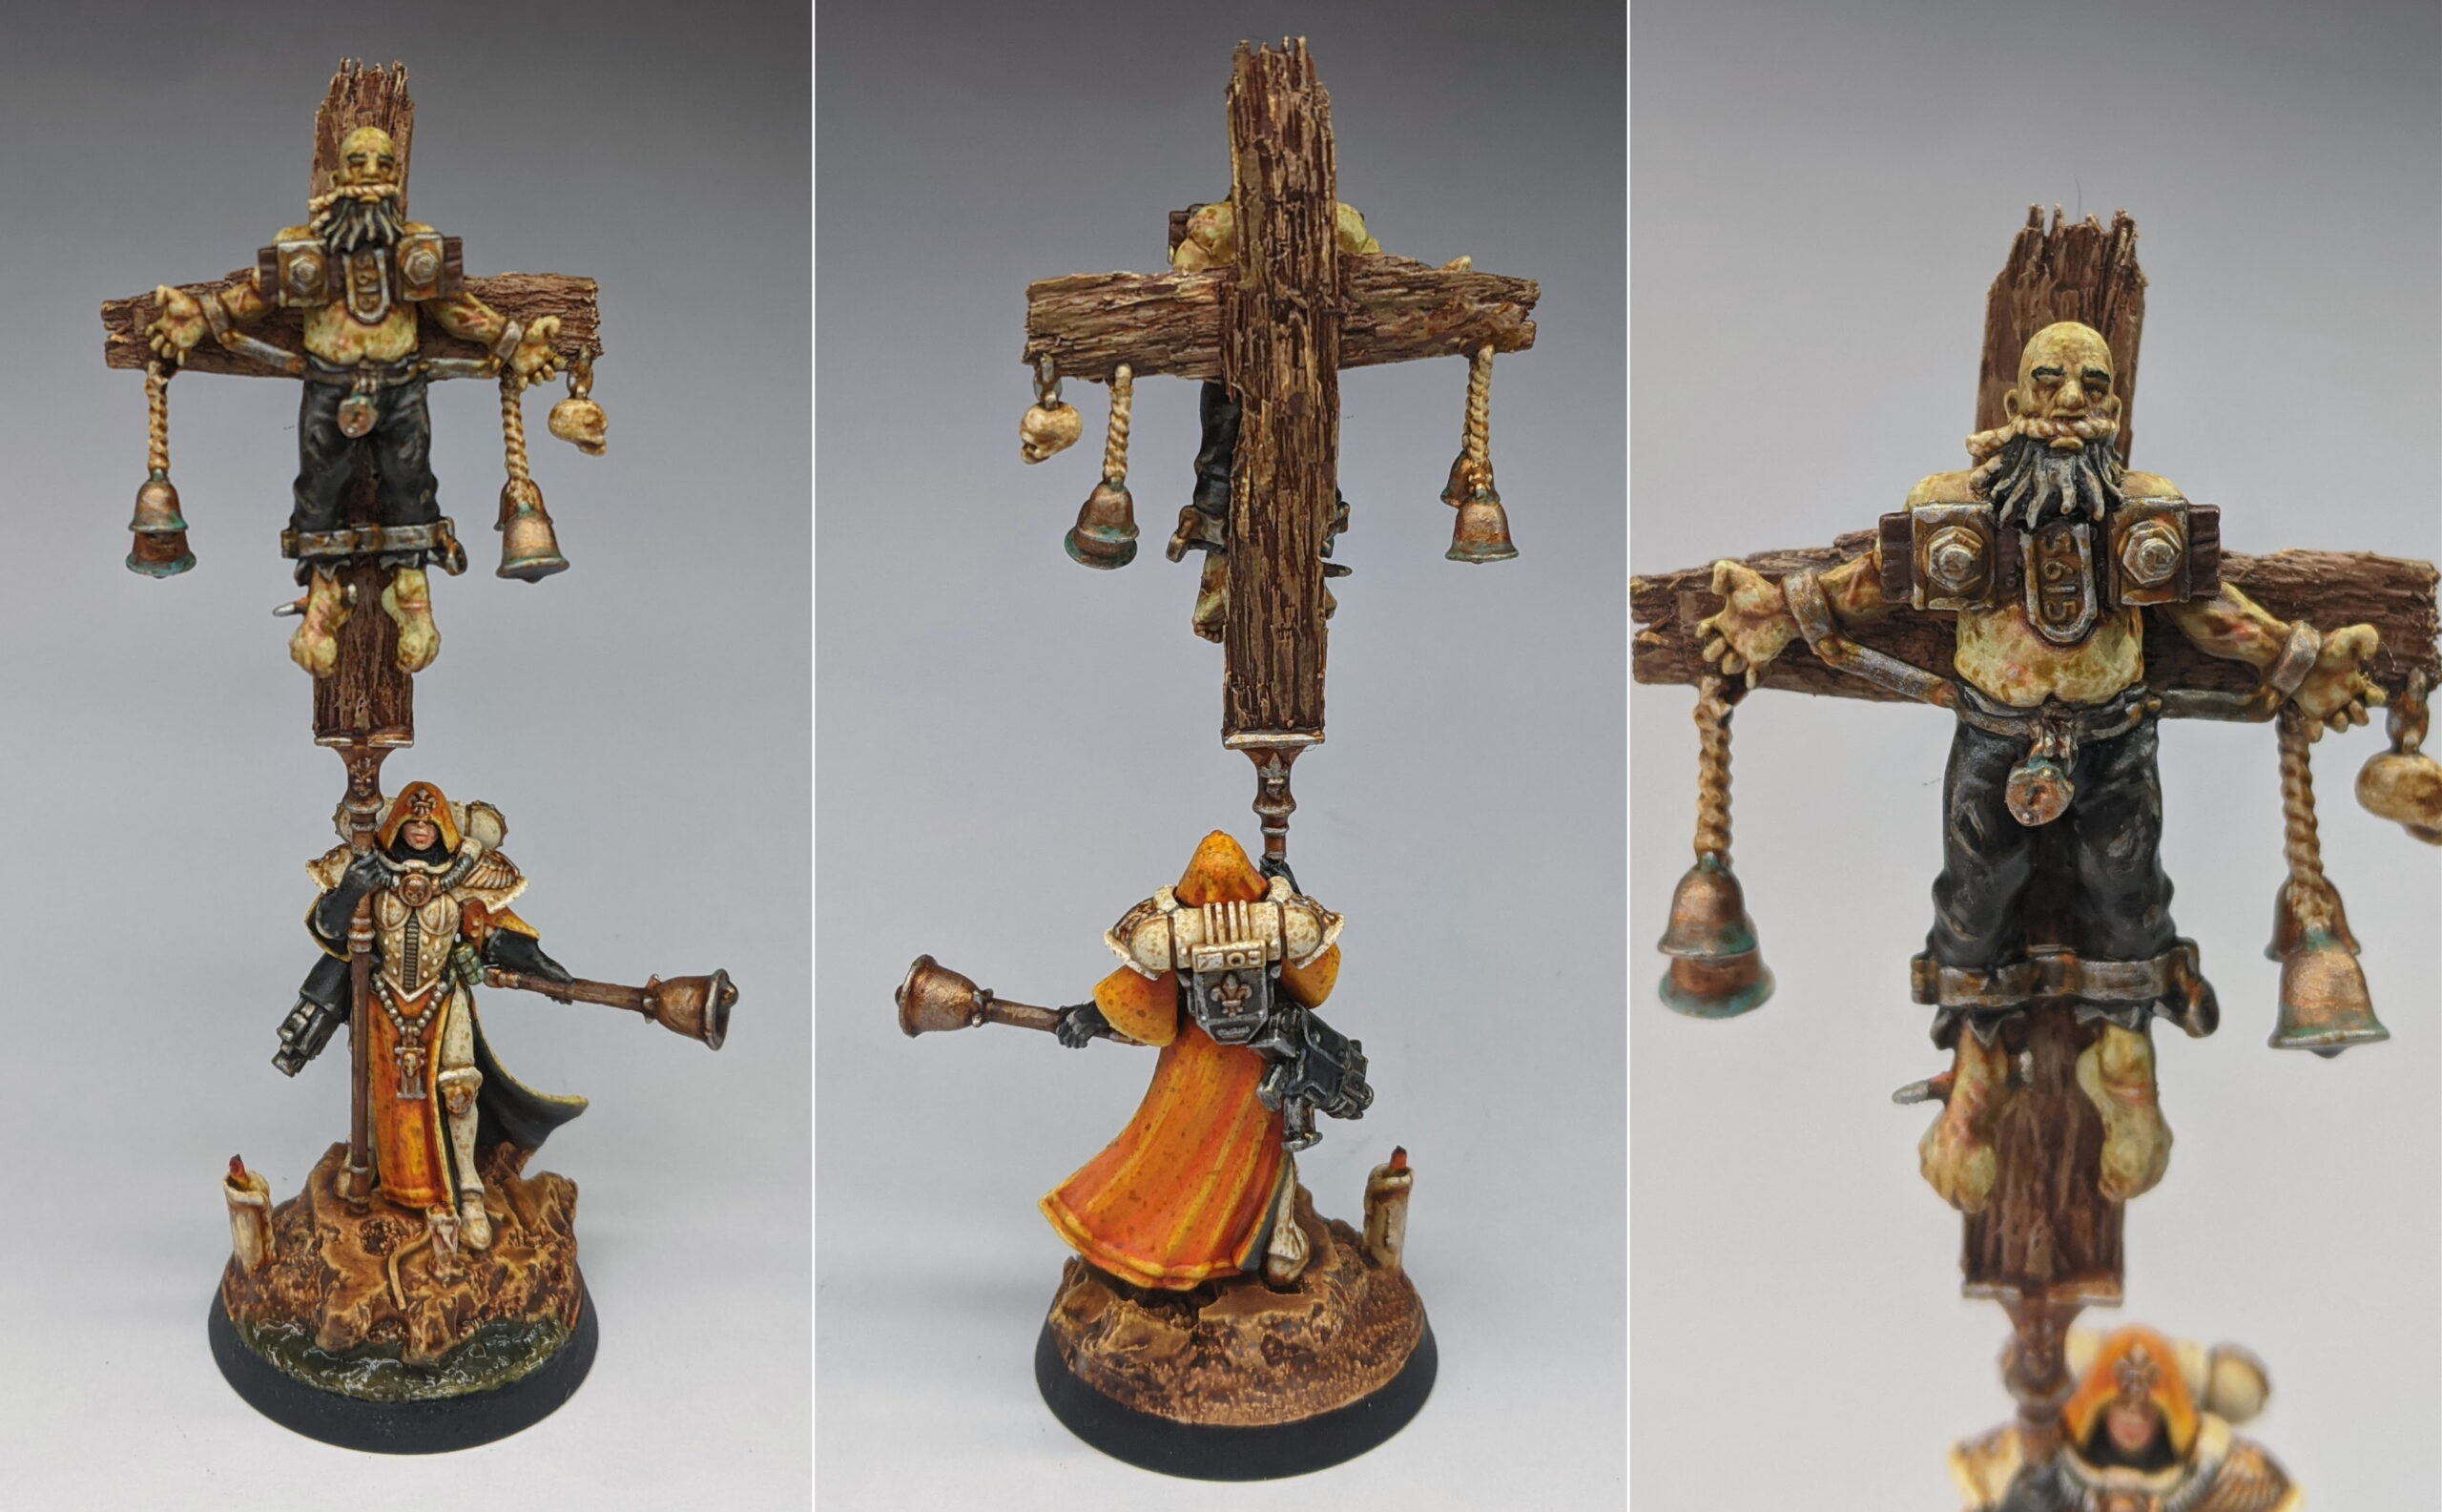
Way back when I was building my Mortifiers, I had a rare moment on inspiration where it occurred to me that one of the Penitents kind of looked a little bit like he was being crucified – arms outstretched, palms facing forward. This seemed like it would be a cool use of the bit, but I didn’t have any real ideas for it. It wasn’t until weeks later when I was discussing the army with a friend who said it would be cool to see some proper Witch Huntery things in the army – witches burning at stakes, for example – that the idea fully formed. What about an Imagifier, only instead of that big relic banner, they’re carrying around a crucified penitent as the battle standard?
There’s just something super Warhammer 40,000 about a Battle Sister going around carrying a live crucifixion into battle as a company standard of sorts – some unfortunate heretic2 gagged and bound on a stake, unable to even scream as bullets and debris cut the air around them. Yeah, I was doing this.
The conversion itself was pretty simple, really. For the cross, I took a couple bits of popsicle stick, cut a little half width chunk out of each of them where the cross would intersect and glued it together with super glue. Cross assembled, I took my X-Acto knife and just started hacking away at the wood – taking off the smooth edges, thinning it down a little bit to 28mm proportions and trying to add a little texture to the thing. I drilled a couple tiny holes and super glued a couple guitar string pins into the bottom to help affix it to the miniature. The Penitent bit, I assembled as if I was building for a Penitent Engine then cut the man loose from the engine’s interface until I just had the body and no wires or machinery. In this regard, the head wasn’t really salvageable, so I swapped it out for a gagged Empire Flagellant3 head instead. And that was.. it, really. I considered maybe cutting up and repositioning his arms to make him physically sag from the cross, but the bondage from the Penitent Engine itself kind of worked well as is. It’s not exactly the traditional method crucixion – nails in the hands and all that – but this is the 41st millennium. There’s something almost poetic to me about the idea of the Ecclesiarchy misinterpreting vague historical depictions of crucifixion and completely overengineering the solution instead. Anyway, I filed down the back of the penitent to get as much contact with the model and my cross as possible and super glued him in place. The last step was attaching the cross to the miniature itself. This was a fairly simple matter, as the Imagifiers simulacrum itself was designed to be glued into a little groove on top of the banner pole – the perfect place to attach my pinned cross. For a final touch, I glued a couple little skull totems from the Flagellants set to the ends of the cross just to give it a little more oomph.
Once again, the paint job was pretty standard affair with the only real difference being the penitents skin – which I painted a sickly greenish tone using Vallejo Game Dead Flesh and washed with Reikland Fleshtone. This was then layered with Dead Flesh and highlighted with a bit of Elfic Flesh before getting a little Fuegan Orange glazed into the recesses to tie everything together. Easy as!

Around about this point, the army was sitting pretty at roughly 1400 points – give or take some wargear here and there. Looking at the force all assembled, there was a decent showing for most aspects of the Sororitas’ panoply of war. At it’s core, the indomitable Saint Celestine, my Canoness and 3x MSU squads of Battle Sisters. For close range punch, I had my mobilised Repentia and Mortifier squads. For anti-tank support, I had an Exorcist for range and a (most likely outflanking) Multi-Melta equipped Retributor Squad. I had the several useful support characters including my Missionary, Hospitaller and Imagifier. What I was really missing was some speed.
A part of me was calling out to do some Seraphim here – we’ve got that Fast Attack slot sitting around doing nothing at all, after all – but I just couldn’t stop myself from building my models as Zephyrim instead. Although taking up yet another slot in the crowded Elites section of the army, this unit just really do it for me – a full squad of power sword armed jump infantry with additional filigree on the helmets and jump packs and a champion equipped with a big, gorgeous flowing banner. Awesome.
Assembling these miniatures was a relatively painless process, not too dissimilar from any other of my Battle Sisters. One minor deviation that I made from the kit was the Zephyrim Superior’s little jump pack decoration. The ones supplied in the kit all featured iconography of the five Orders Militant Majoris, none of which I really felt enough connection to commit to. Instead, I used a little metal candelabra that I had received as a free sample from Kromlech after ordering a bunch of their candle bits (as seen on all of the bases) which felt more true the Order of the Dying Light’s aesthetic.
At this point, normally, I just glue flying miniatures onto their flying stands and accept that it’s going to get frosted at the varnishing step – but I decided to try and preserve the transparency of these for once. Instead, I pulled apart five paperclips, drilled a small hole into the bit on their jump packs that attaches to the flight stands and super glued one side of the paperclips into the hole. This gave me a little something to hold onto while I painted the miniatures.
On the whole, not too challenging. As with assembly, these miniatures were not worlds apart from the standard Battle Sisters or Retributors, although I did get the impression that the bodies were a little more detailed – there were a greater abundance of talismans, straps, pouches and holsters, for example. Presumably this is due to a greater visibility without the bolter covering half of their torso. The most time consuming elements were the power swords and the pennant on the Superior.
These power swords are the bane of my existence. Power swords have never been my forte, although I do feel like these I really made my life difficult with these ones. The decision to paint them “monochrome” using silver and black makes it a little more difficult to see what I’m doing than working with a non-metallic colour and white. Additionally, these slender, pointy little swords are incredibly difficult to pick out the raised edges on and don’t leave a great deal of clean surface area to blend over. Still, after much sweating and swearing, I managed to approximate something at least resembling a quartered blend (if a bit crude). Still, beats a quick Nuln Oil wash and an edge highlight.
The Pennant didn’t require any special techniques or a great deal of thinking, just a careful hand and a bit of patience. I started by base coating all of the raised areas and trim in Elfic Flesh (technically this was already done alongside the power armour in the airbrushing step) and then picked out alternating recessed areas on the flag in Fire Orange, followed by painting the remaining sections in Black. I did the orange first as this would require a couple of coats, and it was easier to clean up any overpainting with black than the other way around. After I finished applying these basecoats, I followed up with two layers of highlights over the orange and black sections – adding some Elfic Flesh to the black and Gold Yellow to the orange to help add a little depth to the flat colours over the curved areas of the flag – not a crazy amount, and not especially neat, but just enough to prevent it looking unrealistically flat. I then smoothed out these highlights with a wash of Cassandora Yellow over the oranges and – when this had completely dried – Nuln Oil over the black. This, of course, made a bit of a mess of the raised/embossed ivory detail on the flag, so I went over this detail again using Elfic Flesh to tidy it up. The trick here is to apply very little pressure, minimising contact with the brush and the model such that the brush naturally picks out the sculpted detail for you. Happy that my detail was crisp and opaque, I applied a thin wash of 50:50 Lahmian Medium and Seraphim Sepia over the embossed detail and in the folds of the flag, followed by a layer of Elfic Flesh over the raised details and a highlight of White over detail on a fold or on the edges of the flag. Some of this step would be lost or toned down in the final, customary “flick Seraphim Sepia onto the model from a toothbrush” phase of the paint job, but that also helped tidy of some of my sloppiness in that step as well. Tit for tat.
Content that I had finished painting the miniatures, I impaled the paperclip handles into the bottom of a cardboard box with a little blu tack for stability and took them outside for a spray of Dullcote. While this dried, I painted the bases on the flight stands and sealed the top and edges by brushing on Vallejo Mecha Color Matt Varnish. I ordered a bottle of this a while ago to try as I was hoping to find something to shoot through my airbrush that could rival Dullcote’s finish and durability, and I must say I am immensely pleased with the results – this stuff is super matt, and I’m looking forward to seeing how it performs through the airbrush given how well the bases turned out with a hairy brush.
After all of the varnishes had dried, I pulled out the paperclip holders from the Zephyrim’s backpacks, carefully shaved off any paint/flash/glue that remained, superglued them to their flight stands and put a little Water Texture tinted with a drop of Athonian Camoshade over the water features. 12 hours of curing later, the miniatures were finished. I’m really happy with their overall look and aesthetic – although sitting them next to the Geminae Superia you can really see the scale creep that’s gone on with this ramge in even recent history. Hm.

With my Zephyrim in the can, my Sororitas army has reached a milestone of 1500 points – not too bad for January, eh? We’re on the home stretch now on our road to a 2000 point army, so stay tuned for Part Five where we’ve got a unit of Heavy Flamer armed Retributors in the most fitting transport of all – a flamer equipped Immolator. Talk about overcompensation4, eh?
Until then, thanks for reading and happy wargaming!
1 Wish I’d considered that before going ahead and gluing it in on my second Exorcist anyway.
2 Probably.
3 Truly the kit that just keeps on giving.
4 You may or may not have noticed that at this point that my Sisters of Battle don’t have even one measly flamer in the whole army. This is, I suppose, my way of attempting to correct that gross fluff injustice.
Sweet Emperor – thank you for documenting your wonderful Sisters force. It is incredibly inspiring as I am just about to embark upon my own SoB… Many thanks for the tips on where to subassemble too!