With my latest pair of armies for Middle-earth finally finished, I am for the first time in some while a free agent. Well, alright, there’s a huge pile of Blackstone Fortress expansions sitting on my shelf of shame with an even bigger pile of Adepta Sororitas boxes keeping them company. And yet, despite my general distaste for amassing unpainted miniatures, neither one of those projects are feel urgent to me. The Blackstone Fortress expansions were something of a “get it or regret it” purchase1, while Adepta Sororitas are an army that I’ve always wanted to get around to – there’s really no danger of me losing interest in that project altogether, it’s just a question of when inspiration will eventually strike.
Still, it’s an bit of an unprecedented time for my hobby. Several ‘real life’ factors have eaten away at the amount of time I could spend holed up in my studio painting miniatures, while the almost complete absence of gaming in 2020 has been slowly chipping away at my desire to paint gaming miniatures. With no events to prepare for and no big chunks of free time to smash out a 10 model batch, it’s just been harder and harder to get myself motivated to paint another 28mm army project.
So I took a little bit of time for myself to relax and unwind, played through the Metal Gear Solid Quadrilogy and thought long and hard about what my next move was going to be in this miniature painting hobby. I went back and forth about working on some more Middle-earth bits and pieces – anywhere from an Iron Hills Chariots to Smaug – but just couldn’t seem to find my mojo. That’s when a friend of mine messaged me asking if I had any interested in Malifaux.
My gut reaction here was to say “not really, no.” Although I’ve had a some interest in getting into some tabletop systems outwith Games Workshop’s ecosystem of FOMO and churn, there’s always been more than enough GW games to get around to that I’ve never really felt like I had the time. Even now, I’d love to build a Xenos army for 40K, a Mechanicum force for Heresy, a Witch Hunters warband for Mordheim, a gang or two for Necromunda, a Skaven army for the eventual Old World game and oh so many more. Still, being between projects, I thought maybe I’d entertain the proposition for once. And so I headed to Wyrd-Games.net to explore the factions.
I’ll be the first to admit it – as a wargamer, I am incredibly motivated by nostalgia. I play Space Wolves in Heresy because they were my first 40K army, and I have Skaven for Age of Sigmar, Blood Bowl and Mordhiem because they were my first love in Warhammer Fantasy. My main interest in Adepta Sororitas is that they embody the grimdark religious aspect of 40K that so heavily permeated the setting back in 3rd Edition, and my fondness for the art of John Blanche is most likely partly down to his prominence in the art of Warhammer when I first got into it. As such, I found looking at this wholly original setting of Malifaux with it’s unique aesthetic to be pretty jarring at first. There was a lot to love – Cyborg Cowboys, Witch Hunters with Ghost Rider-style heads, a mishmash of Western, Medievil Fantasy, Sci-and Gothic Horror – but none of it was really meshing with me.. until I saw them:
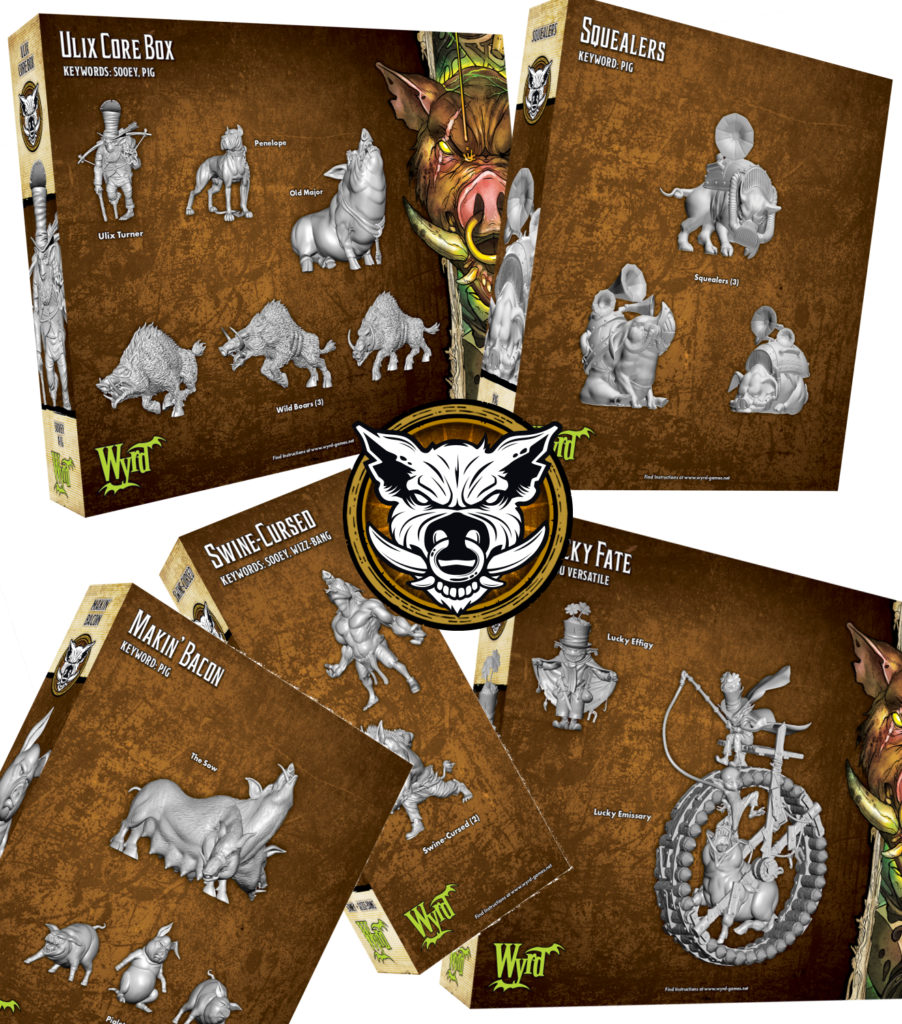
I’ve never been much of a Greenskins player in the worlds of Warhammer – as a wargamer who often takes his hobby way too seriously, comic relief factions tend to rub me the wrong way. For this reason, I’d kind of written off the Bayou / Gremlins faction at first. Despite myself, while perusing the various factions and masters, I stumbled upon one particular Gremlin Master – Ulix Turner. Here was a Gremlin character who’s keywords PIG and SOOEY consisted almost entirely of – you guessed it – pigs. We’re talking anything from wild boars to three-headed sows, lycanthropic were-pigs and the literal pig equivalent of Noise Marines. Needless to say, the hooks were in. Before I knew it, I had the Ulix Turner Core Set in my cart, along with the rulebook, Bayou faction book and a few bits and pieces to make up the rest of my crew2. I was all in. A day or two later, the goodies arrived; I cracked open the box and set about assembling the miniatures within.
I have a few thoughts.
After excitedly dumping the contents of the core set onto my desk, the first thought that entered my head was: “wow, one sprue”. This tickled me, for whatever reason. Sure enough, each subsequent box I opened – and I’ve now opened one of each size3 – was also a single sprue. I don’t know if I’m really making any sort of point here, other than – coming from an exclusively GW world where most boxes contain a pair of stacked sprues – it was just a bit surprising to see everything so.. standardized. It probably helps that these Malifaux miniatures don’t really come with options, nor do they get into any of that “duplicate, but using a different part on the 2nd sprue” chicanery that Games Workshop likes to employ on their snap fits. Just three3 standard box sizes for mummy sprue, daddy sprue and baby sprue.
The plastic of the sprues themselves is top notch. It’s a nice dark grey and feels like the same sort of robust plastic that Games Workshop4 uses these days. I’ve had a good look at a few kits now, and I can confidently report that there’s a good amount of intricate detail ranging from very slight surface texture to chunky folds and creases in garments and facial detailing.
As far as construction goes, my experience has been a little more mixed. I’m not sure I’ve built a single miniature thus far that didn’t involve some gap filling. These aren’t the same kind of gaps you’d expect from a resin or metal miniature, mind you – it’s more like a visible seam where two pieces join together. Chunky miniatures are often cast in two halves and lack the ingenious seam-concealing assemblies that Game Workshop have gotten so good at lately. This reasonable quibble aside, either Wyrd’s plastic miniatures have come a long way or the rumours of Malifaux kits and their “hundred’s of tiny, fiddley bits” have been greatly exaggerated – snap fit kits these are not, but I wouldn’t say they were more complicated to assemble than any other plastic miniatures I’ve put together. Take that with a grain of salt, however, as my experience here is clearly somewhat limited.
Overall, I’m very happy with the quality of these miniatures, and they were mostly good fun to put together and paint. If there’s one niggling issue I do have with the whole Malifaux system, however, it’s that the combination of monopose plastics and named character driven narrative doesn’t leave a whole lot of room to get creative. Where my most recent foray into skirmish miniatures – the long ‘out of production’ Mordheim – was rich with conversion and individuality, most of these Malifaux miniatures will be going together pretty much ‘as is’. This is not without upside – the Malifaux miniatures come packaged with rules reference cards featuring unique artwork matching up with each individual miniature (rather than duplicates for each profile), which is a really nice little quality of life inclusion. Furthermore, there’s no absolutely no duplicates, twins or mirror image sculpts here – your crew can only ever take any individual model as many times as there are unique sculpts for it. It takes a bit of getting used to, but there’s seemingly a reason for everything and it all just seems to ‘work’. Of course, one area that’s always open for creativity is basing – and Wyrd’s nifty little recessed/lipped bases really inspired me to attempt something a little special for these miniatures.
Malifaux is a fascinating ecosystem, because the roster of playable ‘Crews’ is split up between a wide range of factions including the Guild, the Arcanists, Neverborn, Resurrectionists, the Bayou and more. Within those factions are a number of different ‘Masters’ with an attached keyword or two from which you can hire your Henchmen, Enforcers and Minions. You can hire outside of your keyword, but this comes at a premium price and generally speaking miniatures with the same keyword will have better synergies. Each Faction has something of a ‘playstyle’ but there’s also a wide enough range of Masters within the faction that you can generally cover all your bases if you only like the look of one of them – this is even encouraged, as in standard play, your crews are picked out at the table after determining the scenario being played. Without getting too into the mechanics of the game (other blogs can and have detailed this aspect far better than I could), what this really means for me is that there is scope to play around with ‘theme’ on the miniatures basing. For Ulix Turner and the ‘Bayou’ faction, I decided that I wanted my basing to reflect their home turf – the swampy Bayou on the outskirts of Malifaux.
My two sources of inspiration for this basing style came from the Malifaux bases themselves and a pile of popsicle sticks lying next to my desk (initially intended for building some additional flooring for my gothic ruins terrain). The bases themselves have a slightly recessed centre where the miniature fits, which absolutely screamed “pour some Vallejo Still Water into me” – ideal for the swampy waters of the Bayou. I laid some some Vallejo Thick Mud down onto the base, leaving about 1/4 of the base untextured. While the mud was still wet, I cut up some popsicle sticks and laid them down to create ‘decking’ over about 1/2 of the base, using the wet mud as a binder to stick them down.
At this point, the base was ready to stick the miniatures on and – me being the excited child that I am – I did so without a second thought. For the sake of coherency, I’m going to outline how I painted and finished the base right now, but just for the record know that I didn’t do any of the following until after I had finished painting the miniature. First, I basecoated the majority of the base with Vallejo Beasty Brown, then drybrushed with Elfic Flesh to help pick out the raised edges. When this had dried, I threw on a couple wash coats of Seraphim Sepia over the whole thing. I didn’t bother using different colours or processes for the mud and the wood because, frankly, what little mud there was that wasn’t covered by planks was going to get loaded with tufts. For the water area, I painted in some Vallejo Heavy Grey and wet blended some areas with a little Vallejo Game Sick Green before washing the area with Athonian Camoshade. After cleaning up the base rim with some Model Color Black, the miniature is taken outside for a quick blast of Dullcote. When the varnish was dry to the touch, I super glued down an Army Painter Lowland Shrub and supplemented with Woodland Tuft and Jungle Tuft for variation if there was still space. The final touch was squeezing a few drops of Vallejo Still Water into the water pool – this took a few hours to cure, and then I’d have to layer it over again a couple times to get up to height. I hate how much Still Water shrinks.
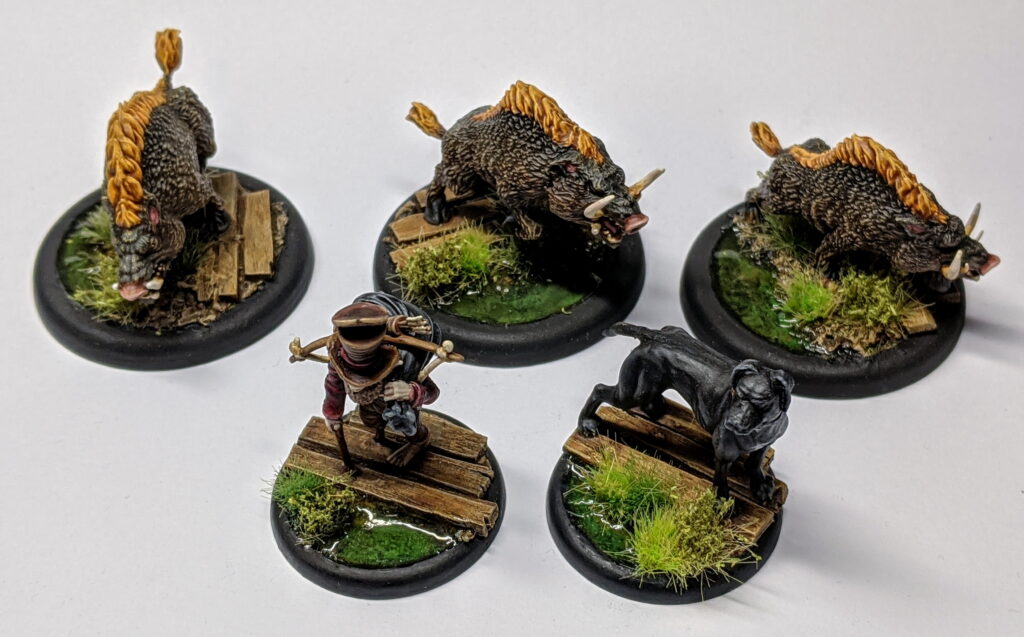
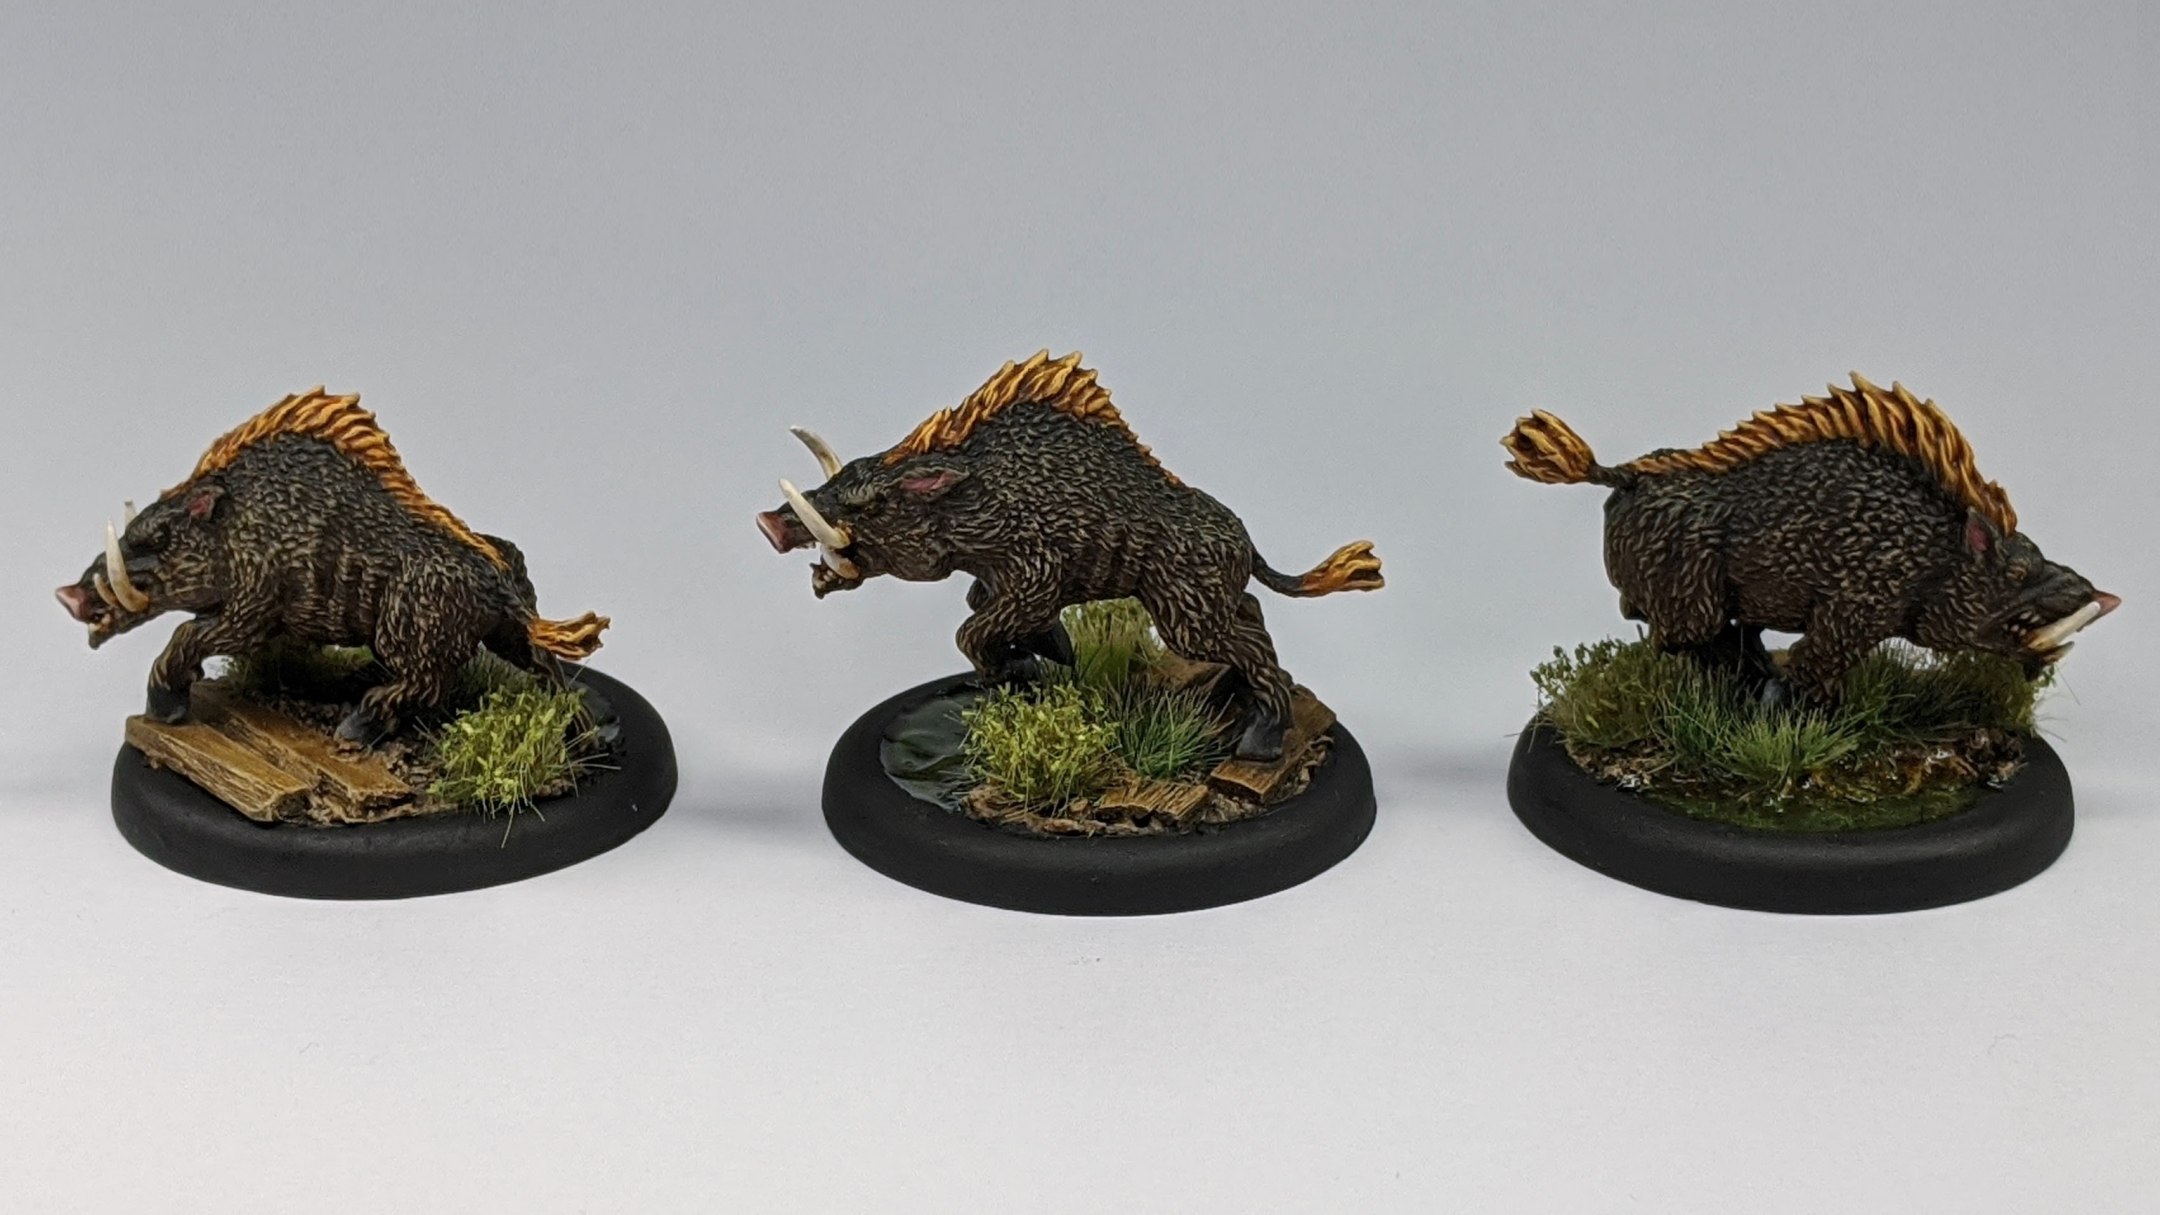
Anyway, I’m getting way ahead of myself here. For the actual miniature paint jobs, I began with “the basic troops”. In this case, that meant the only model type there was more than one of – the Wild Boars.
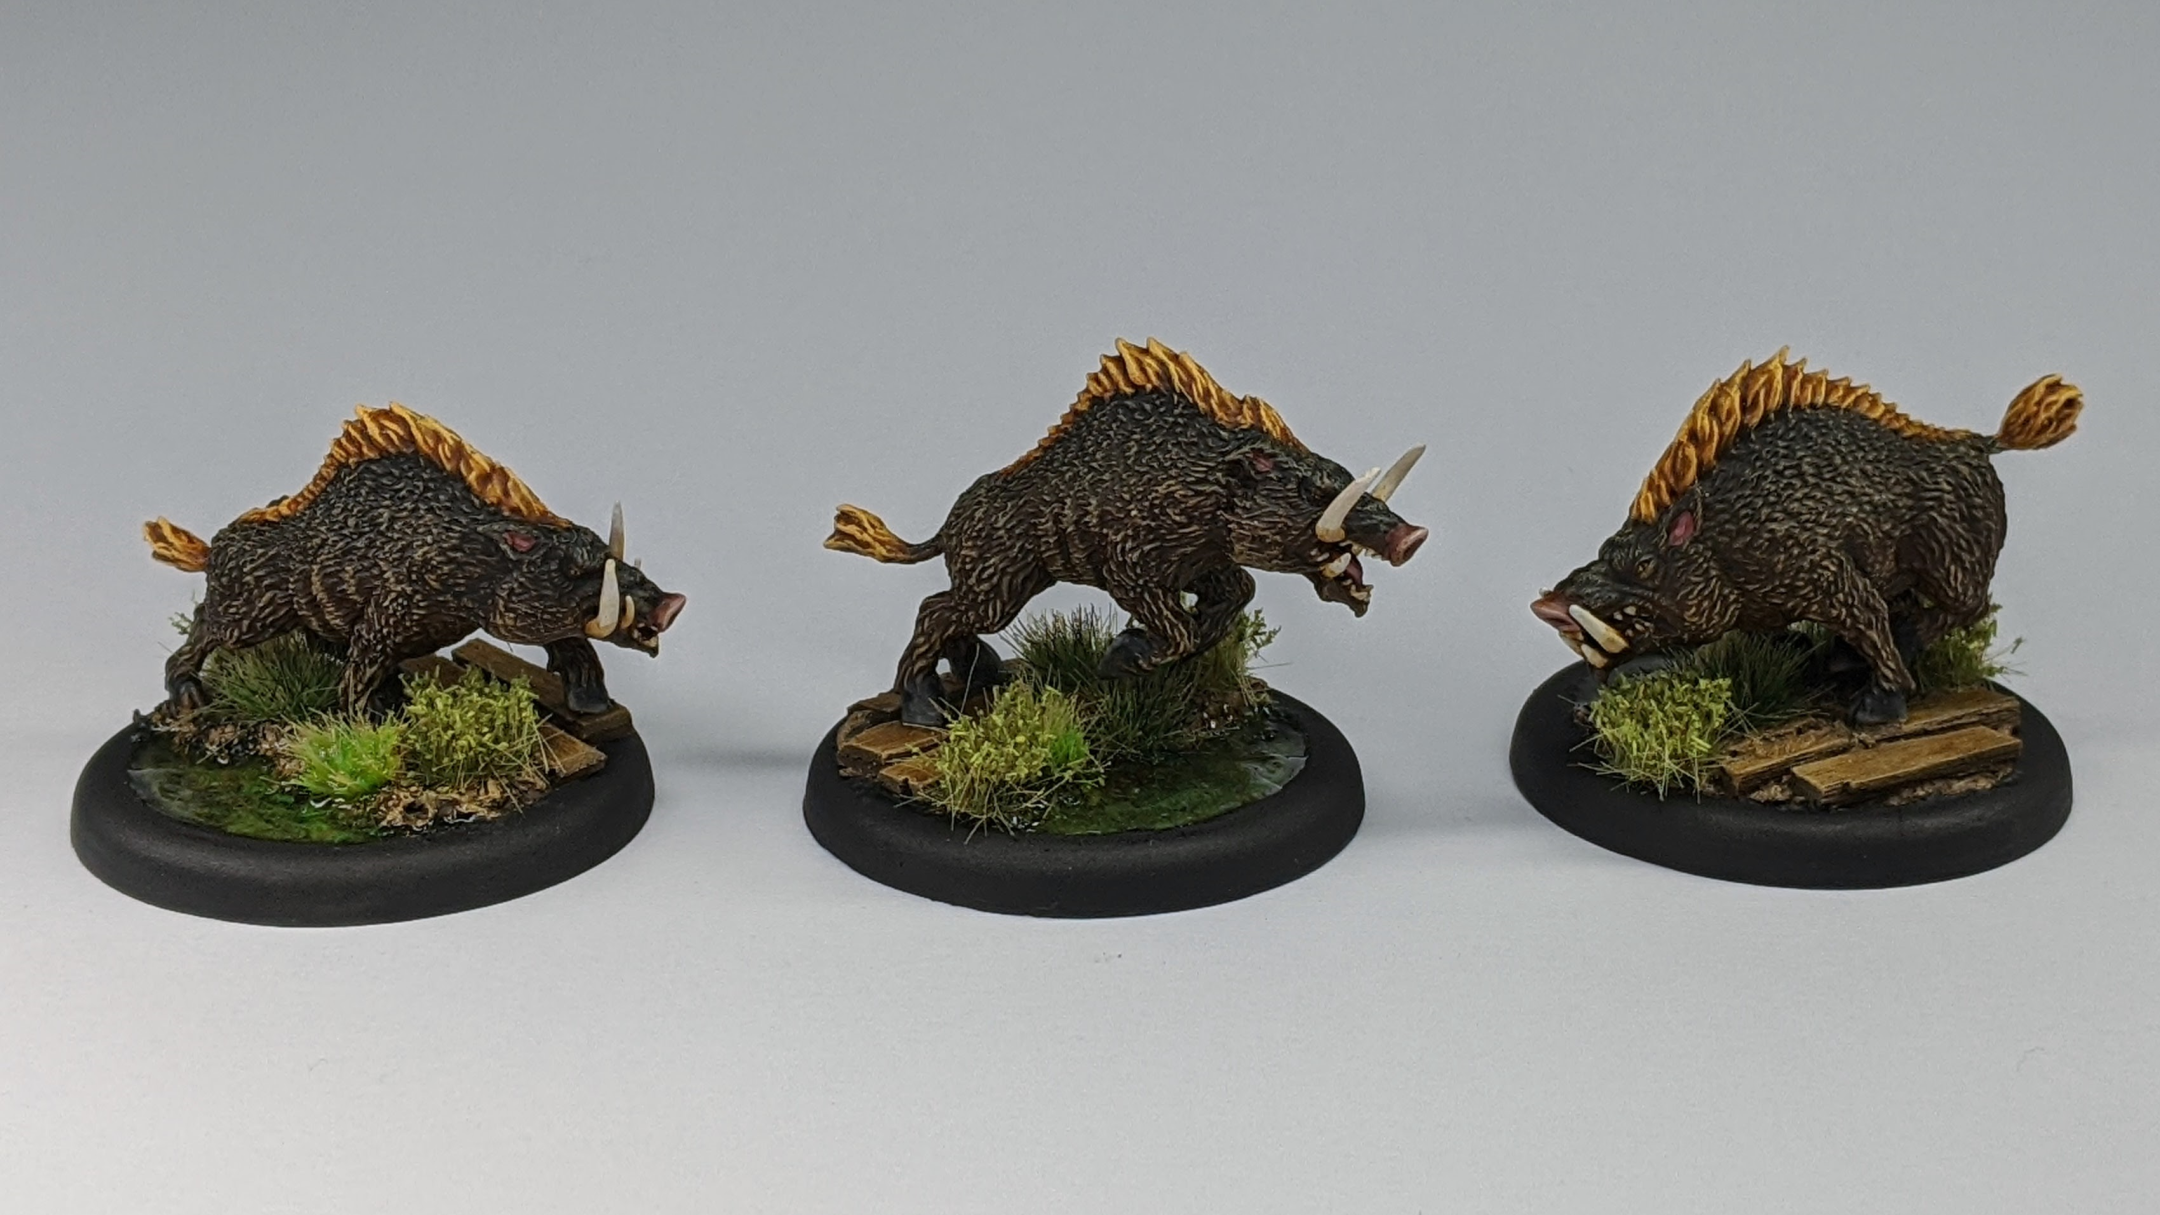
I remember saying way back in the new year that one area that I’d like to make some improvement on in my painting was that of fur, so I decided to leverage that big expensive airbrush I’ve barely used since purchasing way back in May. If I’d learned one thing during my most recent application of the tool, it’s that – at least for now – the purpose of the airbrush is less to do with creating quick effects or speeding up my base coats, and more to do with getting a more interesting base coat from which to build up my paint job from. With that in mind, I attempted to lay down a ‘realistic’ gradient to the fur, starting from the black mane all the way to a lighter brown for the underbelly, with a reasonably smooth transition in between. This went.. okay. The transition itself was fine, but the process was frustrating and time consuming – moreso than if I were to do this with layering and wet blending. I’m still finding myself struggling to thin my paints for airbrushing appropriately and either shooting overly thin paint or clogging up the nozzle, especially when changing colours. I’m putting this down to inexperience mostly, but in an effort to preserve my sanity I’ve just put in a big order for a bunch of Vallejo Game Air to make my life just that little bit easier in the future. After all, I’ve invested this much in the tool already, what’s a few more paints if it makes my life easier?
Either way, I managed to get the gradient down nicely enough, so onto the next messiest step – drybrushing. This too went.. alright. My plan, in theory, was to mix up a nice light khaki colour and slowly add more black as I went up – to keep the fur at the same level of contrast and preserve the gradient. Unfortunately, it’s very easy to add too much black to any mix – and very easy to get carried away trying to fix it. Before I knew it, I had a pretty consistent highlight colour the whole way around, and the gradient was severely washed out. I attempted to correct this with some careful applications of wash – Seraphim Sepia towards the underbelly, Nuln Oil towards the mane and Agrax Earthshade across the middle. The end result was a subtle little blend with a decent amount of contrast for the fur texture throughout – although the impact of my little gradient was washed out a fair bit in the process.
At this stage, the Wild Boars were still just looking very dark, so I set about picking out the little details in the hope that this would help matters. Rosy Flesh over the nose and inside the ears and mouth, Elfic Flesh for the teeth and a little dot of Gold Yellow for the eyes. The teeth and mouth were washed with Seraphim Sepia then picked out with their respective base coats, while the ears and nose were washed with Reikland Fleshshade and the letter edged again with Rosy Flesh. I put a little bit of Cassandora Yellow wash into the eyes then did my best to draw a little slit for a pupil on each in black. This was an improvement, but it just wasn’t quite popping enough for me yet.
After some consideration, I decided that a brighter, more saturated colour for the mane would help break up the excessive brown/black of the fur – perhaps a fiery, reddish auburn. To achieve this, I laid down a couple thin coats of Orange Fire, washed with Reikland Fleshshade then layered and highlighted with Orange Fire and Gold Yellow to push the contrast some more. It was like I’d just found the final piece of the puzzle – suddenly my amorphous brown blobs were eye catching and exciting to look at, with the bright orange complimenting the brown nicely – and even helping to accentuate the subtle gradient in the surrounding fur.
A little varnish and the finishing touches on the bases later, my first Malifaux miniatures were complete.
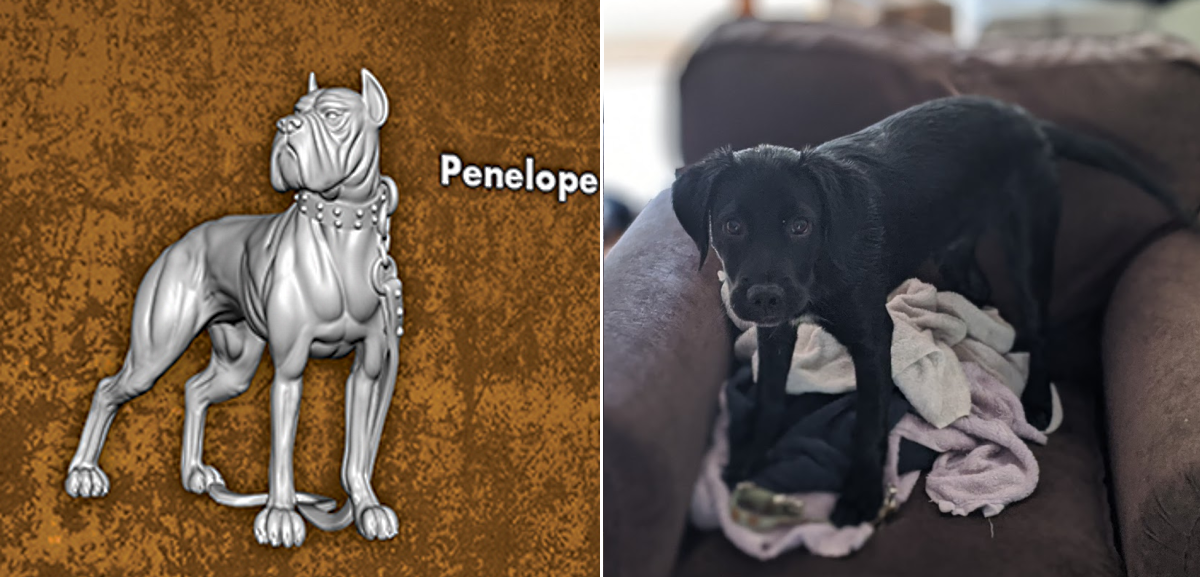
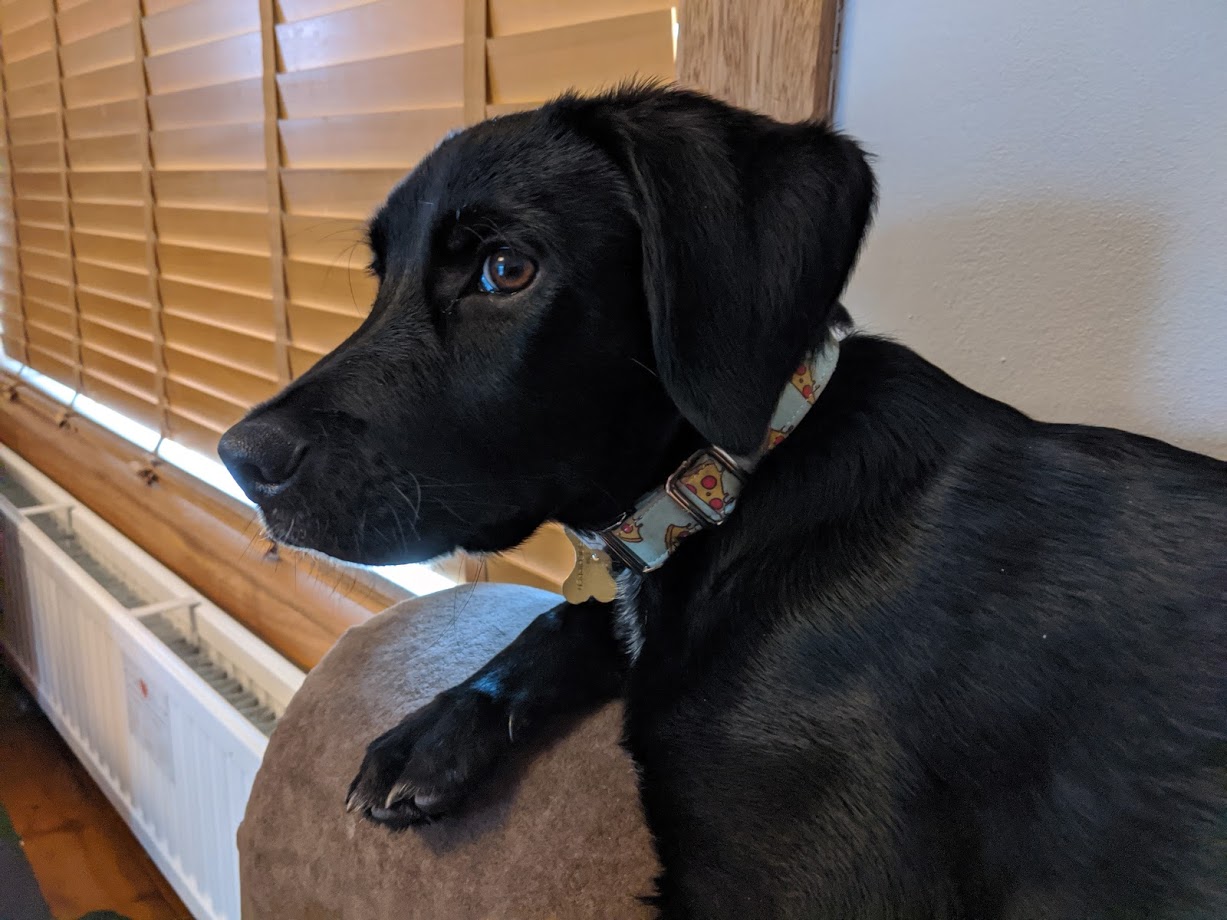
The next miniature is a little special, and not just because it’s the only conversion I attempted with the core set. I decided to convert Ulix’s trusty hound Penelope into a little replica of my own trusty hound Oreo (pictured above5 beside a render6 of the original miniature for comparisons sake). I decided to attempt this conversion upon assembling the original miniature, when I realised that there were enough similarities in build between Penelope and my own dog – the slender body and long legs – that such a conversion wouldn’t be overwhelmingly difficult. Penelope’s Mastiff build was obviously a good deal more muscular than my Cockador Oreo, but that could be excused away as ‘heroic proportions’7 while the other key differences – face, ears and tail – could be adjusted with a little creative use of green stuff.
The tail was the simplest change, if maybe the fiddliest. I rolled up a sausage of green stuff and attached it over Penelope’s docked tail to extend it out. As a little in-joke to myself, I put a little kink in the tail. Oreo has this little quirk where he stretches his tail out with a little kink halfway down every time he does the business. While I was in the area, I used some green stuff to make the miniature ‘anatomically correct’ for Oreo’s sex. If I’m honest, rolling up a tiny little manhood for a dog miniature was one of the weirdest ways I’ve ever spent a Thursday evening – so no, I won’t subject you to a photograph of my tiny sculpted doggy manhood. But it’s there, I promise.
The first and most obvious addition to the head would be Oreo’s floppy Cockador ears – to achieve this, I sliced off Penelope’s big prickly lugs and sculpted on my own pair of floppies. This was trickier than I expected – getting the ears in the right position with the right angle and the right amount of lift from the head is hard enough, but doing so without malforming the thin, delicate shape of the ears was a nightmare. I’m not so sure I did a great job on these, but they at least look roughly like what they’re supposed to, so I’m calling that a win.
Next up was the face. Penelope’s Mastiff mouth was too grizzled and chonky for my little pointy pup, so I shaved down the face with an X-Acto Knife and resculpted the upper lip with a little green stuff. I’m happy that I got the right shape overall here, although I do regret not filing down Penelope’s wrinkly brow – it’s excusable as an embellishment of the miniature, but still a little less faithful to my own dog.
For the final touch, I rolled up a sausage of green stuff, flattened it into a tiny little stick of him and attached it in a ring around the miniature’s neck for Oreo’s signature collar – more on that shortly, but for the moment, here’s how the miniature turned out.
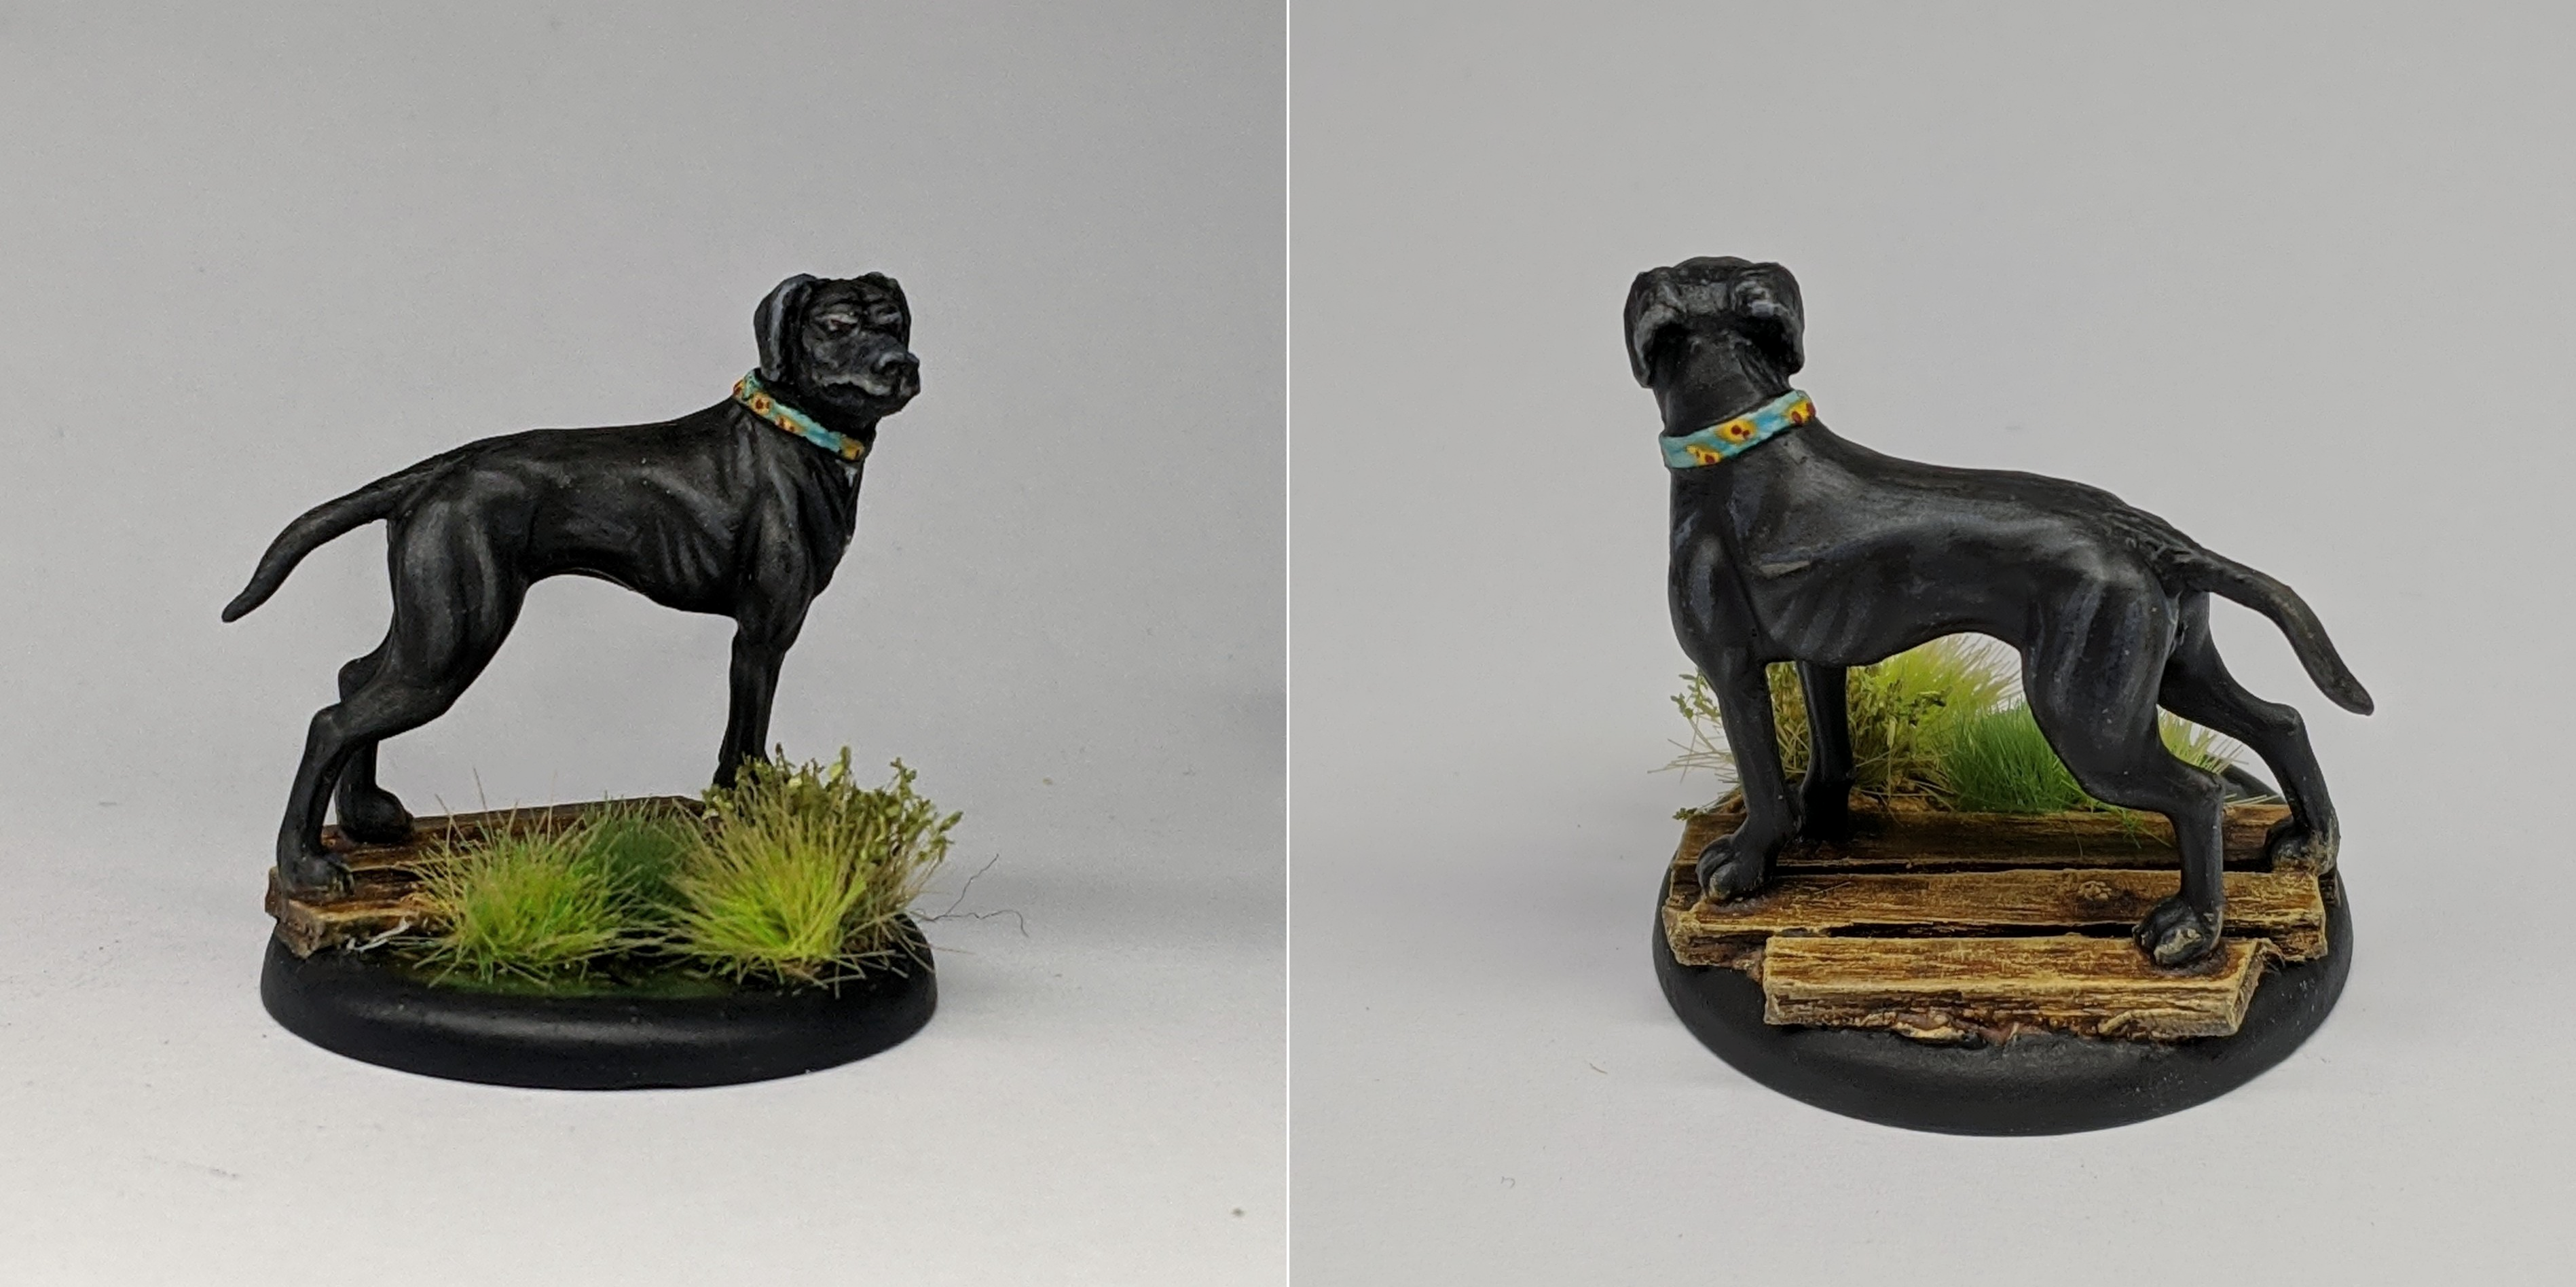
The painting process for the fur was.. Yeah, nothing to write home about really. After a subtle grey zenithal basecoat, all I really did was apply layers of pronounced grey highlight to the miniature followed by a 50:50 mix of Nuln Oil and Agrax Earthshade8 to tone it down and smooth out the transitions. Rinse, repeat. A simple process, but I think it ended up with just enough definition to the miniature’s musculature without it getting too heavy handed and reading as grey.
The most interesting part of the paint job was, of course, the collar. My dog Oreo has a very distinctive collar, which my fiancé found online some time before we got him and we both really liked. Here’s a picture below that shows it off a little better.
For the base colour, I used Vallejo Model Light Sea Grey, washed with a mix of Biel Tan Green and Guiiliman Blue, then edge highlighted with the original Light Sea Grey colour. For the teeny tiny little pizzas, I painted triangles of Leather Brown for the crust, with a smaller Gold Yellow layer over this for the cheese and finished with little dots of Heavy Red for the pepperoni. This was bar none the tiniest free hand that I’ve ever attempted on a miniature, and I think it went pretty well. If you really scrutinise, you’ll see a couple slices aren’t really triangular and a couple of the pepperonis weren’t perfect little dots. Still, at the size we’re talking – and we really are talking 1mm wide for the collar tops – I’m not going to sweat a couple of minor imperfections.
I had a lot of fun converting and painting this miniature. There wasn’t a whole lot of creativity involved in the assembly of the other miniatures in this set, so it was refreshing to push out at the edges of my comfort zone with the sculpting – and the otherwise quick and painless paint job didn’t hurt matters either. It’s also nice to have a 30mm tribute to the little terror that’s been monopolizing so much of my free time the past few months.
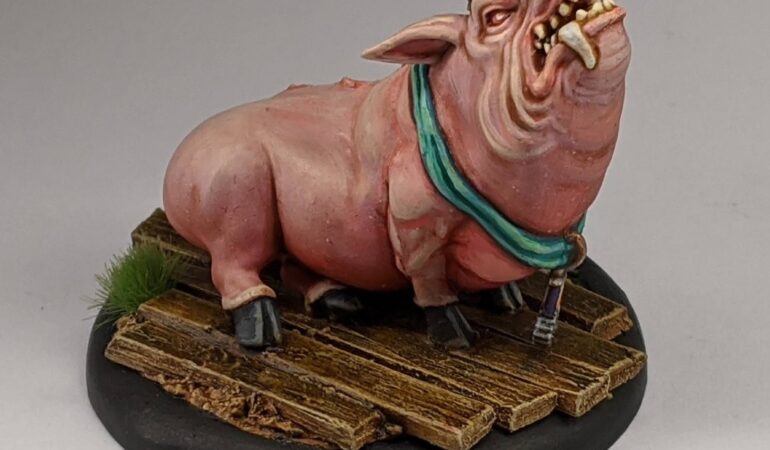
Getting back to the bacon, next up was prize pig Old Major.
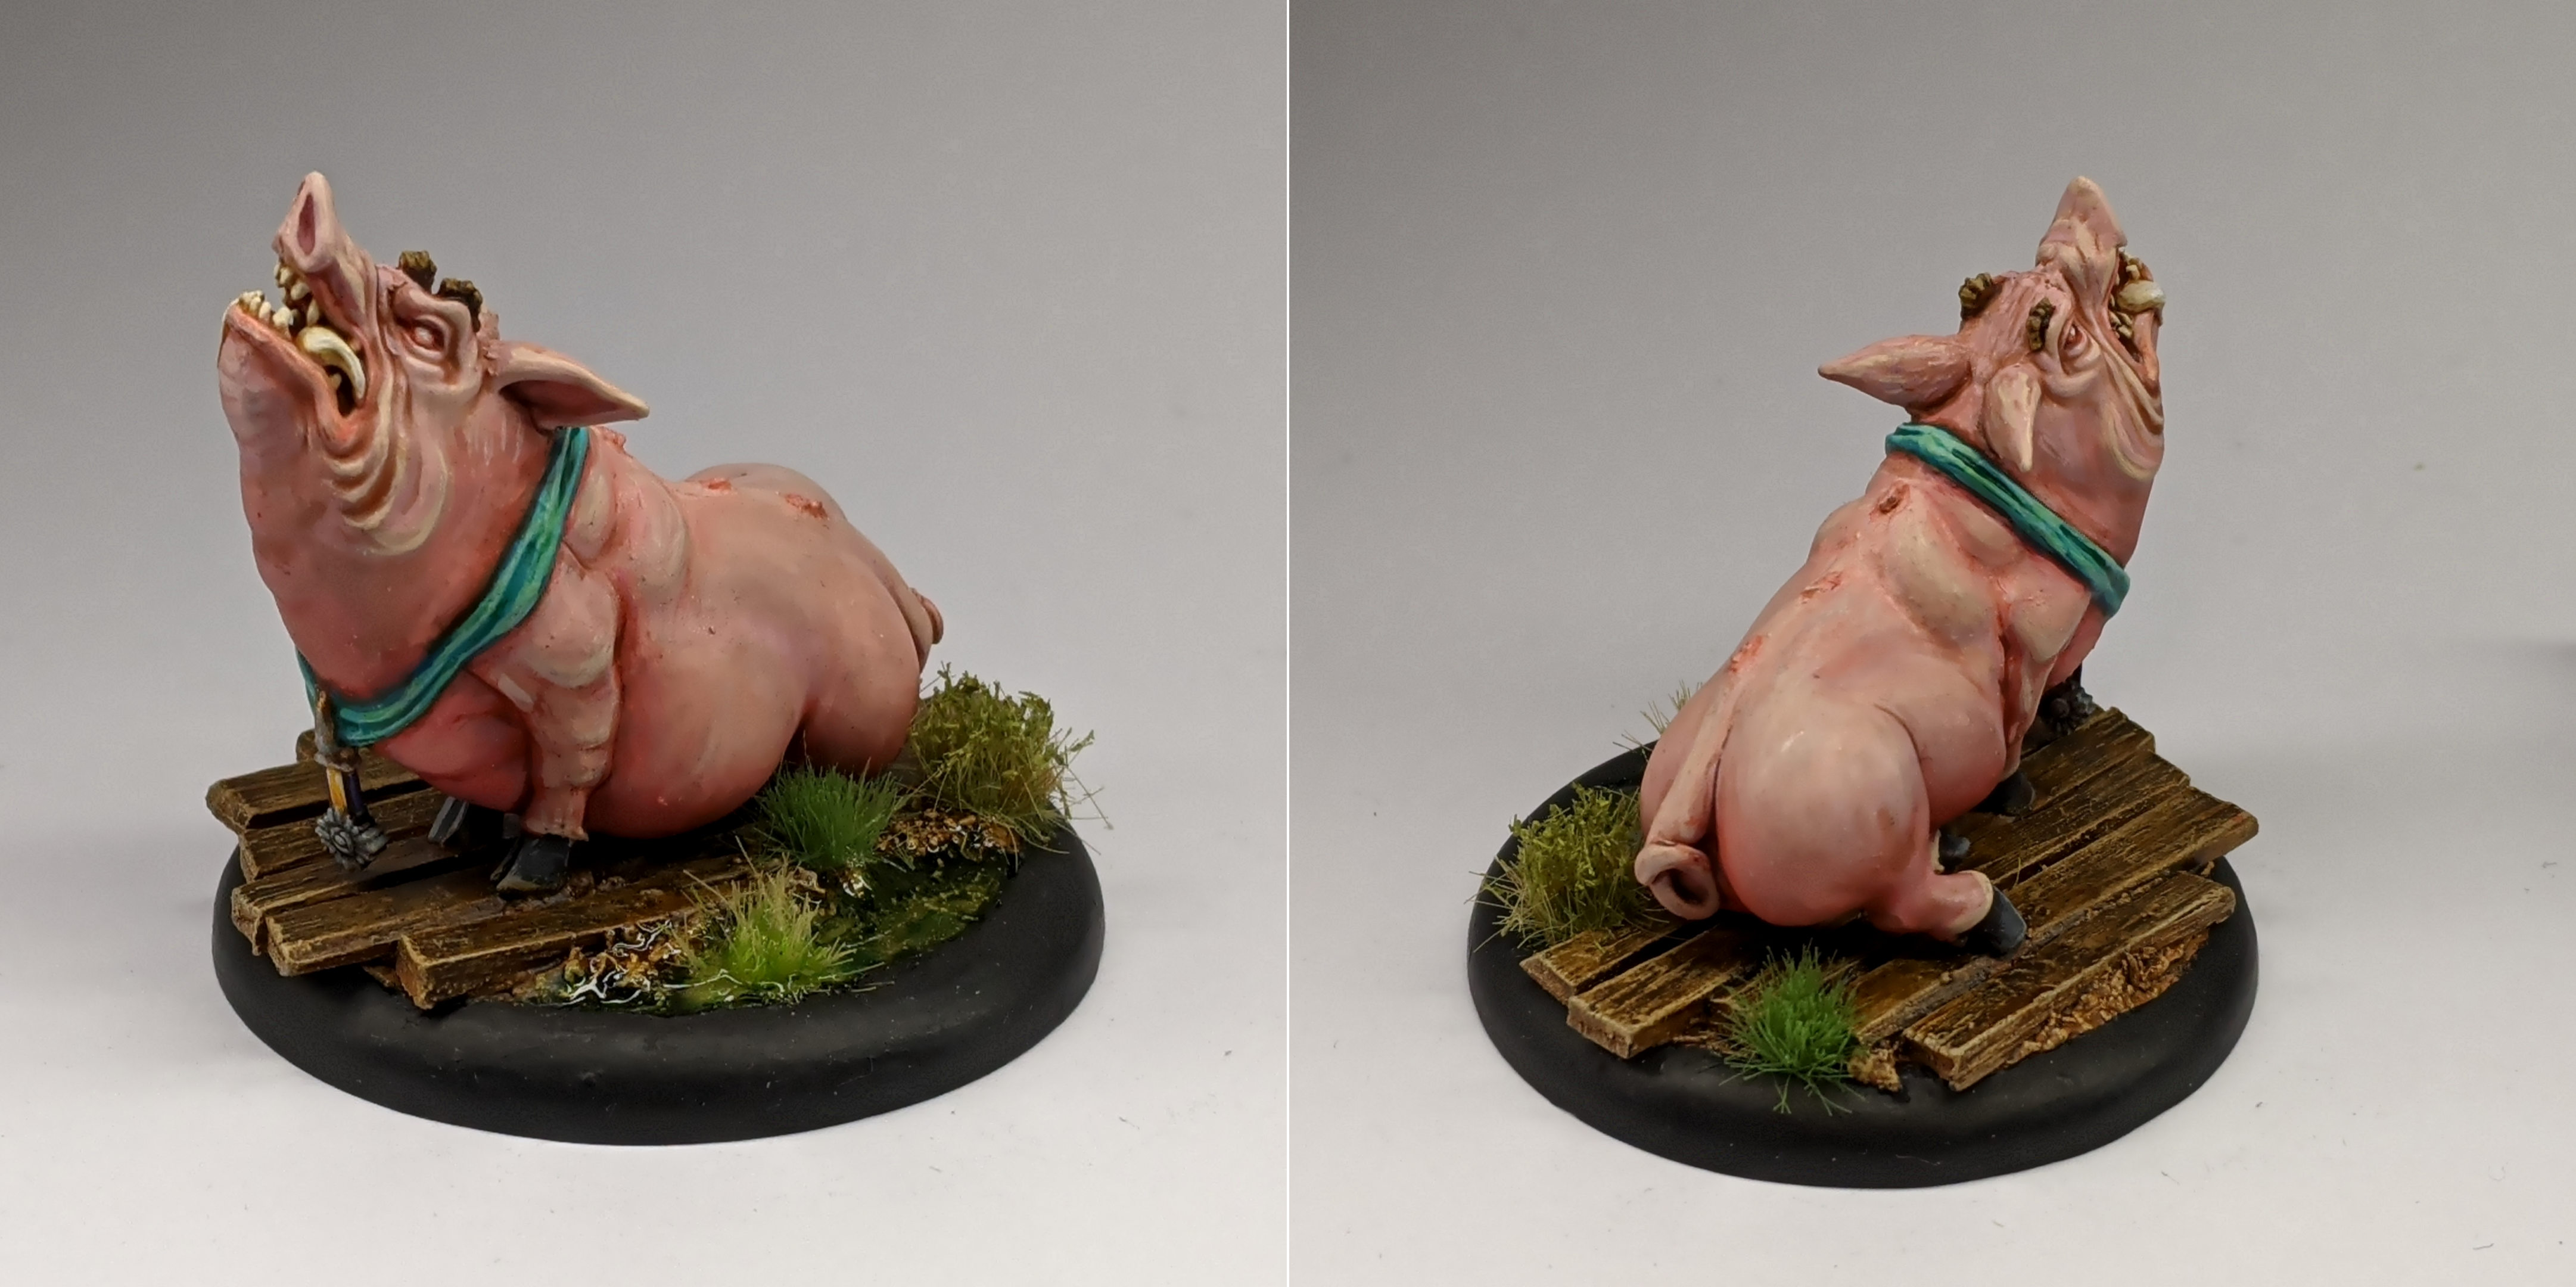
I don’t often make this claim, but this is one of a small number of miniatures that I’ve painted that I believe that looks way better in real life than it does in photograph. I really pushed myself with this miniature and used a lot of techniques that I don’t often bother with in pursuit of some real creamy blends. And it’s all thanks to that damn airbrush.
I knew from my first look at Old Major that this was one miniature that would really benefit from an airbrushed basecoat. The miniature itself is pretty much one massive smooth surface that – besides a a few key areas like the legs – isn’t going to get a whole lot out of more accessible techniques like drybrushing or washes. What it did have, however, were a lot of smooth bumps and valleys that were crying out for an airbrush.
Unfortunately for me, I am still not very good at airbrushing, so by the time I put the airbrush down, the miniature was pretty far away from looking adequately shaded and highlighted. I did manage to achieve a pretty reasonable transition between the pale pink for the back and the top of the head towards an angry, saturated red in his underbelly and lower chest area, but the contrast wasn’t remotely there for his protruding back fat, raised hind thigh, the musculature on his legs or the detail on his face. Some of this – the chunky detail on his front legs or around his face, for example – was pronounced enough to layer and highlight in my usual fashion, but the rest of the miniature demanded that I return to one of my most hated of techniques – glazing.
Glazing is a technique employed to achieve smooth, subtle transitions in colour and tone by gradually applying several very thin, translucent layers of paint to an area. It’s not a million miles off the layering technique that I use regularly – you still paint an area in gradually smaller and smaller layers with an increasingly brighter colour, only glazing requires many more layers to create a much smoother transition.
So, why do I hate glazing? Well, to put it bluntly, I am not what you would call a patient man. Glazing doesn’t often yield immediately noticeable results. I often find myself getting bored or frustrated with it, second guessing whether my paint has been thinned too much or the colour I’m glazing is too subtle.
Unfortunately for me, I had worked too damn hard on my mediocre airbrush zenithal to ruin it with heavy handed layering. And so just this once, I forced myself to sit there for hours, painting thin layers upon thin layers over that globular back fat, slowly pushing up the contrast, using the airbrushed zenithal colour as the ‘shadow’ for that surrounding area. It took a while, but in the end, I actually think I might have pulled it off!
Under normal circumstances, I would have begrudged how long this process took. However, given that this was the centrepiece miniature of the kit – and given how little else there was to this particular mini besides the skin – I actually found myself enjoying the process. It was pretty enjoyable inspecting the miniature under a light, finding areas that didn’t look right, fine tuning it with a glaze and looking again. I’m not saying I’m a total convert – but I can definitely see myself returning to the 1-2 punch of Airbrush + Glazing for future miniatures of this sort.
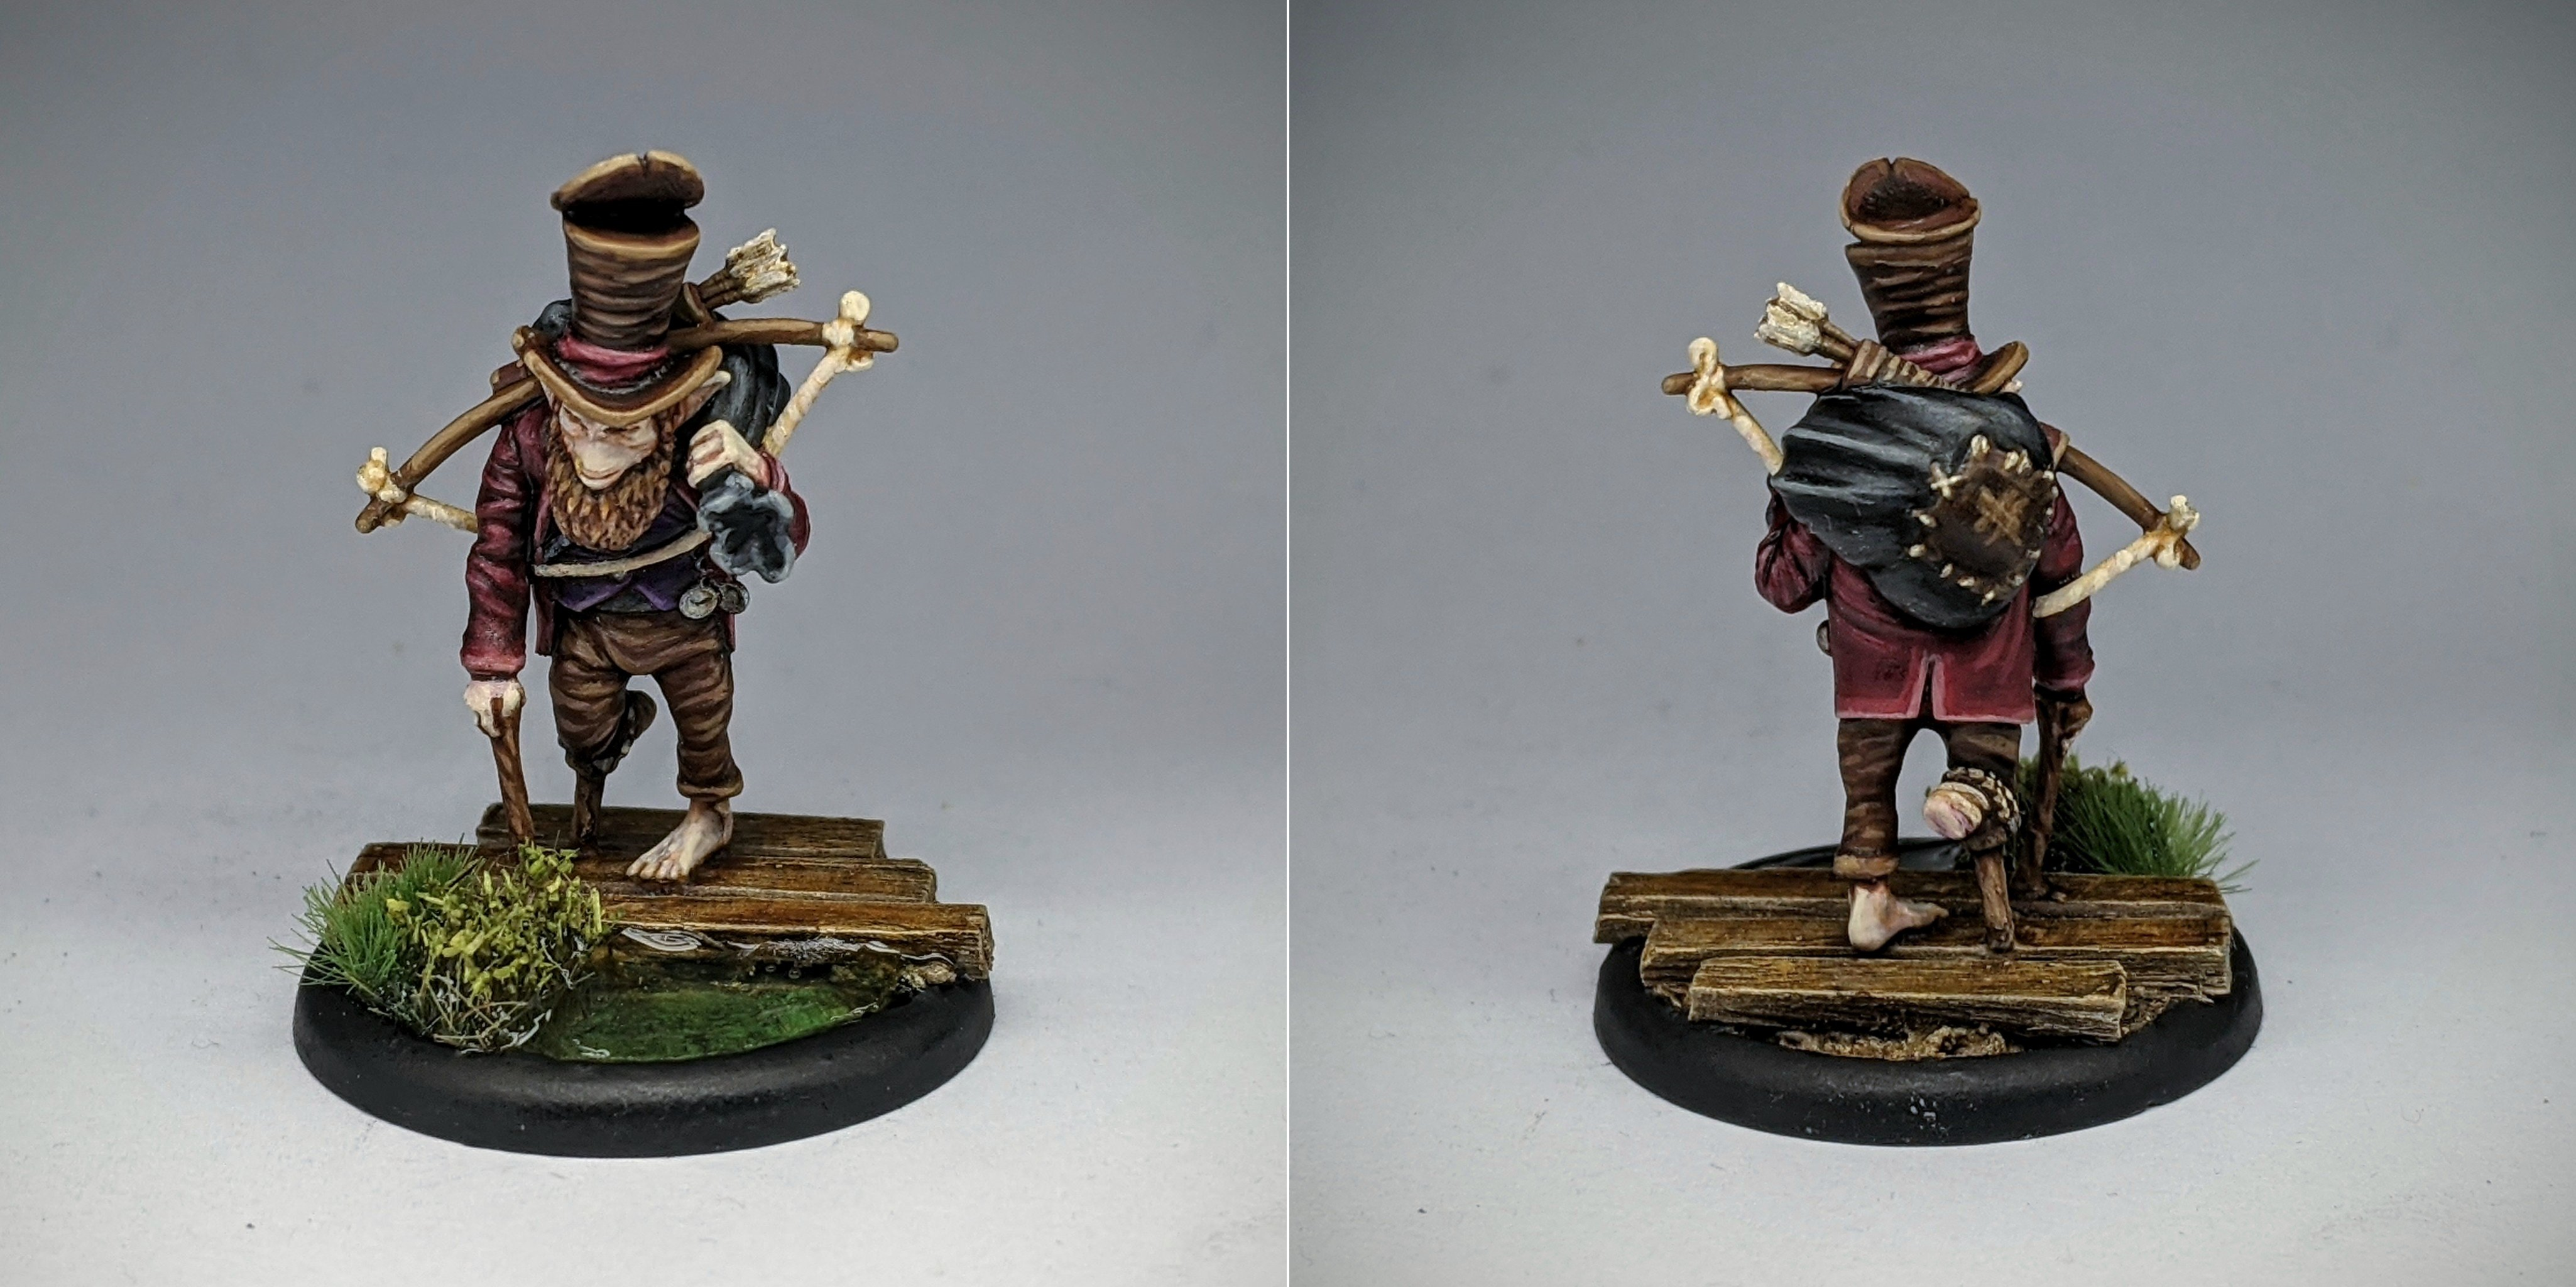
Last, but certainly not least, we have the man in charge, Ulix Turner himself. Those who know their Malifaux will probably have picked up one irregularity with my miniature right off the bat – he’s not green. Yeah, about that…
I don’t know why, but I kind of got it in my head that Gremlin’s would look an awful lot creepier with pale, albino skin rather than that bright, saturated green on the box art. Additionally, I really liked the look of those Swine Cursed Werepigs, but I wasn’t so sure about how well they’d fit in with a crew of fleshy pink pigs if they themselves were bright green.
I think I was right about it being creepier – Ulix has a little more of a sinister vibe with a ‘fleshier’ skin tone. With his top hat, bow and hunched posture he kind of gives off Bloodborne vibes to me. It may have been a mistake to use the rest of the box art colour scheme ‘as is’ though, as the bright green had really helped tie the red jacket, purple waistcoat and brown slacks together. There’s still a nice bright green presence on the base thanks to the foliage and water, so it’s not as if the colour is entirely missing from the miniature, I suppose. I am a little concerned that the pale skin might not contrast well enough for War Pigs were I ever to go down that route, I guess we’ll cross that bridge when we get to it.
To paint, Ulix was a nice palette cleanser. With every other miniature in this set being a beast of some sort – involving airbrushing, glazing, drybrushing and the like – it was kind of nice to get back to basics painting a humanoid with layering and edge highlighting again. This was my first ‘humanoid’ Malifaux miniature, so it was a bit of an eye opening experience to paint. It was not unlike painting a modern Citadel Middle-earth miniature – plenty of fine detail, yet also a bit small thanks to those realistic proportions. It’s a little tricky for a sloppy painter like myself, if truth be told. There’s a part of me that yearns for a system with heroic proportions again, albeit without the extraneous detail that Games Workshop are so fond of these days that makes many of their miniatures so tedious to paint.
As far as colour choice goes, well, you can see an awful lot of my favourite colours on display here – Heavy Red, Dark Fleshtone and Elfic Fleshtone are all present in abundance. Oh, I did get to break out the Royal Purple for the waistcoat. Beyond that, I don’t have all that much of interest to say about painting Ulix. I tried my hand at a little scuff mark on the patch on his scruffbag, which dual functions as a highlight of sorts. I also had a bit of fun trying to paint the TEENY TINY ITTY BITTY HANDS on his pocket watch, which came out exactly as well as I could’ve realistically hoped for.
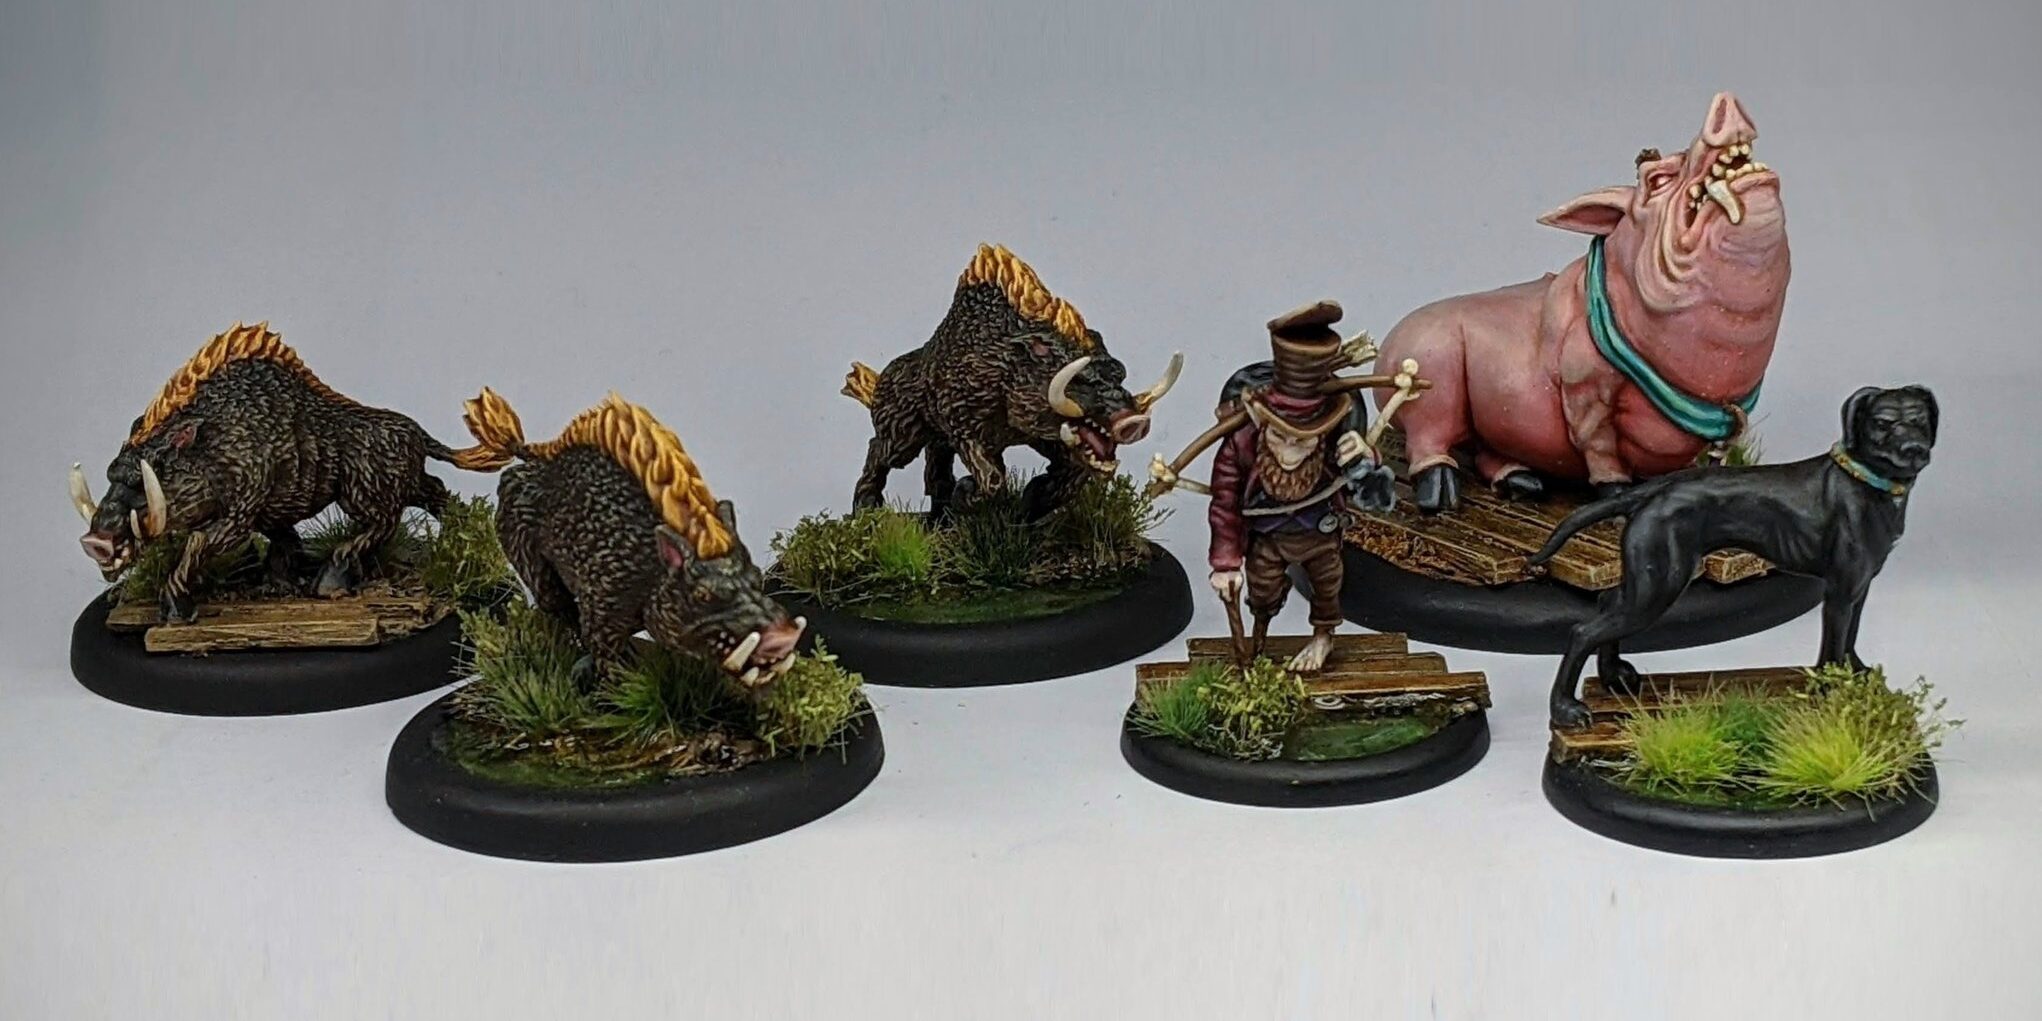
So that’s my Ulix Turner Core Set for Malifaux in it’s entirety. It’s been a fun little no stress project that has helped push me out of my comfort zone in more ways than one. There’s something to be said for Malifaux’s total absense of duplicate miniatures – it feels impossible to get bored or uninspired. No crew member is ever repeated enough to wears out its welcome, and even batch painting begins to feel more like a helpful time saving tool than a necessary evil it is when you’re staring at 100 basically identical Clanrats. Painting has once again become a genuinely relaxing experience, one where I don’t find myself needing to summon the strength of will to pick up a paint brush as I have of late. Suffice to say, I’ve been bitten by the bug – you’ll be seeing a lot more Malifaux content on this blog for what remains of 2020, and most likely 2021 and beyond.
Until then, thanks for reading, and happy wargaming!
1 Thanks to COVID, I’ve barely had a chance to play the base game, so there’s not exactly any pressing need to get around to the expansion miniatures any time soon. That said, at the time of typing this, several Blackstone Fortress expansions – such as The Dreaded Ambull and No Respite – have gone out of production already. I don’t fancy paying eBay prices for OOP expansions a year down the line, so in this instance I felt justified sitting on all of the expansions until I need them – particularly after spending about 2 months painting the base game!
2 I could tell you what these are, but for now I’m going to keep these under my top hat for Makin’ Bacon Part Two!
3 I think? I’ve now opened a Core Box, one of the kinda almost square boxes and one of the thin rectangular boxes. Disclaimer: these are not industry standard terms.
4 For any fans of Wyrd Games and Malifaux finding this blog post from Google Search, I sincerely apologise for all the references to Games Workshop. They’re just sort of my ‘north star’ for expectations of plastic miniatures and the manufacturer of.. pretty much every game I’ve covered on this until now. Stay tuned for a LOT more Wyrd Games coverage throughout the rest of 2020!
5 And from his expression, presumably caught in the act of something naughty. This was the best photo I could find in my Google Photos that captured his body shape – most of my photos of this dog are lying down, seated or very blurry.
6 Curiously enough, the render actually differs from the physical miniature – unless I missed something on the frame, the Penelope miniature comes with neither a collar nor a leash. I’m not sure if this is often the case where the render on the back of the box is not accurate to the miniature itself, but it’s a curious incident none the less.
7 Listen, people make miniatures of themselves as adventurers – complete with a jacked Conan the Barbarian physique – all the time. Why can’t it extend to our canine friends?
8 Oreo’s coat is black with a little white, but as with most black hair it’s got a very slight brownish tinge to it in the right light (hence the name ‘Oreo’).