We interrupt the previously scheduled instalment of The Emperor Protects to bring you something rather special.
For some now, I’ve had a bee in my bonnet about doing something massive again. It’s been in my head that, following the reasonably taxing undertaking of my new Adepta Sororitas army1, I could use a bit of a palette cleanser. As such, I’d been putting aside a little money each month to save up for something big and exciting, which I’d managed to narrow down to either a Thunderhawk Gunship for my Space Wolves or Smaug the Terrible for Middle-earth. For a time, I had my mind rather firmly set on the Thunderhawk – it’s an incredibly iconic piece of Warhammer 40,000 history and something I’ve lusted after since the first time I watched the Ultramarines emerge from one on the first level of Chaos Gate. It’s also got a rather nice looking interior, a feature that I am somewhat obsessed with on Heresy vehicles. Yet, the timing didn’t quite feel right. It wouldn’t fit in my display cases for one, so I’d need to get a little side table to display it on – not ideal in my limited hobby space. I was also right off the back of painting a load of Sisters of Battle – including but not limited to several rather Imperial vehicles2. I concluded then that as I wasn’t as thrilled about the prospect of painting another, larger boxy vehicle as I ought to be for such a purchase, a Thunderhawk might be a project best left for another day. Now Smaug, well, that was different. I found at least one person claiming that he fits in a Detolf display case – no display issues here. As a large, organic and very airbrush friendly model he felt like the perfect antidote to the cluttered infantry and boxy vehicles of my Sororitas army and – I’m slightly ashamed to admit was a factor here – he was actually in stock3 at the time that I wanted to purchase him. I had also just recently finished playing the Demon’s Souls remake on PS5 and had big, intimidating dragons on my mind a bit at the time. With all of the above influencing my decision, I went ahead and finally pulled the trigger.
And man, what an awesome miniature this is. There is just so much texture to every millimetre of this model – from the exceptionally fine detailing on his scaly skin to the missing scale on his chest where the black arrow found it’s mark. Size wise, you could say that he’s kind of comparable to a Warhound Titan – his footprint much wider and tail to head he’s longer, but lacks the chunkiness and vertical height of the Warhammer 40,000 miniature. Compared to, say, a single Rivendell Elf, he is downright intimidating.

It took a couple of days to dispatch and a further day or two in transit before the massive box arrived on my doorstep. Knowing that the moment Smaug arrived I would absolutely drop everything to get started on him, I used this time to polish off a half-finished squad of Sororitas minis that were currently occupying my painting desk. When the moment came that my long-suffering postman handed me my awkwardly large package one fine Saturday morning, I immediately set about chopping off resin gates and dumping all the parts in the biggest bowl of soapy water that I could muster.
I gave the parts a good 72 hours to soak, occasionally taking parts out for a gentle rinse and replacing the cloudy mirky dragon soup with fresh warm soapy water. The cast itself was about as good as anything I’ve ever received from Games Workshop/ForgeWorld in the past, with no major warpage and only a couple of pieces with reasonably shallow mould slips that were easy to fix or ignore. There was very little in the way of obvious mould release sliminess on the resin either, although for a model this big and expensive, I wasn’t taking any chances.
While the resin soaked, I put my feet up for a couple evenings and played Dark Souls on the Switch until I felt adequately ready for something a little less stressful – like assembling an expensive resin miniature. To my delight, this process wasn’t really all that hard. The miniature was in maybe 7 or 8 key parts – a tail, a body, a neck, a head, a pair of legs and a pair of wings. Each of these had their own little subassemblies and fiddley bits to attach – the head had a separate jaw, the wings needed the hands attached, the legs needed the feet attached and the tail was in three segments. The wings had these little spikey spear tips (that have snapped off during assembly and absolutely will break time and miserable time again during the painting process and on the tabletop) at the end of each spine. All along the neck, back and tail had little additional spikes to glue into place as well. Most of this was straightforward enough to assemble with a bit of common sense – I only had to glance at the instructions on the side of the box once in the entire assembly process, and that was just to confirm whether a part was broken/miscast or simply battle damaged4. Many of the parts sort of socket into little square pegs or joints as well – quite in contrast to many large resin monsters, there seemed to be few if any situations where pinning was really necessary. Even warpage was fairly minimal – with only the wings needing a little bit of resetting in order to get a nice, close fit. Of course, this is still a large resin cast kit, so just about every part that attached still needed filling with green stuff to get a proper, seamless joint. If I had one genuine complaint about the kit, it’s that the final section of the tail joins with a weird sort of bulge that makes it super obvious that it’s a joint. It can be corrected with some careful filing after gluing (albeit at the expense of the scale texture around the joint) and that area is mostly concealed by the wing anyway, but it still feels like they could’ve done better there.
Being me, I agonised for some time over how much of the miniature I wanted to leave in subassemblies. In the end, I decided to paint the base, the wings and the rest of the dragon as three main subassemblies. It might’ve been nice to paint Smaug’s head separately, but after a couple dry fits I wasn’t super comfortable with how much green stuffing I’d need to do after painting to make this work. The wings were the obvious choice for subassembly – Not only would they be a gigantic pain in the ass when trying to paint both the wings themselves and the dragon’s body, but after resetting the resin in place with some boiling water, I found they attached onto the body with very little in the way of gaps to fill and paint over after the fact. The base – well, that’s practically a project in and of itself.
One thing that I knew from the outset with Smaug was that I was absolutely not going to use the resin base that he comes with. Don’t get me wrong, it’s an awesome piece5, but it kind of conflicts with the unified base theming I have throughout the rest of my Middle-earth collection (cool as it would have been cool to get the Erebor Reclaimed set and do a little Erebor diorama with the Dwarves on matching Erebor/treasure bases). It’s too useful to be able to pull any random bunch of Good or Evil Middle-earth miniatures and field them together as a cohesive bunch – and I’d like to be able to take Smaug and 10 Goblin Mercenaries with a Captain to an 800 point tournament and have them still look like a deliberate army project. Besides all that, I really love making bases – it’s good fun to make something completely from scratch and to add something uniquely yours to a miniature sculpt.
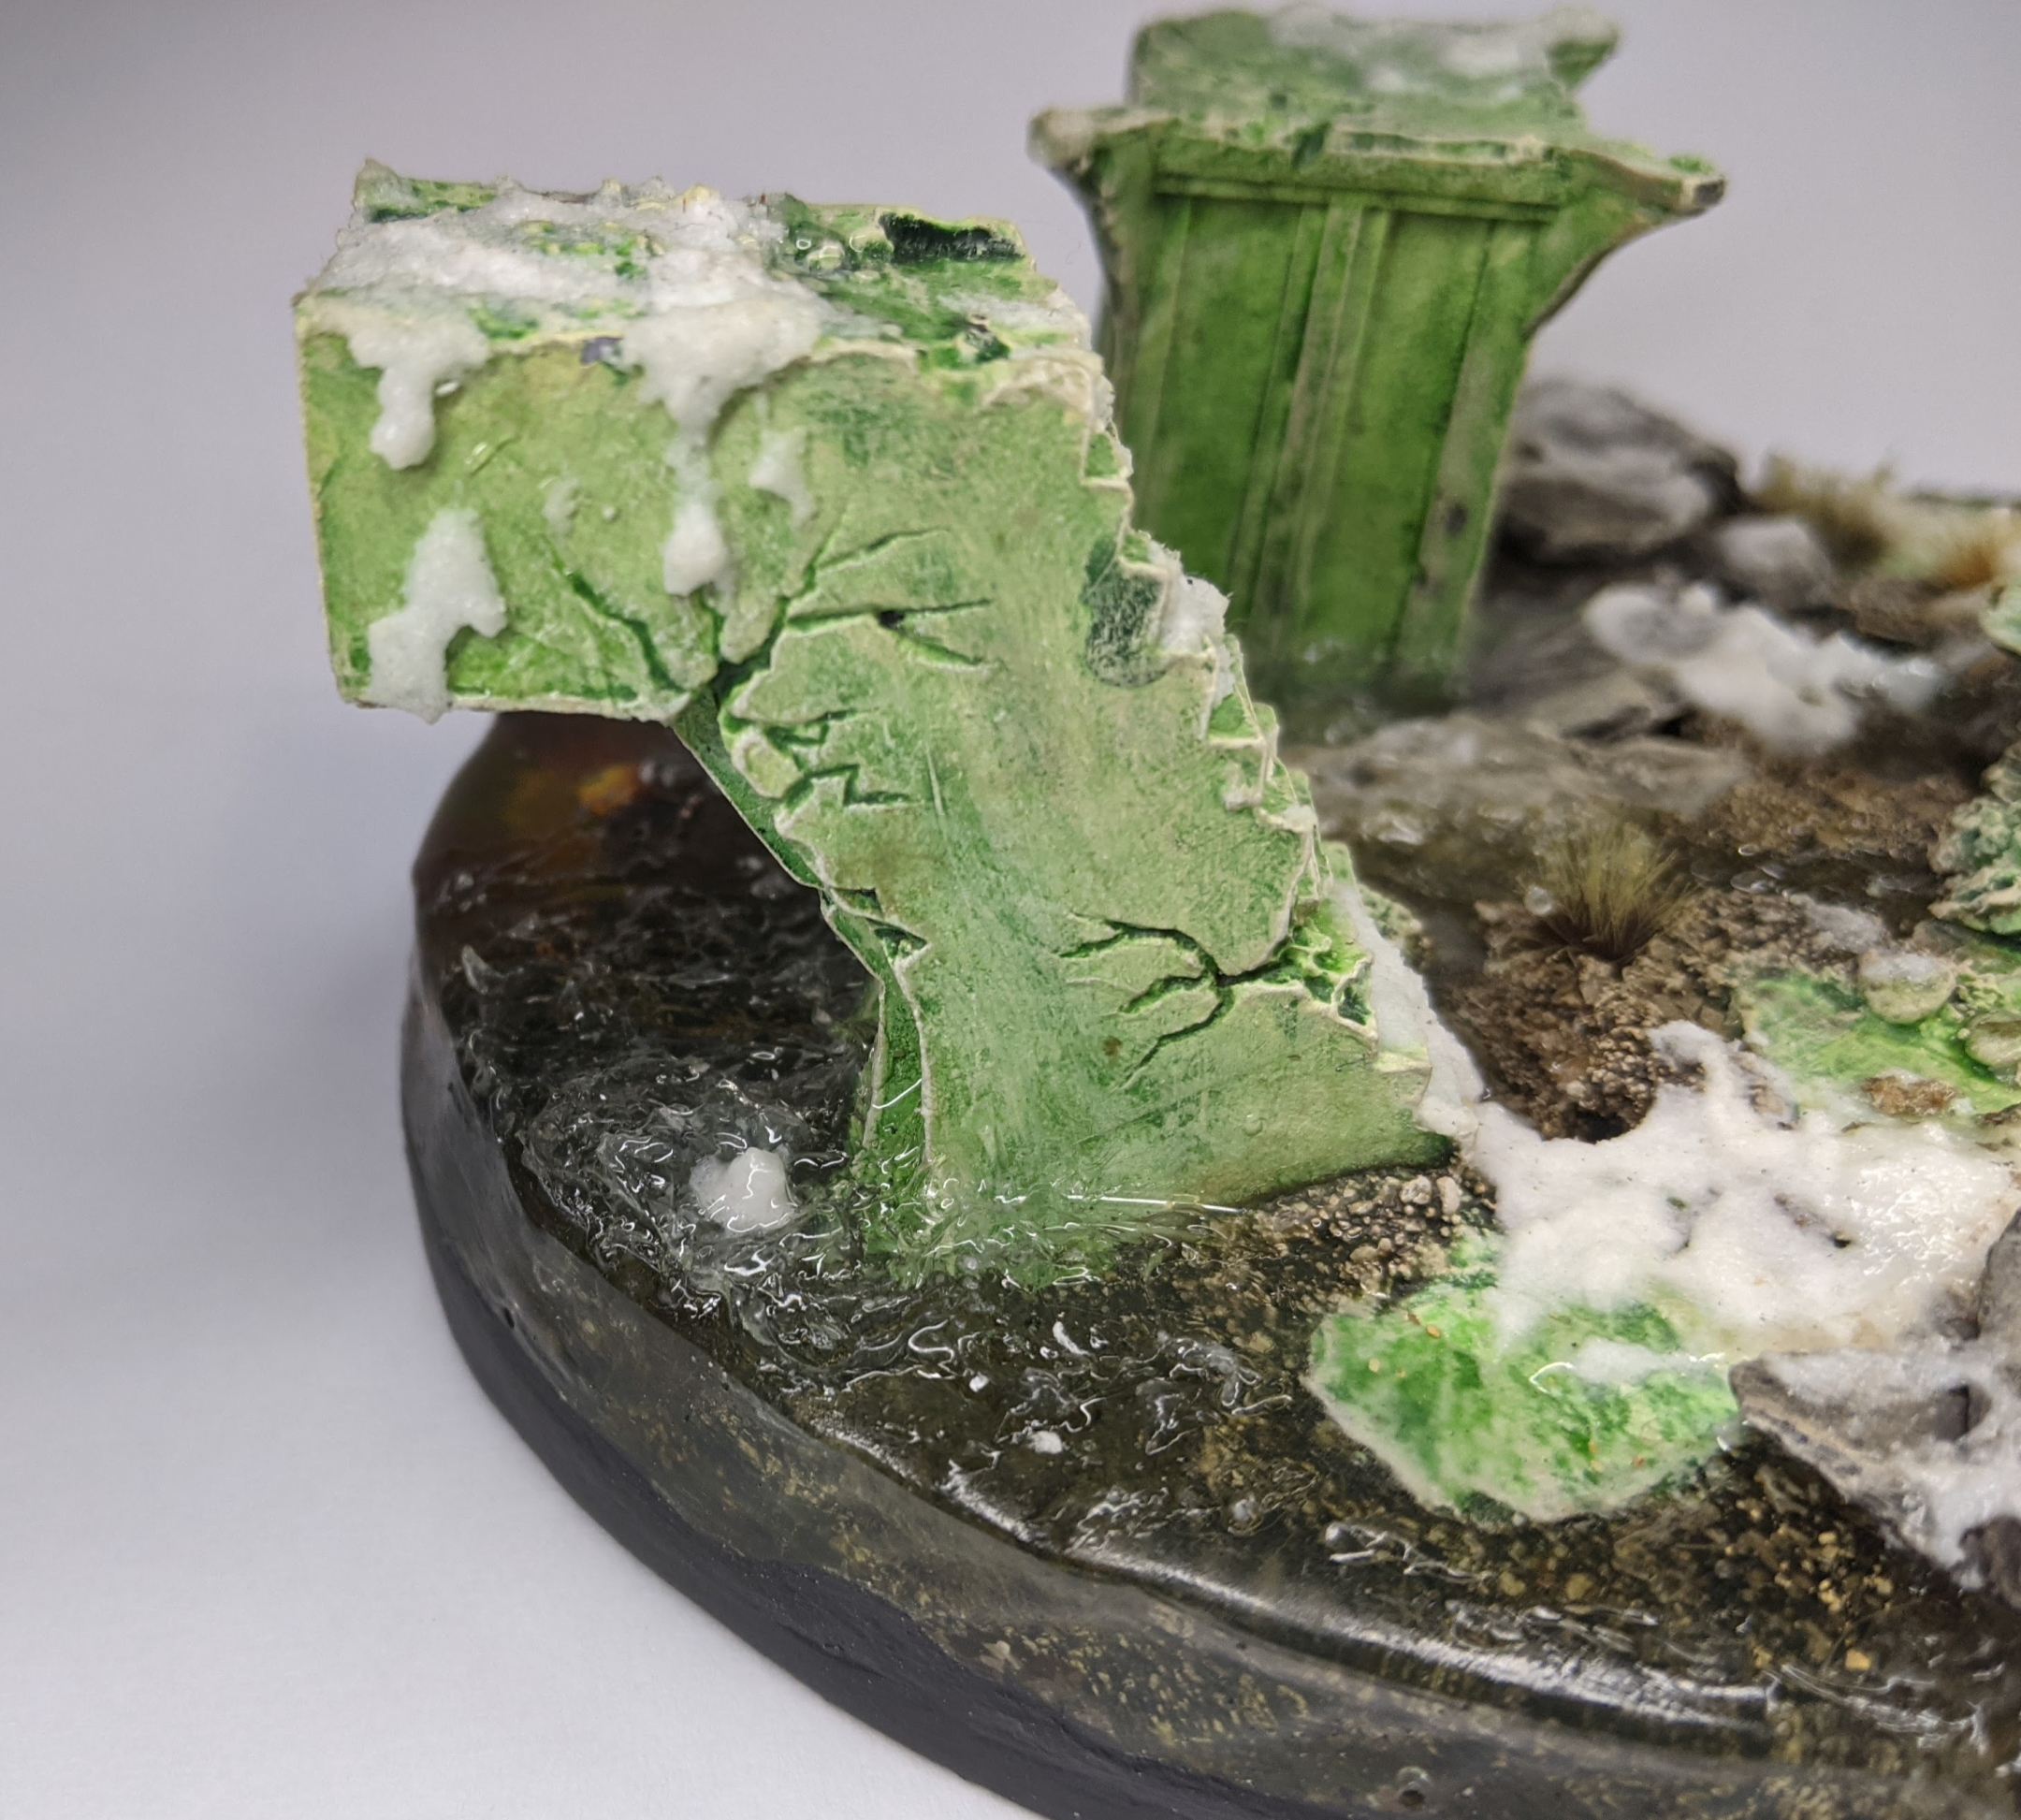
So, first things first, I took my Erebor base and scored around it on a nice thick piece of plasticard with an X-Acto Knife to get the dimensions correctly. Once the outline was clear, I put the resin base to one side and went over my score again slowly with the blade for a couple more passes until the oval shape popped out from the plastic. To increase it’s sturdiness, I glued some popsicle sticks in an X shape with wood glue over the base and reinforced this with a second layer to add a bit of structural integrity. Finally, I cut some corkboard using the same method as the plasticard and glued it down over the base foundations. From here, I started building the base as I would any Azog’s Legion base, layering bits of cork and roughly cut squares of plasticard to get a sort of paved mountain pass effect. Given that the little pillar and staircase pieces from the Erebor base were integral to Smaug’s pose, I decided to repurpose those for the base – they fit well with the stone paved aesthetic anyway. I used the original Erebor base to figure out exactly where to place them and at what angle, and started building up some various bits of debris with corkboard and slate for where Smaug’s legs were going to sit. This was never going to be laser accurate, but as long as they had a few solid points of contact, I could add some additional debris to fill in the gaps and create a better contact after the fact.
You might be wondering why I decided to cut my own base out of plasticard instead of sourcing an equivalent base online, and the reason for this was simply that I had a really hard time finding someone to manufacture this for me. The base that comes with Smaug is a solid cast resin piece, rather than a topper for an existing plastic base – because Games Workshop don’t make plastic bases that large. My only remaining option was thus to find some sort of laser cut acrylic or MDF solution. My usual go to for this sort of thing – Warbases – told me that Games Workshop uses an unusual oval shape that they were unable to produce, which was unfortunate. I’d sort of given up hope at this point and began to produce my own plasticard base when eventually I found an eBay shop – fluid3dworkshop – who created a custom listing for me. This ended up being a perfect fit, so I decided to mount my custom base (which was already past the painting stage this point) on top of it and sealed the gaps with some milliput, which I smoothed out and sanded. The moral of this story is that if you are ever in need of a custom sized base of any dimensions, then get it touch with fluid3dworkshop. It took a couple of days to get the custom listing sorted, but the order was fulfilled zippy quick once I placed it and for an incredibly affordable price. Highly recommended.
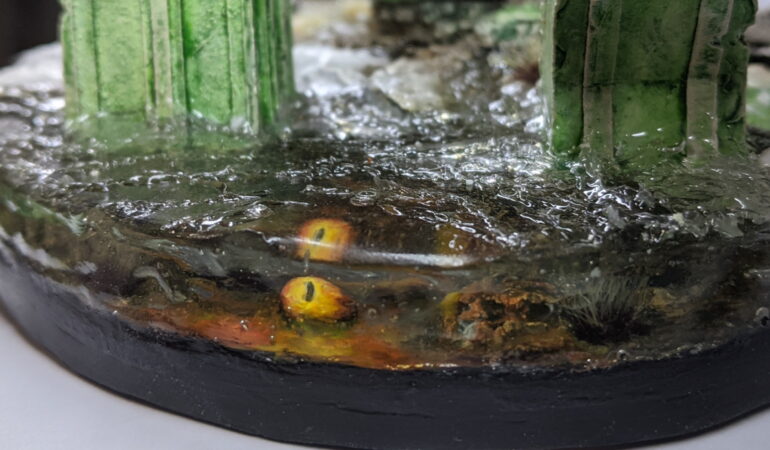
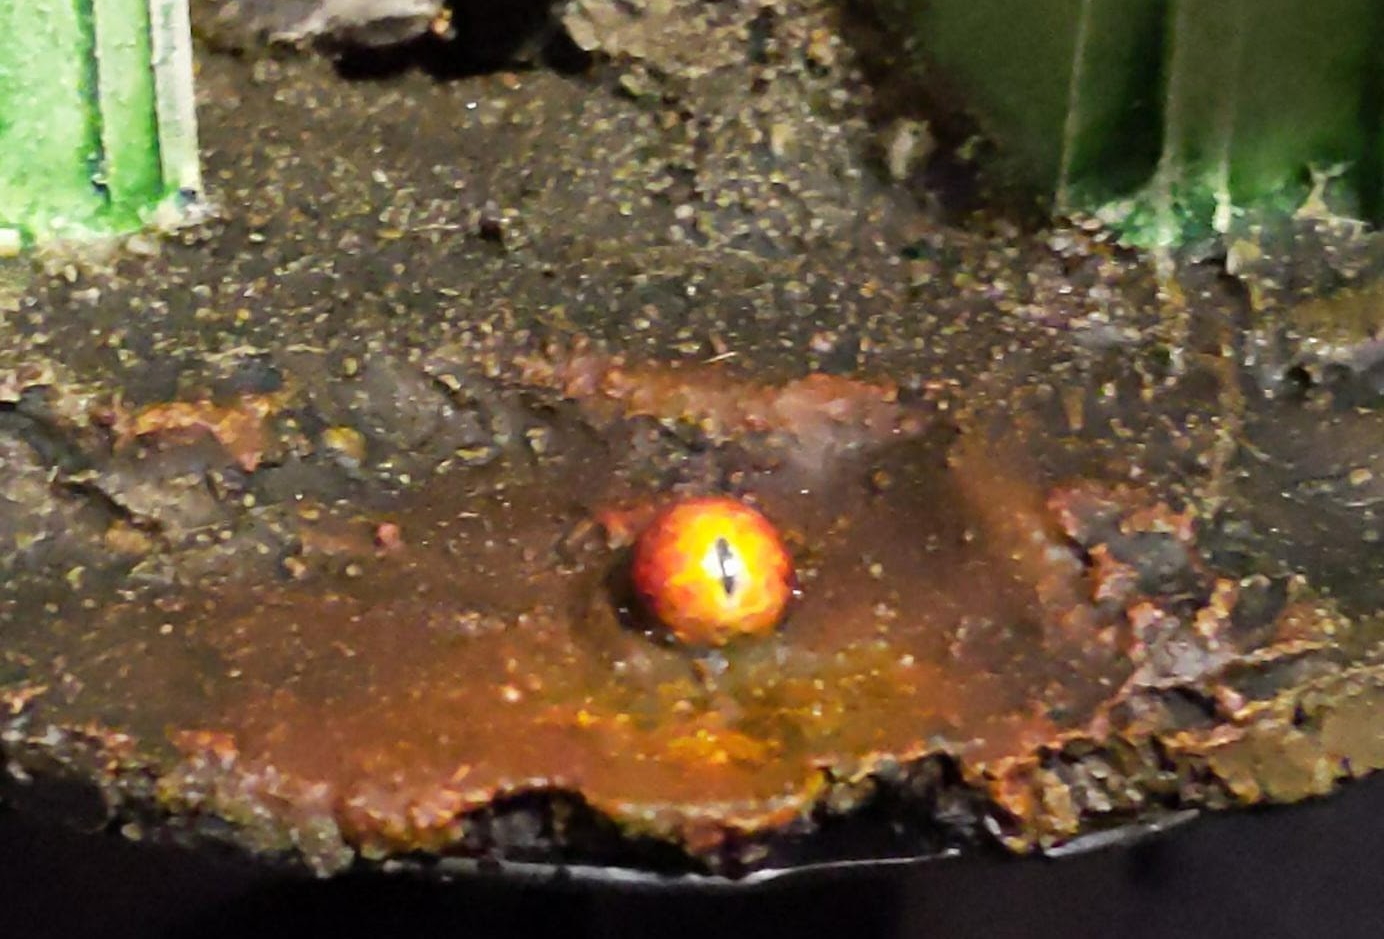
Alright, back to the base itself. Something I really wanted to do with this base was have another go with pouring resin. Recently, a friend of mine turned me onto UV Resin from Green Stuff World – a thick, gel like substance not entirely dissimilar to two part pouring resin, except that it starts to set immediately once exposed to ultraviolet light. This was too cool not to try on a model such as this, and my head was immediately buzzing with all sorts of ideas for little Easter eggs that could be lurking under the surface of the resin water. After bouncing a few of them off my fiancé (a fellow Lord of the Rings aficionado), she came back with a suggestion: not all [of the Palantir’s have] been accounted for. I loved the idea of painting/modelling this – and the implied narrative that an evil artefact such as this could draw out or attract the presence of Smaug – so when the time came I sank a little glass agitator bead in the texture paint that I’d applied for the water bed; this was going to be my Palantir. The rest of the construction was all as you might imagine – a little cork here, a little slate there, some Earth Texture Paste and some sand and debris to add a little variation and texture throughout.
The majority of the base was pretty quick and dirty to paint. The stone paving, pillar and stairs were based in Elfic Flesh, washed with Biel Tan Green, drybrushed Elfic Flesh, glazed with Waywatcher Green and drybrushed once more with Elfic Flesh to really pick out the edges. The dirt was painted Vallejo Game Earth, drybrushed VG Elfic Flesh and washed with Agrax Earthshade. The dirt above ground was given two Agrax washes, while the stuff below water level was washed a second time with Athonian Camoshade to give it a murky green tint. The slate was easiest of all – no basecoat, just Agrax Earthshade over the bare grey stone, drybrushed Heavy Bluegrey, then Khaki, then Elfic Flesh and washed again with a watered down Agrax to tone it back down. Super simple, super quick.
I spent considerably longer painting the Palantir than I did any other part of the base combined. My original intention was a black orb with a feint glow, but I started to worry then that this might be a little too subtle. Instead, I thought it might be cool to free hand a little eye of Sauron gazing out from the Palantir with warm object source lighting beaming out from it to really draw the eye to it. I started from a black base coat and blocked in increasingly smaller layers of brown, red, orange, yellow and finally a yellow/white mix outlining the pupil. I carefully painted a tiny slit for the pupil with black, then painted out little flamey tendrils from the outline in yellow. To finish, a couple thin coats of gloss varnish. For the glow, I used Bloodletter Red glaze to build up a feint red tinge in the soil around the front of the Palantir where the eye is facing, with a few layers of Lamenters Yellow a little closer to the centre. It’s not perfect – OSL is absolutely not a technique in my comfort zone – but I think it conveys the idea well enough for an underwater Easter Egg.
After taking the base out back for a quick coat of Dullcoat to seal my paint job, I started gluing some stuff down. I used some nice flat tufts in the shallowest part where the water was going and Army Painter Mountain, Highland and Wasteland Tuft in various locations elsewhere. I used some super glue to stick down little piles of leaf litter in places, and threw a whole bunch of Valhallan Blizzard all about the place. I’m generally a fan of Valhallan Blizzard, but if I could level one criticism on Citadel’s snowy texture paste it’s that it can look a tad dry at times – which would absolutely not be the case with a fire breathing dragon standing over it – so I mixed up a batch of 50:50 Valhallan Blizzard and Vallejo Water Texture and layered it on in thick patches. The end result of mixing the two is a snow effect that looks a little wet, like the patchy slush you get as winter begins to thaw a little – which better suits my patchy, sodden looking landscape. With dry land more or less finished, it was time to throw down some resin.
I like to think that I have learned a few lessons from my somewhat tumultuous experience with resin water on my Barrels out of Bond diorama. The first and foremost was getting a real seal on your edges – instead of trusting the adhesion of my masking tape this time and simply sealing the bottom of the tape with PVA glue, I decided to paint coat the entire rim of my base edge with PVA glue before attaching the tape. Knowing that the rugged edges of my corkboard would get in the way a bit here, I smoothed out the edge of my base using milliput and sanded this down to an even, vertical surface after it had cured. I painted this with PVA glue and then attached my tape as rigidly as possible around the edges – and sealed the bottom with a little more PVA glue just to be safe. This was left to dry, and then came the resin pour.
Okay, so a few thoughts and learning experiences here. First of all, on the whole, I think that this UV Resin stuff is an absolute miracle. It really works. As soon as you point a UV flashlight at this time, it starts hardening in seconds – which makes it ideal for anyone worried about seepage or spillage. It also makes it really easy for you to lock in any mistakes if you’re not careful. Overall, I found the first layer to go.. pretty well. A few air bubbles, but if you’re careful to work in a room without any direct sunlight you can take as long as you want to fish those out. Working in the kitchen and with a short attention span, I did.. not. Instead, I tried my best to push them towards the Palantir with the reasoning that its.. probably hot, right? Secondly, it’s probably worth noting that if you want to use the good old trick to level your resin surface by pouring a little more on top while your main bulk is partially cured, you probably don’t want to use a UV torch to cure the first layer. Once you shine that light on the resin, it cures FAST and there’s not really a kind of thick jelly stage like there is with two part resin. I’m not saying that it can’t be done, but at the very least you’re going to want to be a little more careful than I was – or leave it in the sunlight, where the water will cure quickly, but not immediately like with direct UV rays.
On the whole, I’m entirely convinced by this product – and I will absolutely use it again in the future as my resin water product of choice. I still managed to make a few rookie mistakes on my water however, so I’ll detail them here before I go on. First of all – what I said above about needing to be careful how much you let it cure before you apply a second layer. It’s not super obvious at a glance, but you can definitely see a ‘second layer’ of water if you look closely at the side of my water at eye level. Probably not going to be a big issue once a massive dragon miniature is sitting on top of the base, but it’s there and it does annoy me. Secondly, don’t just double check that your second layer has fully levelled out before you cure it – triple and even quadrouple check. Make sure you have a tool on hand to help you spread it if you need to. I was so sure that I had my water sitting perfectly when I cured it, only to realise I’d managed to make a big lump of water towards the front. This necessitated a second layer of water to even it out and before I knew it my shallow little pond became full on flooding. It’s not the end of the world – it still looks alright to my eyes, but in the back of my mind I know it was never meant to be that deep, and could’ve been prevented if I was more patient with curing the resin. That kind of stuff eats away at you.
Still, the mission was accomplished – I had a resin water feature at the end of my base. It was less wiggly and wobbly than the water on my Great Unclean One’s base and without any of the edge seepage like what happened on my Barrels Out of Bond diorama. I’d call that a success. All that was left was to apply a little water texture to the surface.
Recalling some lessons learned on my Great Unclean One and Brood Horror miniatures, the key here was to keep the surface low and subtle – not to apply the water texture too thick (or risk clouding) and to be sparing and leave some smooth surface texture to maintain the glassy finish. To that end, I started painting some waves in the water moving out from the bulk of Smaug – he is a very heavy creature, after all, so his footfall is likely to cause some ripples. Not wanting to risk the visibility of the Palantir however, I started reducing the curvature of the ripples as they approached the Palantir, even bending them around it somewhat. I was hoping this would give the impression of a mysterious power or aura about the magical object, but I’m not entirely sure it doesn’t just look like I have absolutely no grasp on basic physics. Ah well.
I also used the water surface texture as a means to try and resolve some of the issues I had with my resin pour. I made a deliberate effort to put a small wave over any air bubbles that made it to the surface of the resin – allowing me to fill any such imperfections. More significantly, I had managed to create some pretty sizeable air bubbles underneath the little staircase feature during the second pour of UV resin (don’t ask me how, I honestly don’t know), which were a little unsightly and really noticeable from the surface of the water. I decided to try and justify their existence by adding a small, wet blob of snow texture on the surface of the water at the edge of the staircase, and tried to create a sort of ‘splash’ effect with water texture around it. I’m hoping that this looks like snow falling off the edge of the staircase into the water.
The only thing left to do was to smear a little water texture over the shallow pools of water in the side of the base and my custom Smaug base was completed.
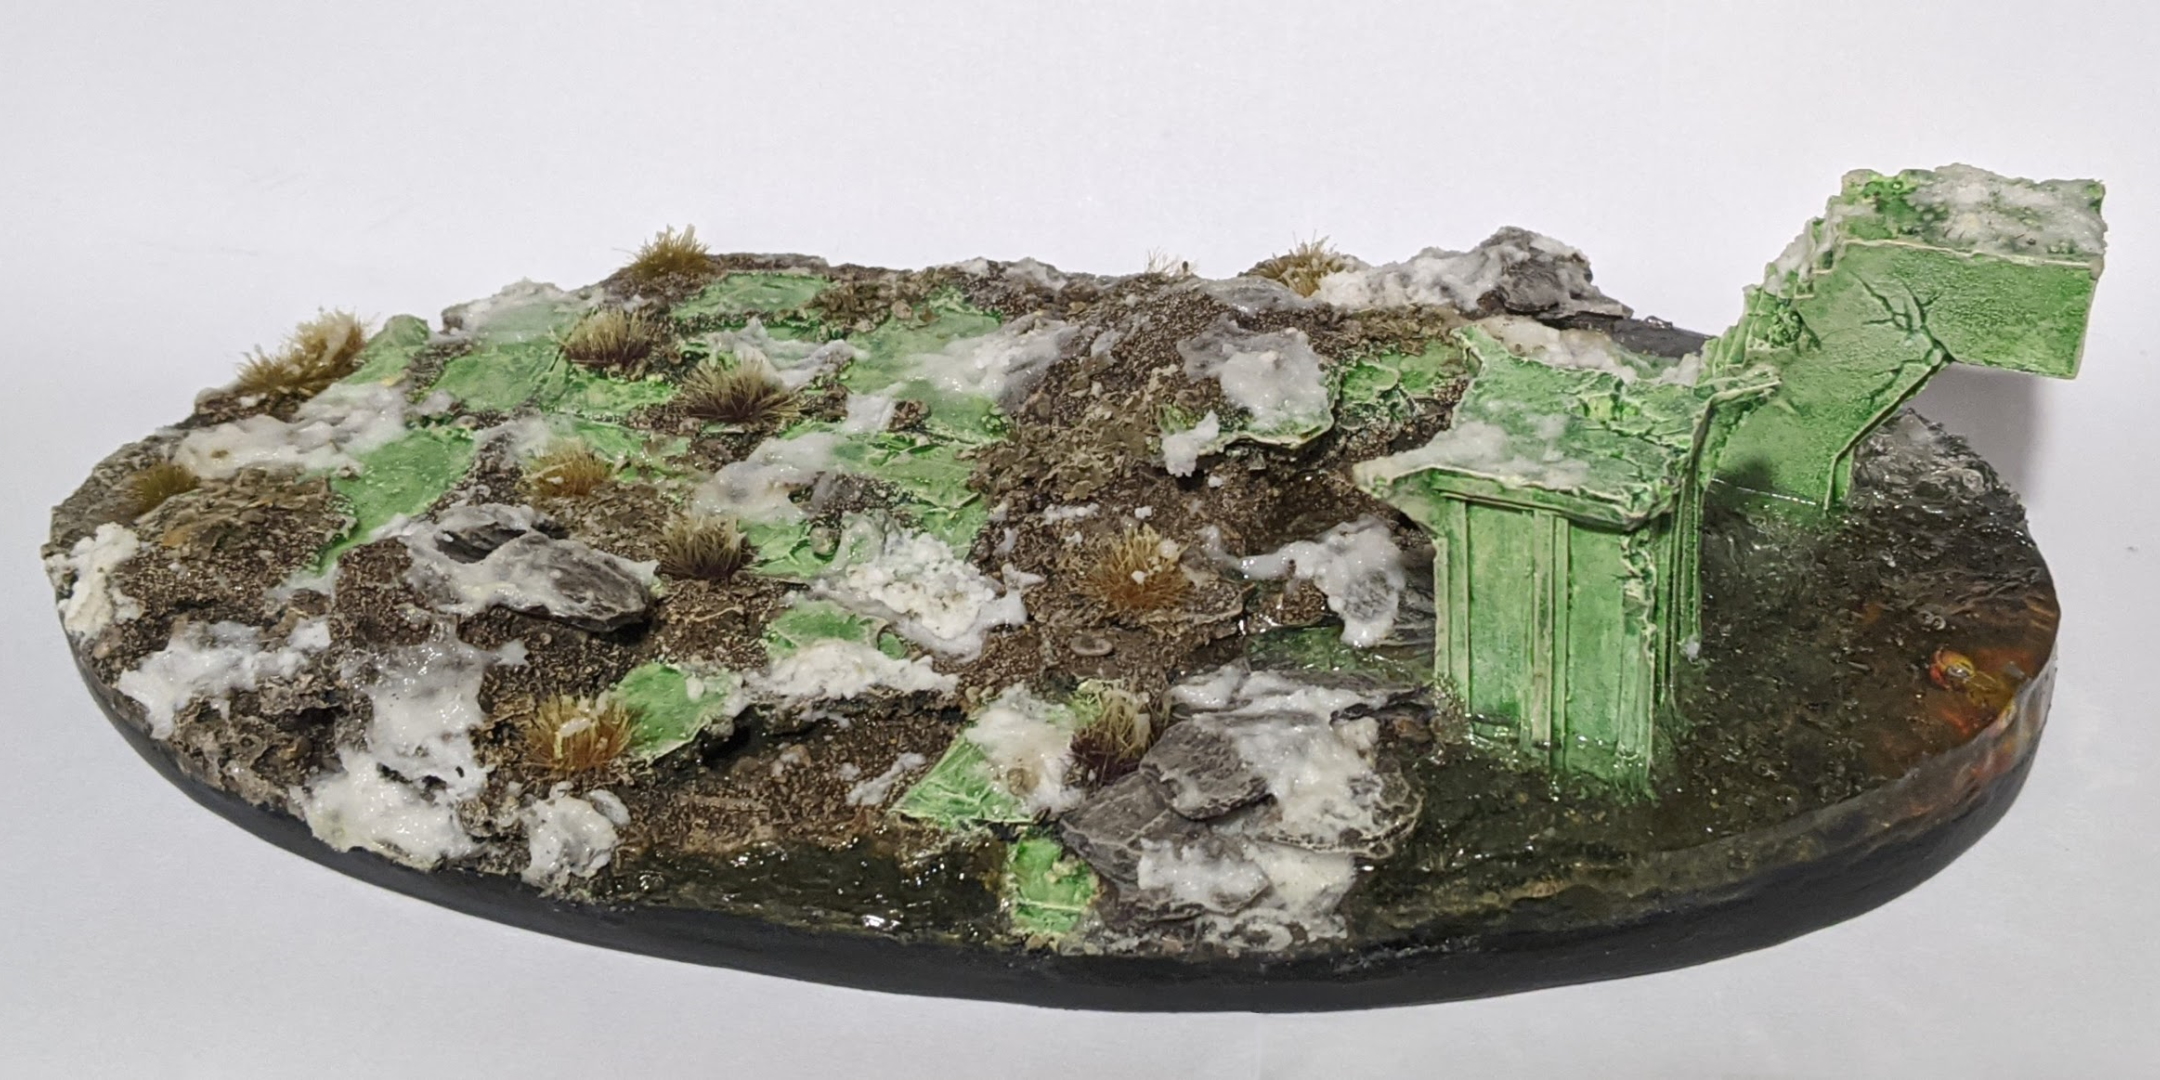
All that work and I haven’t even put a single colour down on Smaug himself yet! Still, this has been a really enjoyable project already with a fair shake of ups and downs. My base for Smaug hasn’t quite turned out as perfectly as the vision I had for it in my head, but I’m pleased with how it looks anyway and it feels like a worthy alternative to the treasure base.
I’d originally intended for this post on Smaug to be a one off, but it’s already starting to get on a bit. With that in mind, keep your eyes peeled for the next instalment of Desolator of the North, where I cover painting and reuniting the various subassemblies as well as reveal photos of the finished miniature.
Until then, thanks for reading and happy wargaming!
1 I recognise the irony in that the army technically isn’t actually finished at this point, but do you really expect me to sit around and not build a kit like this immediately after it arrives?
2 More coming in the next instalment of the Emperor Protects!
3 Not to mention a good £150 odd cheaper, which didn’t hurt.
4 Specifically, the fins on the right side of Smaug’s head are broken/cut/whatever. It looks an awful lot like a miscast or a breakage, but rest assured – it is simply Smaug.
5 This is one of those bits where I don’t now what I’m going to use it for, but I’m glad that I have it in my inventory.